Category Archives: Photoshop Tutorials

UI Quick Tip Series :: Music Player Interface

Your ads will be inserted here by

AdSense Now!.

Please go to the plugin admin page to paste your ad code.

Today we are continuing our new series of User Interface Design. With the vastly rising popularity of mobile apps and mobile web design User Interface Design is now a huge area for Designers to become proficient in. In this quick tutorial I will be walking you through creating a Music Player Interface today. Let’s get started!

As always this is what we will be creating:

Resources

Muncie Font

Pixel Patterns V2

Rating Stars

Getting Started

Start out by creating a new document that is 600px by 300px and fill it with #101010. Now go to Filter, Noise, Add Noise and choose .75 for your Noise amount. This should leave you with a pretty nice background image for our music player.

Now grab whatever album cover that you want to use for your music player. I am using the album cover for Eminem’s Recovery. Shrink your album cover down to 180px by 180px and apply the following layer styles.

Now space it 55px from the top of your document and 30px from the left hand side of your document.

Now grab your type tool and choose the new font you just downloaded Muncie. Set your size to 36pt and use #e2e2e2 for the color. Type out whatever name you want for your song. For our document I am using the song No Love, which is my text. You will want to space your text 25px from the album cover and 80px from the top of your document.

Grab your type tool again. Keep your font the same but change the size to 24pt and the color to #313131. Now you will want to type out the artist information. For my song I am using “By Eminem FT Lil Wayne” for my text. Line up your text with your song title text and space it 5px from the bottom of your song title text.

Progress Bar

Now time to set up our button and progress bar area. Grab your rounded rectangle tool and change the radius to 25px. Change your foreground color to #464646 and draw out a rectangle that is 360px by 30px. Set your Blend Mode to Soft Light and space your rectangle 15px from the Album Cover and 25px from the bottom of your artist text.

Now grab your regular rectangle tool this time and change your foreground color to #393939. Drag out a rectangle that is 250px by 5px. Center it vertically on your rounded rectangle and 15px from the right of your rectangle.112110


Now grab your rectangle marquee tool. Zoom in on your document and make a selection that is 70px wide and that fits within our lighter gray rectangle.

Create a new layer and fill your selection with #cbbf00. Apply the following layer styles:

Your ads will be inserted here by

AdSense Now!.

Please go to the plugin admin page to paste your ad code.

Now grab your rectangle marquee tool again. Create a new layer that is underneath the layer that we just created. We are going to be creating our buffer layer now. Change your foreground color to #282828. Now make a selection with your rectangle marquee tool that is 65px from the right of our progress bar.

Now apply the following layer styles:

Now our progress bar is complete. You should have something like this:

Time to start working on our pause, rewind, and fast forward buttons. The buttons are pretty simple to create. Grab your custom shape tool and choose a triangle as your shape. Change your foreground tool to #f3f3f3 and draw out a triangle that is 12px(w) by 11px(h).Hit CTRL+T and grab the corner of your box for rotation. Hold down the SHIFT key and rotate it to be horizantal. Space your triangle 10px from the top of your rounded rectangle and 10px from the beginning of your progress bar.

Now grab your rectangle tool and draw out two rectangle that are 2px by 11px and space them 2px apart. Space it 20px from your fast forward button.

Duplicate your fast forward icon and hit CTRL+T. Right click and choose to Flip Horizantally. Move it to the left side of our document. Space it 20px from your pause button.

Finalization

Now that is a very very simple Music Player interface, but let’s take it up another notch just to make things look a little bit better. Go ahead and open up the PSD file of our rating stars that we downloaded earlier. Grab the 4 Star folder and drag it over to our document. In your document on the 5 Star open up the Layer Styles and turn off the Color Overlay. Now centerhe stars on your album cover, below it, and 10px from the bottom.

Now grab your type tool and change the font face to Verdana, Size 12pt, Color #cbcbcb. Type out “4/5 Stars” and space it 5px from the bottom of your stars and center it on the stars.

Now grab your type tool again and choose 11pt for the size and #7a7a7a for the color. On the right of your document type out “Download | Get Lyrics” space it 25px from the right and 10px from the bottom.

Now our Music Player is complete. To add a little more of a touch you can add Previous and Next Tracks to the top and it will still look good, but my preference is to not have it so I have not included steps. This is what it would look like though:

Conclusion

You can use this Music Player Look to create a simple JQuery Based Music Player with embedded music, or even make a flash music player. Either way you go the process is simple with some possible font changeI hope that you have enjoyed the tutorial and learned a few simple techniques for your future designs. As always I would love to see your designs or hear your comments. Just post anything in your comment and I will take a look at it and I promise to always reply.

Looking for More About the UI Series?

You can find more about our UI Series on our Facebook Discussion board. On the board you can request UI tutorials, articles, and even figure out how to submit your own site’s UI for review.

Your ads will be inserted here by

AdSense Now!.

Please go to the plugin admin page to paste your ad code.

UI Quick Tip Series :: General Settings Interface

Your ads will be inserted here by

AdSense Now!.

Please go to the plugin admin page to paste your ad code.

Today we are continuing our new series of User Interface Design. With the vastly rising popularity of mobile apps and mobile web design User Interface Design is now a huge area for Designers to become proficient in. In this quick tutorial I will be walking you through creating a Simple General Settings Interface, an aspect of User Interface in many administrator backend designs today. Let’s get started!

As always this is what we will be creating:

Let’s Get Started

Start out by creating a new document that is 600px by 600px and fill it with #161616.

Main Body

Alright, now grab your rounded rectangle tool and set the radius to 4px. Set your foreground to #4a4a4a and drag out a rectangle that is 525px by 125px. You can space it anywhere on your document for now as you can choose to move it later.

Now we will be applying the following layer styles to our simple rectangle to give it more of a 3-D feel.

The Screws

Now to create our screws. The screws are a very simple process of two shapes with some little layer styling. Start out by grabbing your Ellipse tool and drawing out a circle that is 12px by 12px. You can use any color because we will be adding the following layer styles.

Alright, now space your circle 5px from the top and left of your rounded rectangle.

Now you will want to go to your Custom Shapes Tool. Choose shapes from your drop down menu and grab your hexagon shape.

Now draw out a hexagon that reads 7by7 in your info screen. Center your hexagon on your circle to give it that screw look.

Now take those last two layers and put them into a group. Name that group Screws and duplicate the group three times. Space each group the same spacing, relevant to positioning, in each of the four corners.

The Text

Now grab your text tool and change your foreground color to #f0f0f0. You can use whatever font that you want, but for this project I recommend a nice web safe font. For that purpose I am using Verdana as my font, set at 24pt size. Type out General Settings and space it 40px from the top and 45px from the left.

Now add the following layer styles

Your ads will be inserted here by

AdSense Now!.

Please go to the plugin admin page to paste your ad code.

Alright, keeping your text tool change the font size to 14pt and the foreground color to #0b0b0c. Type out “Edit and change your personal settings”. Line it up with the “G” in General Settings and space it 5px from the bottom of your header (going from the g in settings).

Now apply the following layer styles.

Lighting and Icons

Its time to start on our icons and lighting.

Change your foreground color to #03b814. Grab your ellipse tool and drag out a circle that is 55px by 55px. You will want to space it 35px from the top and 30px from the right.

Now apply the following layer styles to your circle.

You should now have this:

Now grab your favorite set of Web Icons and choose one that best fits your idea for General Settings. For me I chose to use a gear icon. Drag your icon over to your document and center it nicely in your lighting. Now lower the fill to 0% and apply the following layer styles:

Now you have one completed section.

That is, technically, the end of this tutorial. However, I just want to point out that it is easy to create more settings areas. You can just place all layers into a group and duplicate the group. Then you just change out the Gradient and Inner Glow of the lighting for a different color. You can change the icon and text simply as well so that you can have many different colors and areas

Conclusion

You can use these General Settings Areas for almost any administrator design project just by changing a few things around. I hope that you have enjoyed the tutorial and learned a few simple techniques for your future designs. As always I would love to see your designs or hear your comments. Just post anything in your comment and I will take a look at it and I promise to always reply.

Looking for More About the UI Series?

You can find more about our UI Series on our Facebook Discussion board. On the board you can request UI tutorials, articles, and even figure out how to submit your own site’s UI for review.

Your ads will be inserted here by

AdSense Now!.

Please go to the plugin admin page to paste your ad code.

UI Series Tut 2 :: Login Form

Your ads will be inserted here by

AdSense Now!.

Please go to the plugin admin page to paste your ad code.

Today we are continuing our new series of User Interface Design. With the vastly rising popularity of mobile apps and mobile web design User Interface Design is now a huge area for Designers to become proficient in. In this quick tutorial I will be walking you through creating a Simple Log In Form, a main aspect of User Interface in many websites today. Let’s get started!As always this is what we will be creating:

Resources

Fugue Icons :: http://p.yusukekamiyamane.com/

Delicious Font :: http://www.josbuivenga.demon.nl/delicious.html

Get Started

Start out by creating a new document that is 800px by 400px. Fill your background with #181818.

Change your foreground color to #e7e7e7. Now grab your rounded rectangle tool and set the radius to 10px. Drag out a rectangle that is 580px by 275px.

Alright, now grab your text tool and choose whatever font that you want to use. For the entire document I will be using the font Delicious. Type out whatever you want, using color #2e90b4, and space it 15px from the top and 15px from the left.

Alright, now its time to add some basic text explaining what the form is. I am just going to use Lorem Ipsum dummy text from the lipsum.com generator. You can choose a different font or keep with the same font. I changed the size to 14px and the color to #5d5d5d. I spaced the font 15px from the left and 10px from the bottom of our header (Going off the “g”).

Grab your line tool now and change your foreground color to #c9c9c9. Draw out a line that is 540px by 1px. Center it horizantally on your login form box and 15px from the bottom of your text.

Now change your foreground color back to #5d5d5d and type out the word “User Name” in your chosen font. If you are using Delicious you will want to choose a font size of 18px. Space it 50px from the left and 30px from your seperator line.

Change your foreground color to #f8f8f8 and grab your rounded rectangle tool. Change the radius to 5px and drag out a rectangle that is 350px by 30px.

Now add the following layer style:

Grab the “users.png” icon from our icon set and add it to the login bar. It should be centered vertically on the login bar and spaced 10px from the left.

Your ads will be inserted here by

AdSense Now!.

Please go to the plugin admin page to paste your ad code.

Grab your text tool again and type out the word Admin if you want to. This will let you see how it will look when they log in.

Alright, now follow the same procedure, with the same spacings, for our Password area. You will want to change the text, obviously, and the icon. I have used the safe-pencil.png. This is what you should have:

Ok, now that we have that done its time to set up our Sign In Button. You will want to grab your rounded rectangle tool again, but this time set the radius to 3px. This will give us a nicely rounded edge but not too round.

Change your foreground color to #2e90b4 and drag out a rectangle that is 90px by 35px. Space it 25px from the bottom of your Password bar and line it up with the right end of both bars.

Now add the following layer styles to your button to give it a more in depth feel:

Grab your text tool, color white, and insert your “Sign In” Text. Center it horizantally and vertically on your button to give it a nice feel. You may need to edit the kerning if you are using the Delicious Font, depending on your settings.

Well our sign in form is pretty much complete. We could leave it there, but why not bring it up another notch or two? The simplest thing we can add is an “Not Registered? Sign Up Today!” text. I am using the same color as our header, font size 10px. Type out your text and place it on the left side of your document where you think it looks good.

To take it to our final notch we will create a new layer below the main body. With your new layer selected hit CTRL + the thumbail of our main body layer. This will make a selection of our main body. Now go to Select, Modify, Expand and choose 5px. Fill your layer with #d2d0d0. This will give our login layer a huge visual advance.

Conclusion

I hope that you enjoyed today’s tutorial in our new UI Series. It was a pleasure for me to design the log in form and even more of a pleasure to post a tutorial about it for all of you to read.

Looking for More About the UI Series?

You can find more about our UI Series on our Facebook Discussion board. On the board you can request UI tutorials, articles, and even figure out how to submit your own site’s UI for review.

Your ads will be inserted here by

AdSense Now!.

Please go to the plugin admin page to paste your ad code.

UI Quick Tip Series :: Simple Switch

Your ads will be inserted here by

AdSense Now!.

Please go to the plugin admin page to paste your ad code.

Today is the start to our new series of User Interface Design. With the vastly rising popularity of mobile apps and mobile web design User Interface Design is now a huge area for Designers to become proficient in. With that in mind we are creating a new series on User Interface Design and a “Simple Switch” is our first Quick Tip Tutorial. Let’s get started.

Create our Document

Start out creating a new document 400×400. Fill the background with #232323.

Now grab your rounded rectangle tool and set the radius to 50px. Go ahead and switch your foreground color to #0d6f08.

Drag out a rectangle that is 285×95. You can place it in the horizantal center of your document and a little bit down from the top.

Alright, now change your foreground color to black again and drag out a circle that is 90px by 90px. You will want to space it 3px from the top, left, and bottom of the green circle. Name this layer outer switch.

Now duplicate the layer and name it Inner Switch. You need to also change the color to white for right now to differentiate. Hit CTRL+T and choose 90% for the ratio. You should have a nice looking switch right now.

Time to move on to actually styling the switch. For our outer switch you will want to apply the following layer styles”

You should have a nice metallic look behind your white switch.

Your ads will be inserted here by

AdSense Now!.

Please go to the plugin admin page to paste your ad code.

Now, go ahead and copy your layer styles from the Outer Switch. To do this right click your layer and choose “Copy Layer Styles”. Now paste your layer styles, using the same method you used to copy them. Now open them up and simply change the angle to 180 degrees. Now you will have a nice metallic look to your button.

You can play around with the angles depending on what direction you want the light to look like its hitting your button.

So, now our switch looks good but the switch background just doesn’t have the feel that we are looking for.We need to add a few layer styles to give it some depth.

Now your switch is pretty much finished. You can add whatever text you want for your on state. For me I simply added YAY for my text in the font “Delicious”

That is the end of the tutorial for our UI button. However, you only have one switch, what’s up with that? Well to create your second switch simply duplicate the layers, flip them horizantally, change the color to red, and change the text! Move it down a bit and you have two UI Switches.

Conclusion

In this tutorial you learned to create a simple metallic textured button using Layer Styles as well as create a nice, simple User Interface Switch. Hopefully you enjoyed the tutorial and will follow up for the rest of our series. You can also Download the PSD.


Your ads will be inserted here by

AdSense Now!.

Please go to the plugin admin page to paste your ad code.

Web 2.0 Professional Blog Layout Tutorial

Your ads will be inserted here by

AdSense Now!.

Please go to the plugin admin page to paste your ad code.

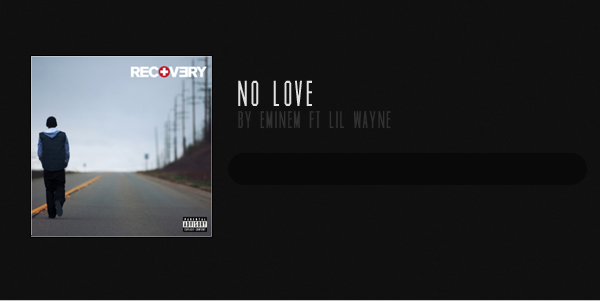
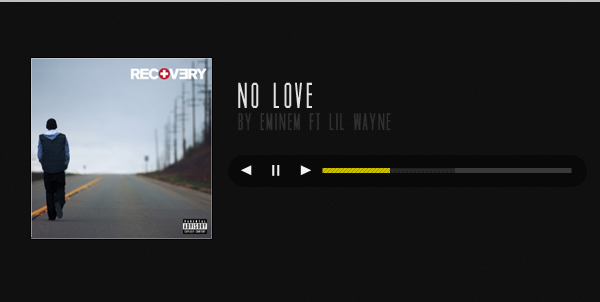
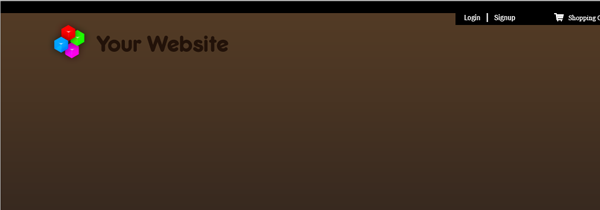
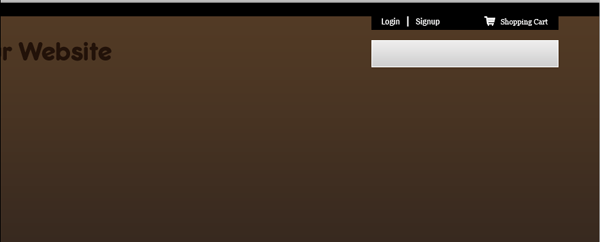
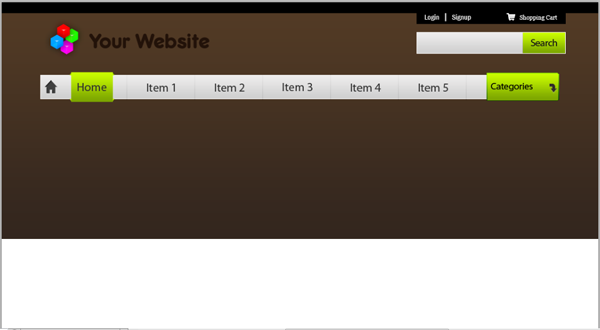
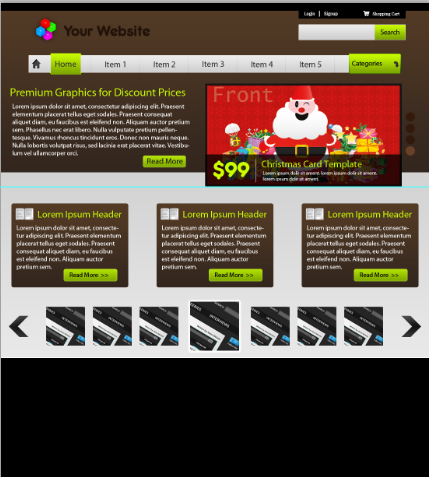
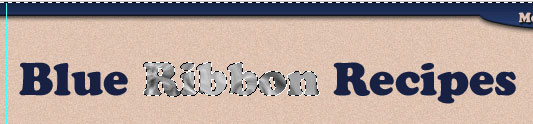
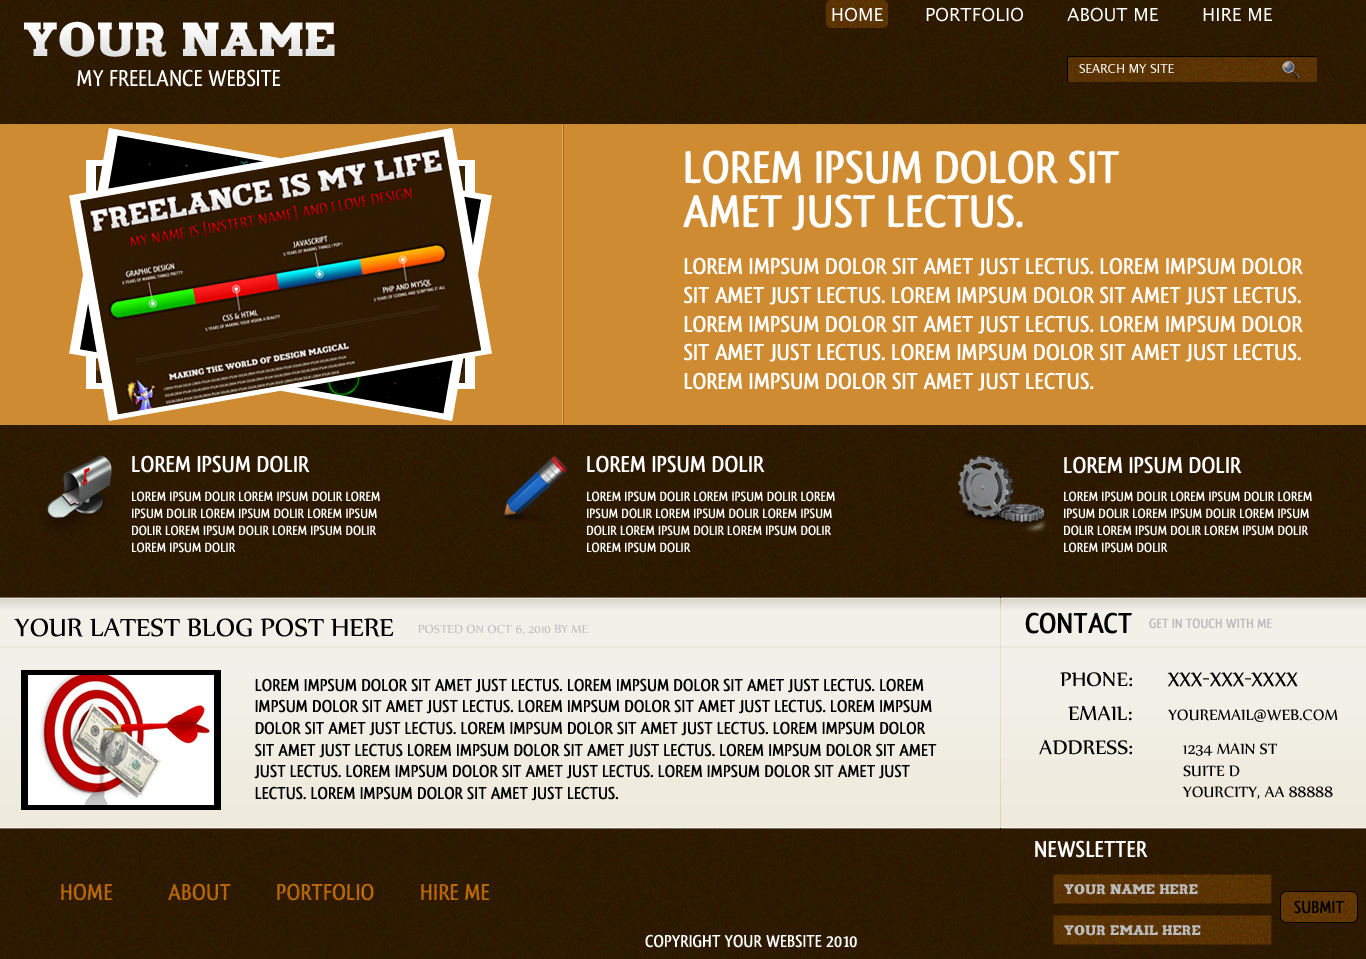
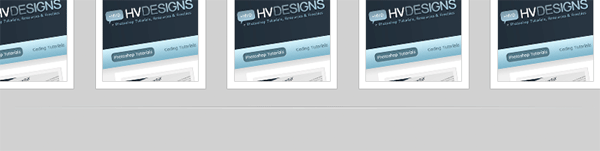
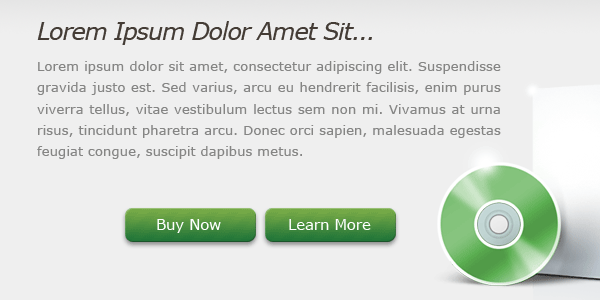
This new tutorial from Alice will walk you through the steps for creating a Web 2.0 Layout for a blog. Be patient, take your time and have fun! Let’s get to work!

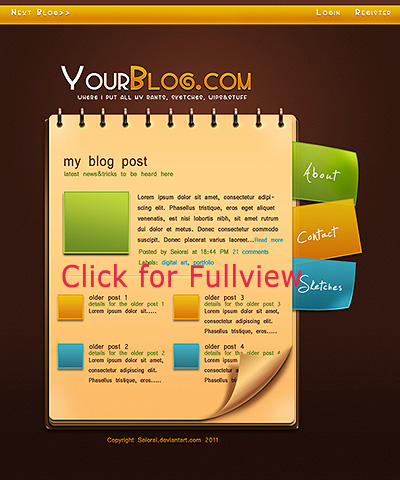
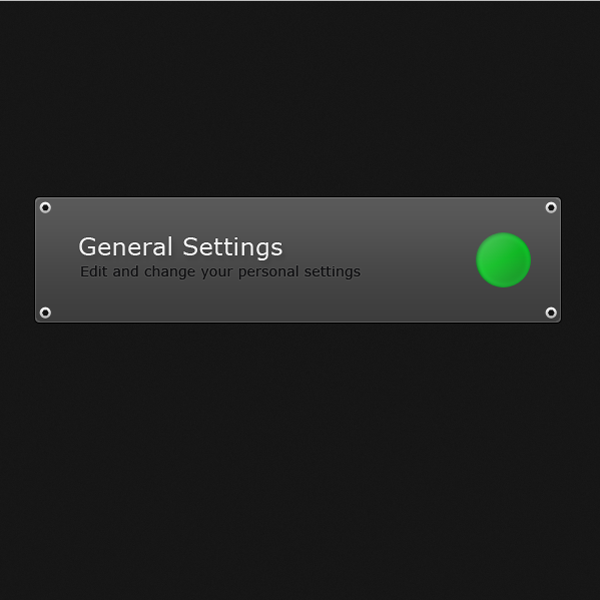
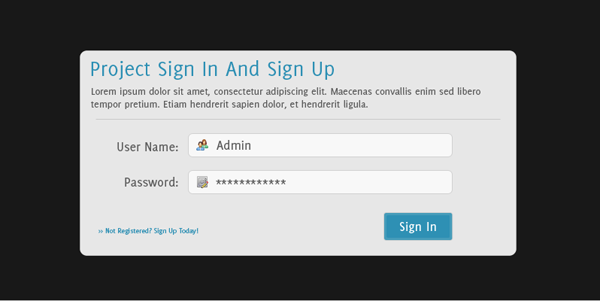
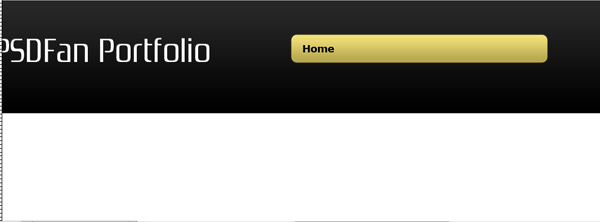
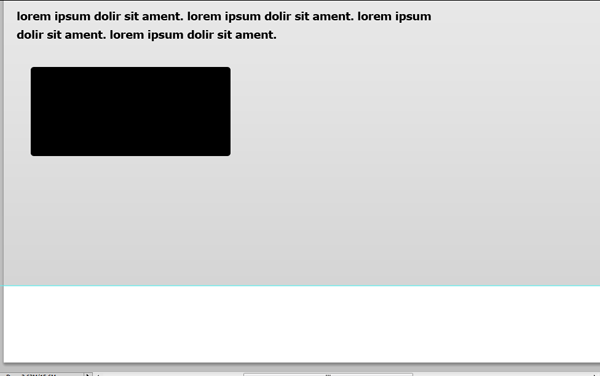
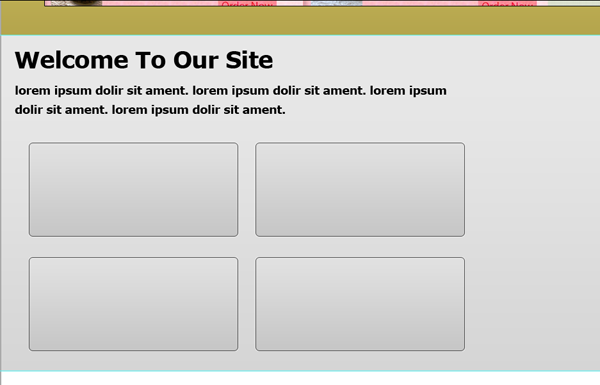
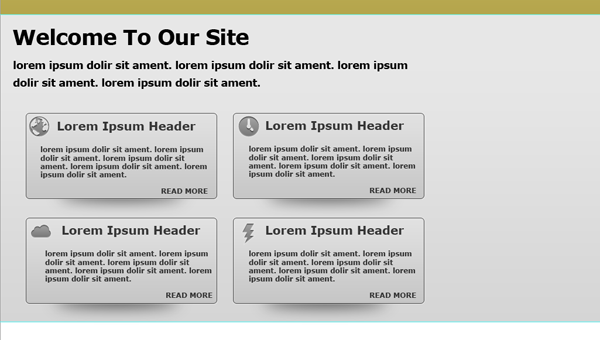
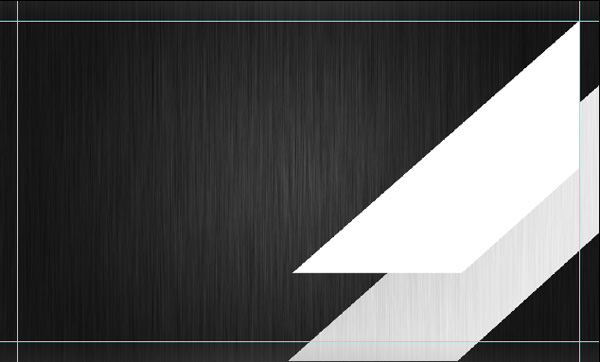
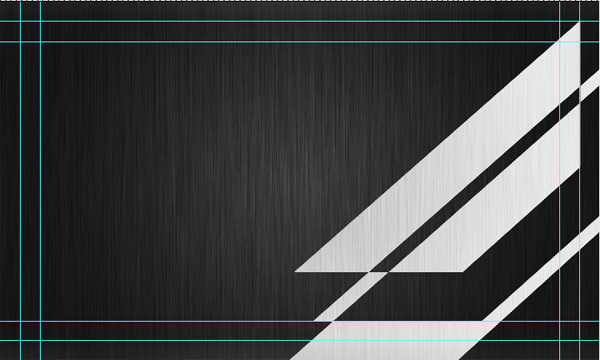
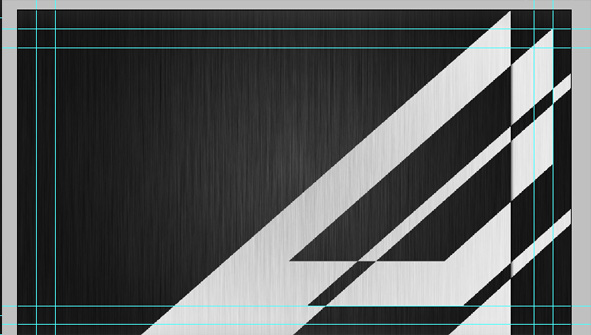
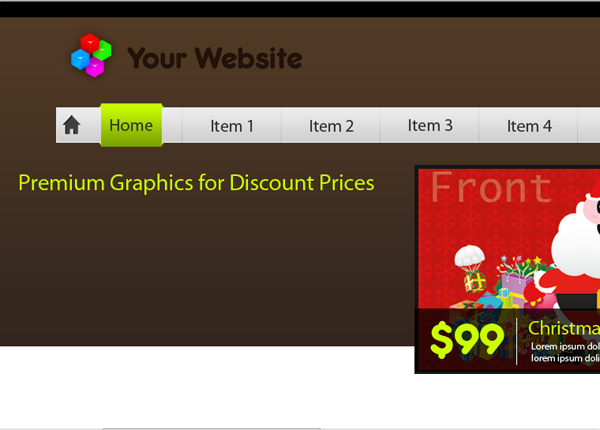
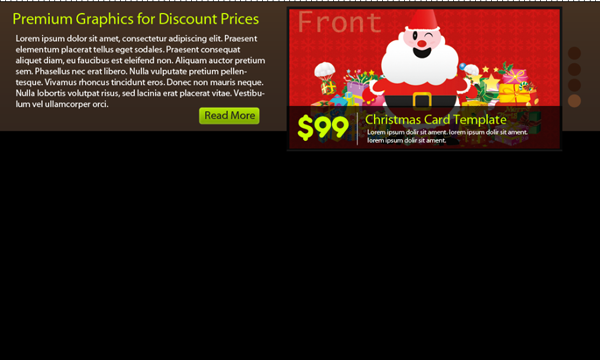
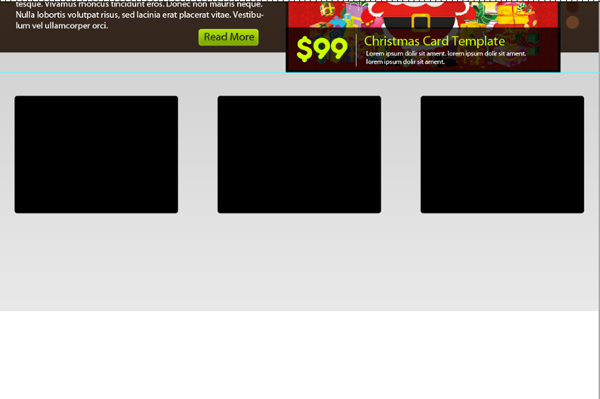
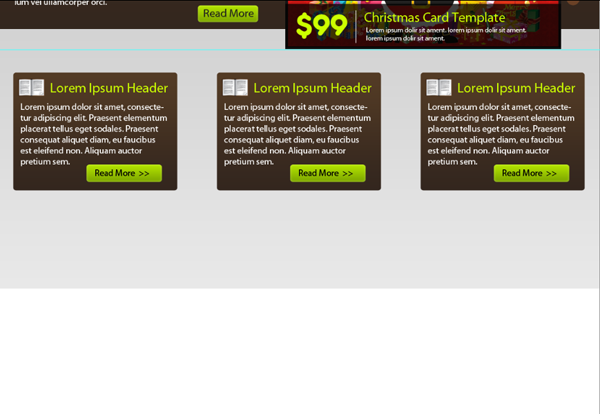
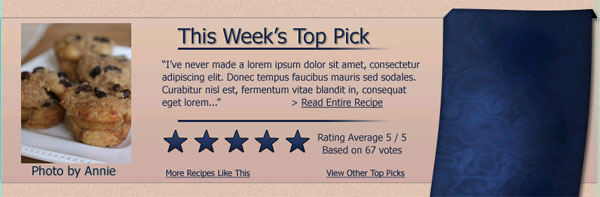
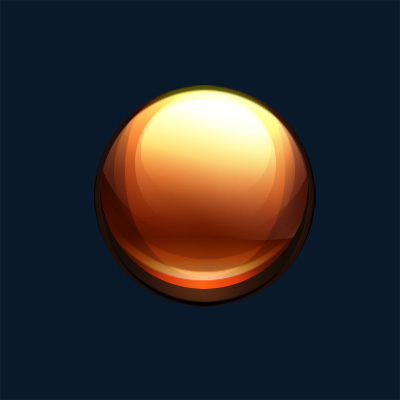
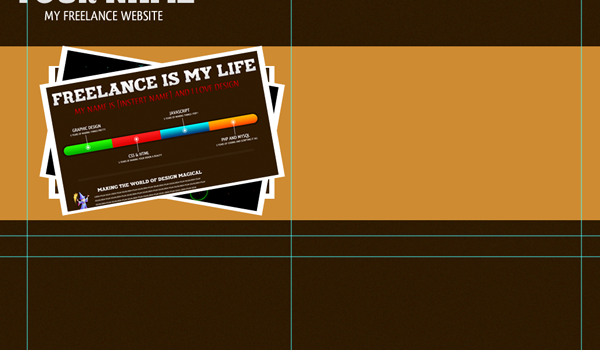
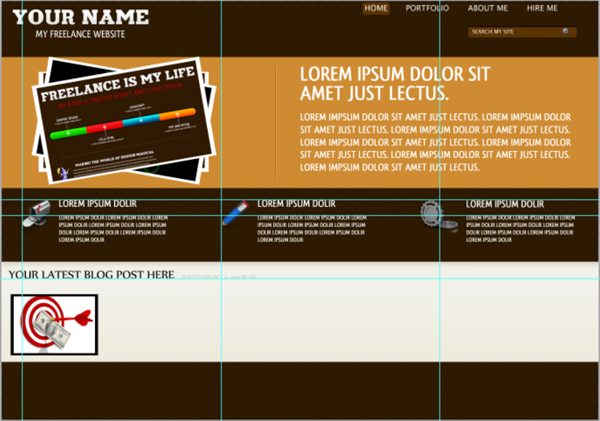
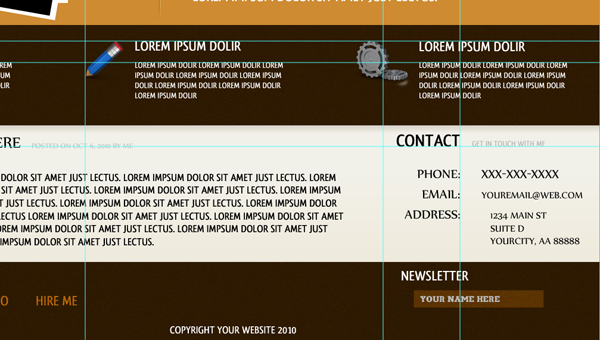
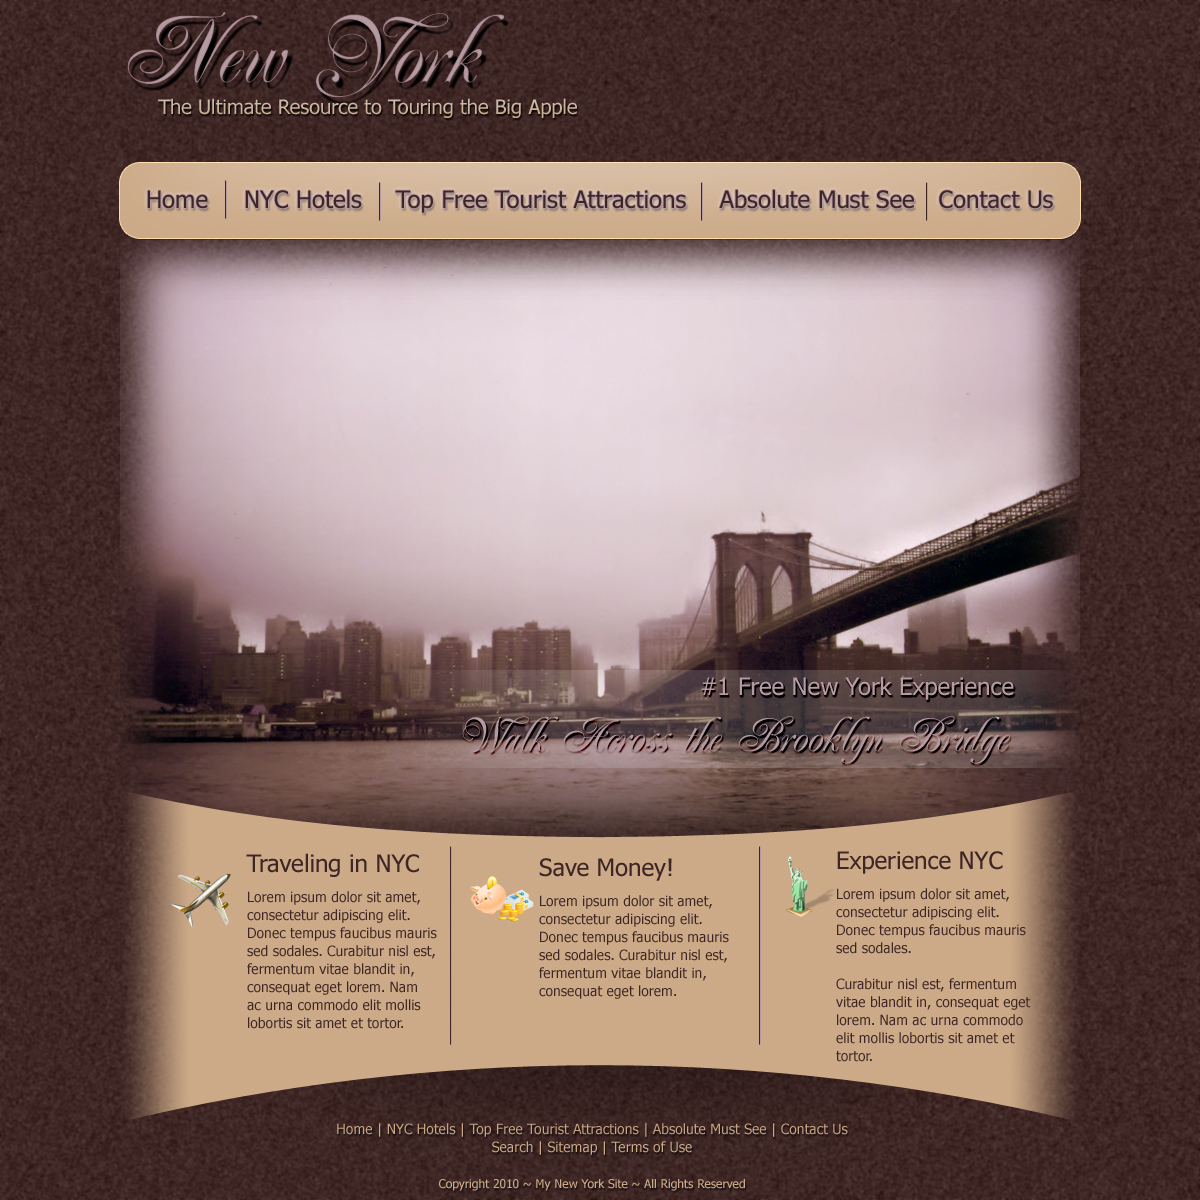
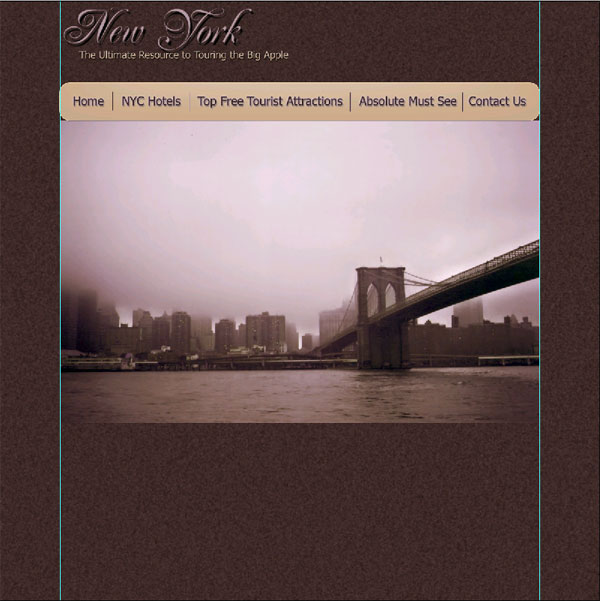
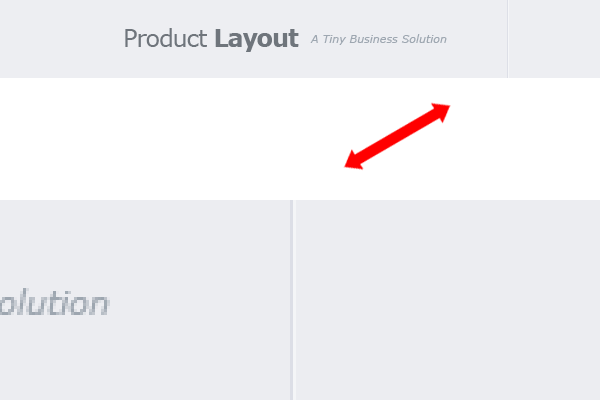
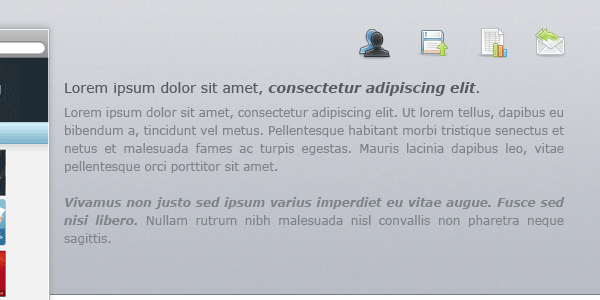
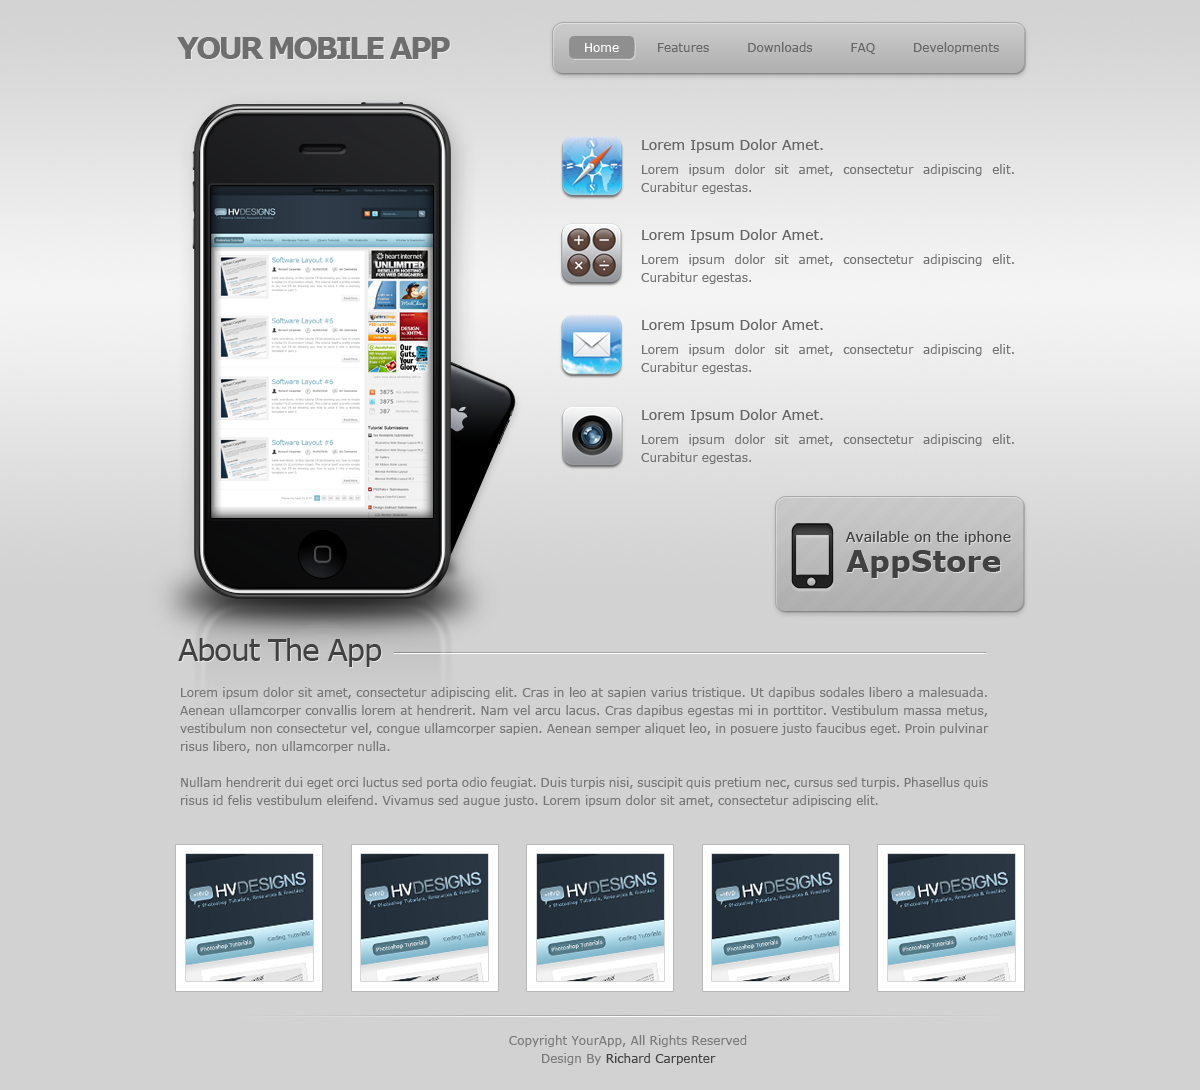
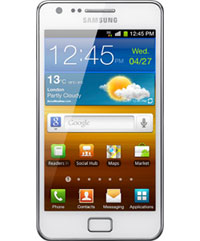
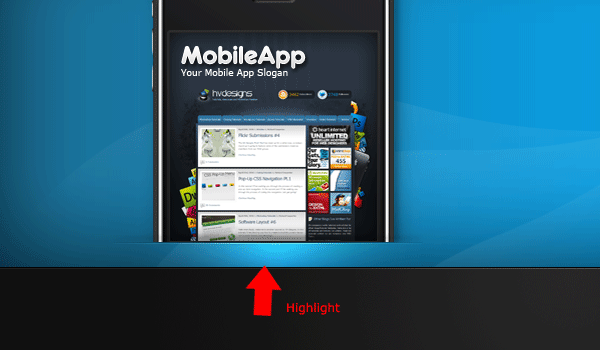
This is what we’ll be working on *click for fullview*:

So! Vurkeeng tiemz <3

  • Step 1:

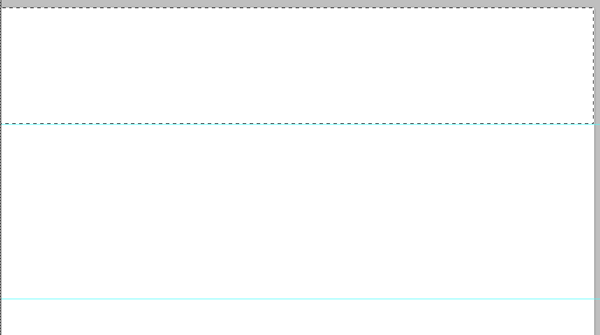
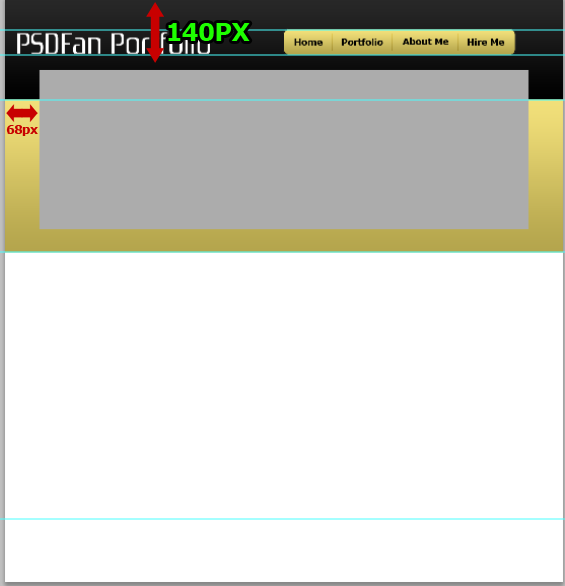
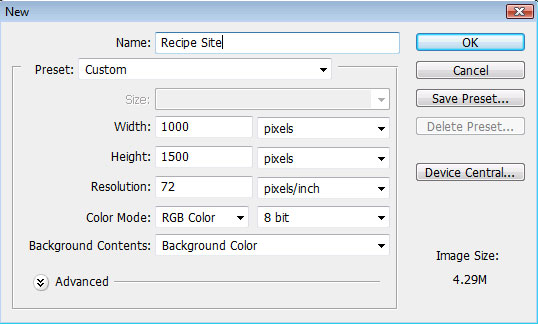
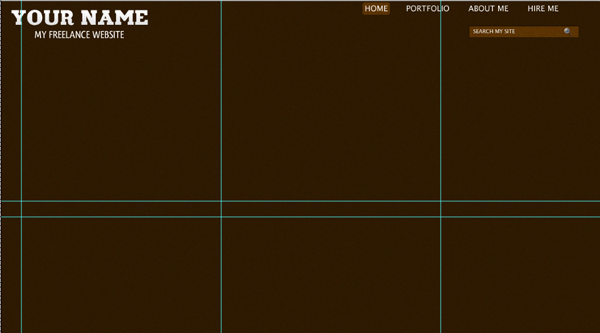
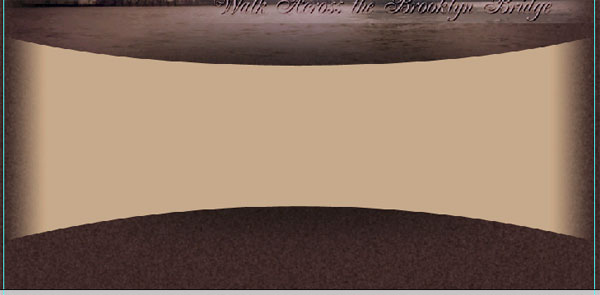
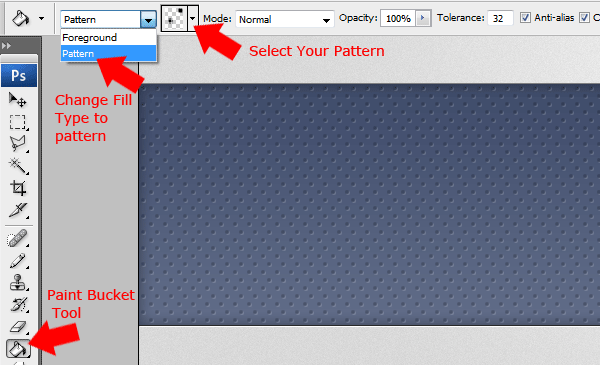
Time to fire up that Photoshop and make a new document, of whatever size you are in need of. For example, I set mine to 750px width and 900px height for handiness sake ^^
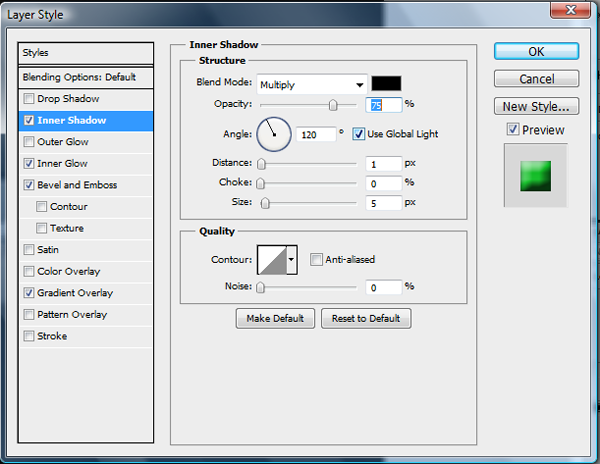
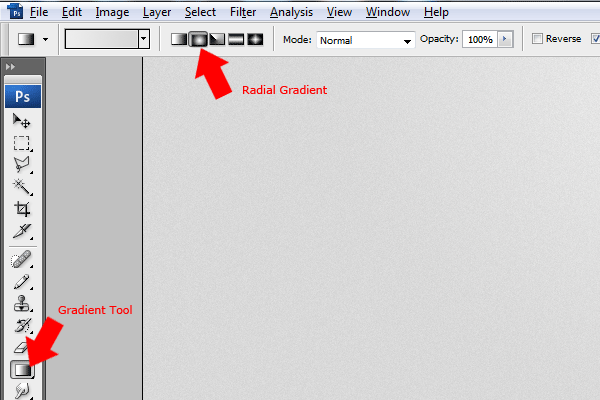
Okay…awesome :) Now it’s time to set our Foreground&Background colors, we can’t go around with an empty canvas now can we ^^
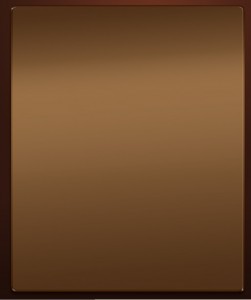
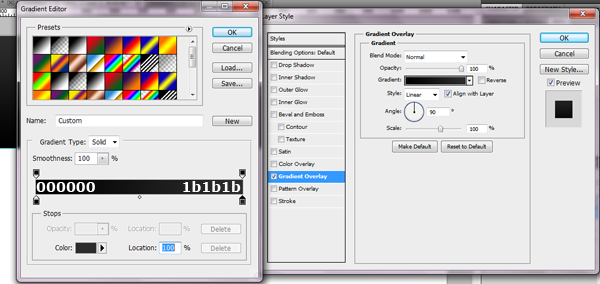
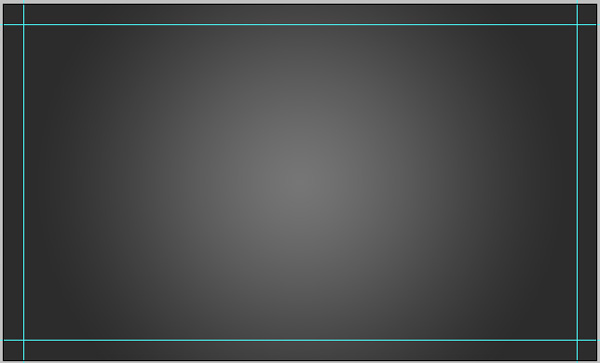
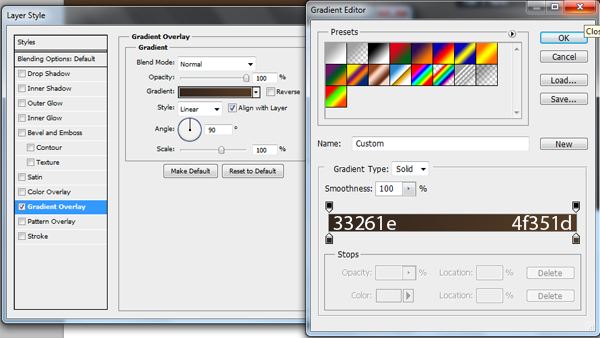
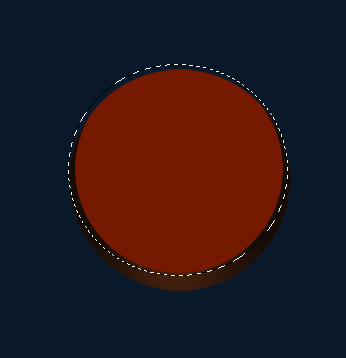
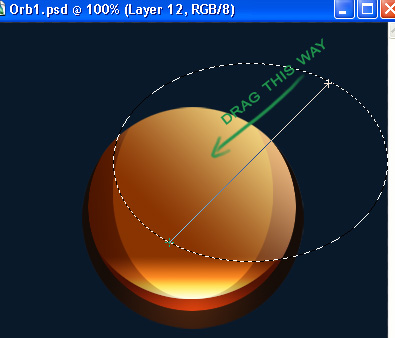
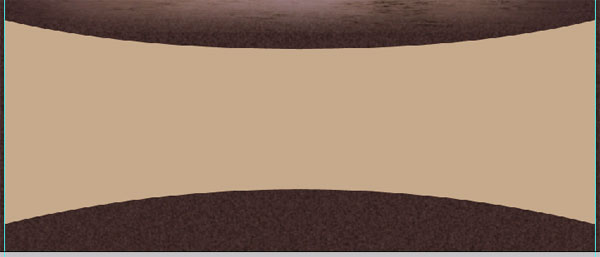
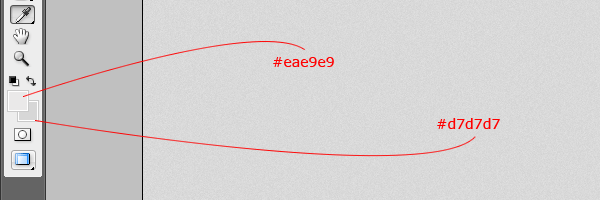
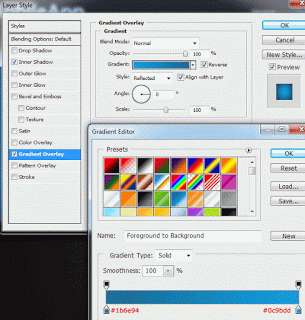
Kay, set your Foreground color to #6b3724 and your Background one to #361b12 and take the Gradient Tool (G) , setting it to Radial Gradient, Foreground to Background.
Take that radial gradient and holding down Shift key, drag from the center-top to the left (or right…no matter) until you meet the end of the canvas , like so (here it’s at 50% zoom, so you can see the whole picture:

Niice, now you should have a result…something like this (also at 50% zoom, to avoid page stretch) :

  • Step 2:

Kay, let’s move on now :)

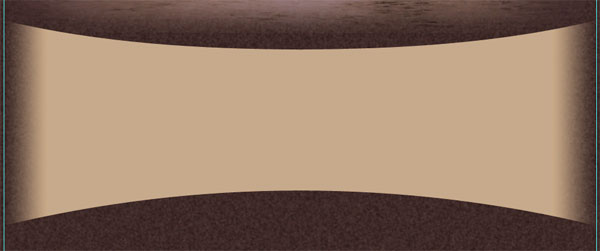
Duplicate the gradient layer, and set the copy to Soft Light blending mode. Then lower its Opacity to about 20% and press Ctrl(Cmd on Mac) + E to merge it with the original.
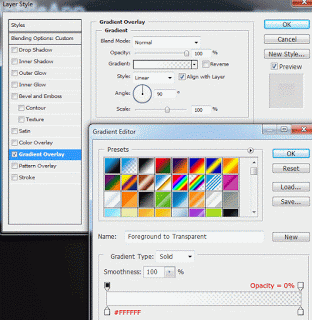
Next, set your Foreground color to #31170f and take that Gradient Tool (G) again and set it to Linear Gradient, Foreground to Transparent this time….kay, good!
Create a new layer, and set it to Multiply blending mode, with the Opacity lowered to 35-40%.
Make sure this newly-created layer is your active one and then drag, with the gradient, from the bottom of your canvas upwards for about…let’s say 300px.
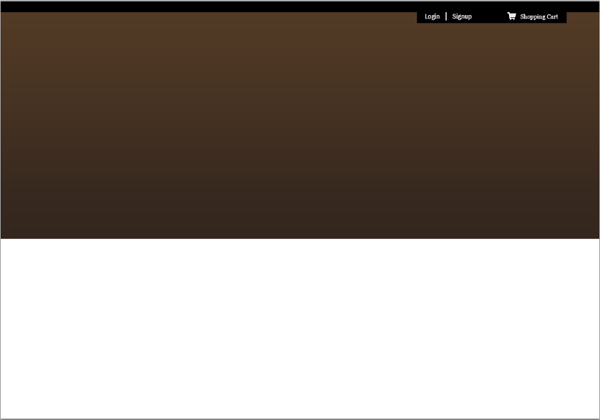
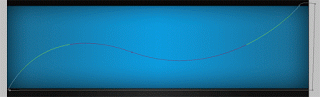
Release the mouse button and this is what you should have (50% zoom)

Niiice…now it’s time to merge again, so press Ctrl(Cmd) + E to merge the Multiply mode layer with the solid gradient background……yea…..and next we’ll re-name the layer into “Background”…okay.
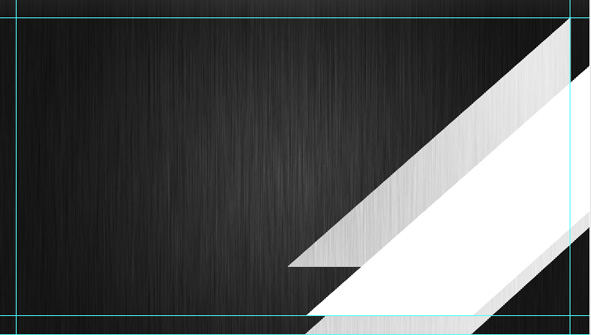
Next step ^_~

  • Step 3:

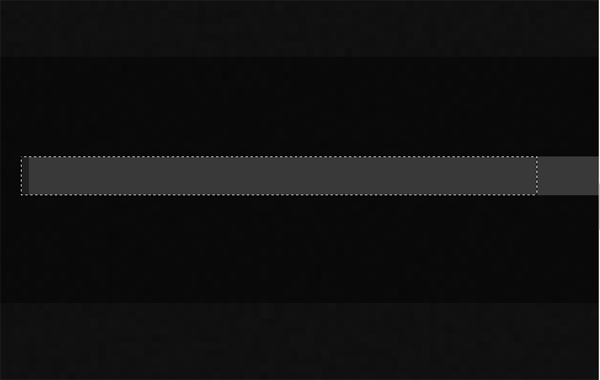
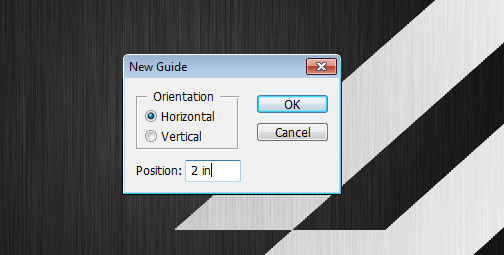
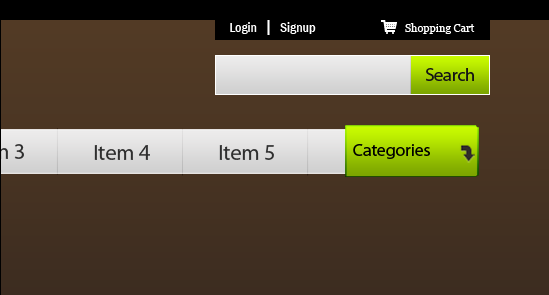
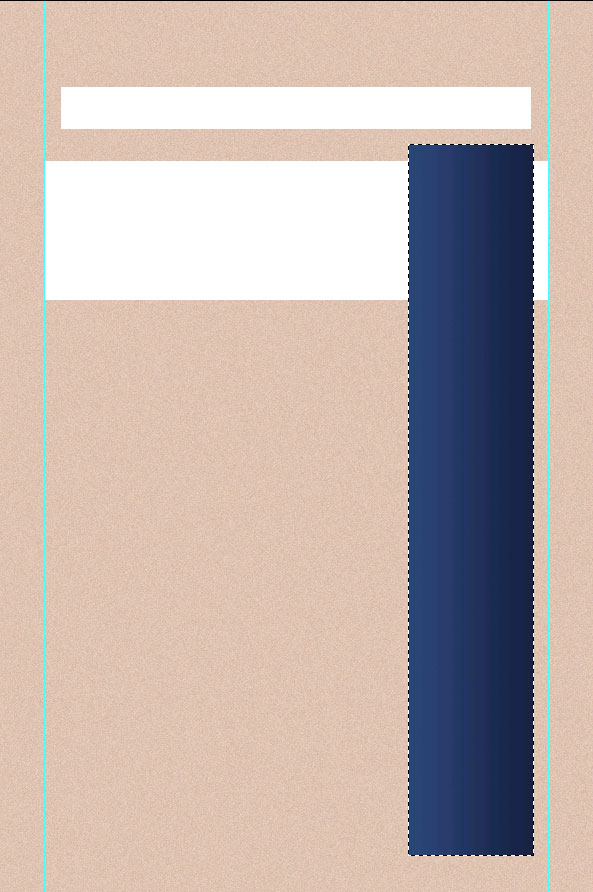
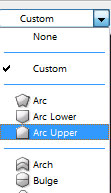
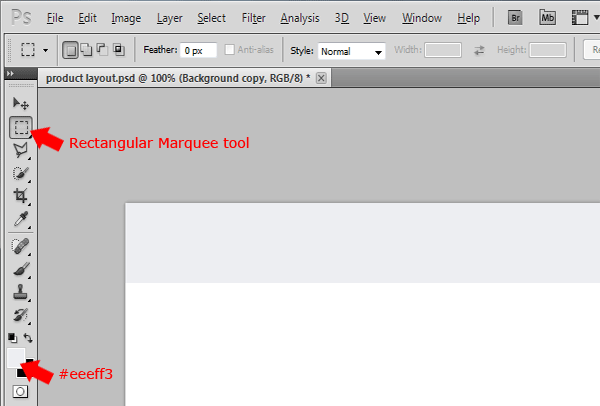
Next, let’s take care of the orange bar at the top. Take the Rectangular Marquee Tool (M) and then go to it’s Style setting, and set it to Fixed Size, like so:

professional-blog-layout-tutorial-3-1

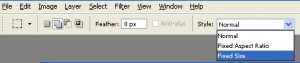
Let’s now give values to our fixed size marquee…
Set the height to 35px and the width to…well whatever width you set for your document – mine is 750px, so I’ll have my fixed size marquee set to: Height: 35px and Width: 750px

Niiiiiceeee…….

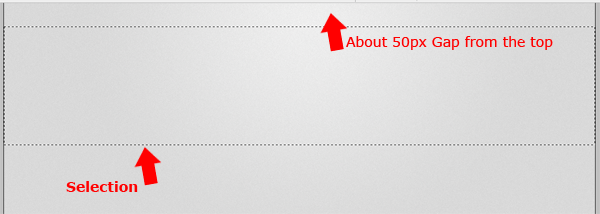
Click on the canvas so that your fixed size selection becomes visible. Now make sure your Marquee is set to “New Selection.” Which is this button:

Make sure you have that particular button down and then move your selection so that it is perfectly centered …and move it so that it is only a few pixels from the top, like..10px
Like so (image below is at 50% zoom, to fit) :

  • Step 4:

Create a new layer, and then let’s fill that selection, okay?

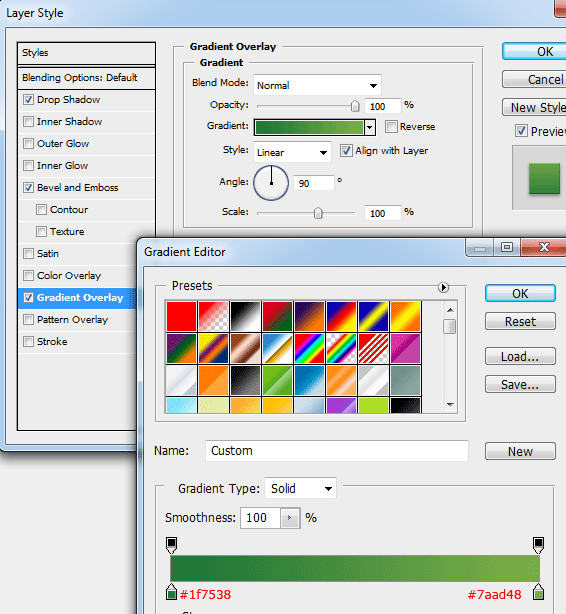
So. Set your Foreground color to #e7b905 and your Background one to #d87a00. Take the Gradient Tool (G) and set it to Linear Gradient, Foreground to Background. Then, on the new layer we just created, drag from the top to the bottom of the selection (you might need to zoom in 2-300% for that)….then deselect….and you will get this:

Now we can name this layer to Top Orange Bar.

We’re not totally done with the top orange bar, so create a new layer above the one we just worked on (now you should have a total of 3 layers, the Background one, the Top Orange Bar one…and the new layer we just created).
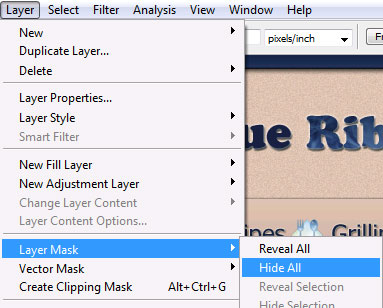
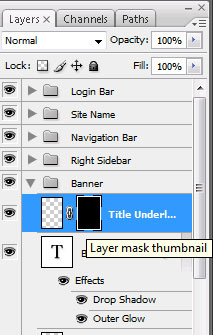
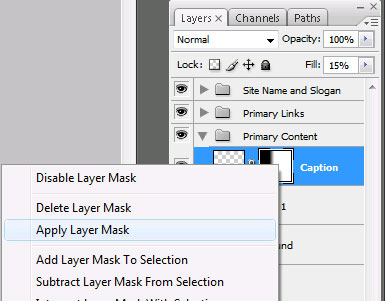
Right-click on it and choose Create Layer Mask.

Now let’s give it a highlight, okay? Just to have that nigty 3D look ;)

Gogogogogo, set your Foreground color to #e7a204 =D
Then see that Gradient Tool again…settings: Linear Gradient, Foreground to Transparent.
Zoom in to 300-400% and click at the bottom of the bar and holding Shift key drag upwards for a bit…for about half the total height of the bar, like so:

Lower the layer’s opacity to about 75% and you should have something like this result for your top bar:

  • Step 5:

Well I think it’s safe now to press Ctrl (Cmd) + E and merge this little highlight layer we just worked on with the main Top Orange Bar layer….

Mooo-vin on to the next step…

Press D to reset your colors, then create a new layer above all your current others……..and then take the Line Tool (U) and set it to Fill Pixels mode…and Weight to 1px.
Go to the left margin of your canvas and holding down Shift key (to give us a straight line) draaa..aaaa..aaaag….all the way to the right margin.
Okay now make sure your line is spanning all the way across your canvas…..and then make a new layer, and press X key to reverse your Foreground&Background colors.

Do exactly the same as before, and create a new line with the new foreground color (it should be white #ffffff now). Good.

Now zoom in a lot and move your lines layers so that the black on is above the white, and both are right under the Top Orange Bar..like so (image below is at 400% zoom-in) :

Kaykay, now set the layer to Soft Light mode.

This is what you should have so far (100% zoom) :

Name the layer “Inset Orange Bar”……

  • Step 6:

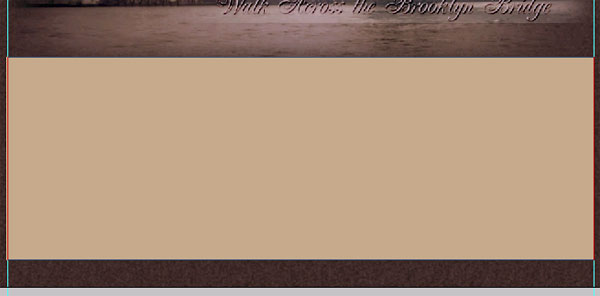
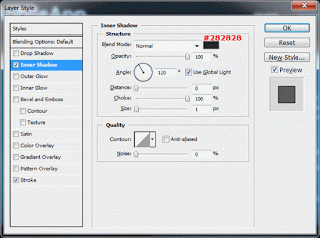
Okay, make a new layer and move it just above your Background one (in the Layers Palette).
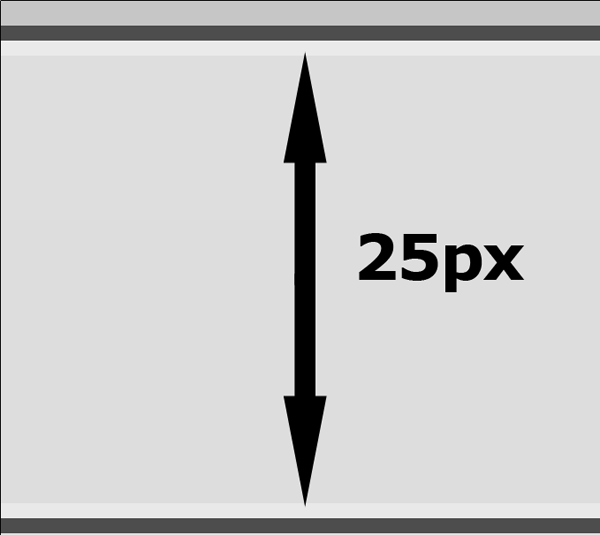
Set your Foreground color to #602e1e and taking the Gradient Tool with the setting of Linear Gradient/Foreground to Transparent, zoom in to 400-500% and drag from the top of the canvas downwards, for about 30px.

After doing this, you should have such a result (compare on the left with the right for a Before and After shot) :

Well, now it’s safe to merge this with the Background layer….. … …

  • Step 7:

Okay, now on to the Notepad:

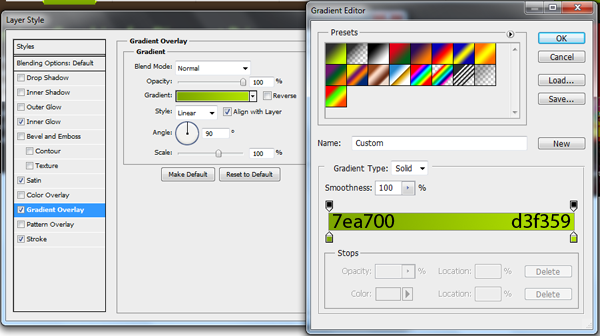
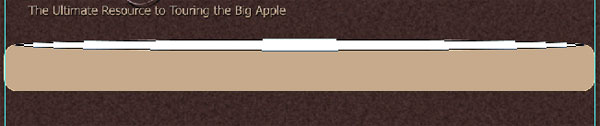
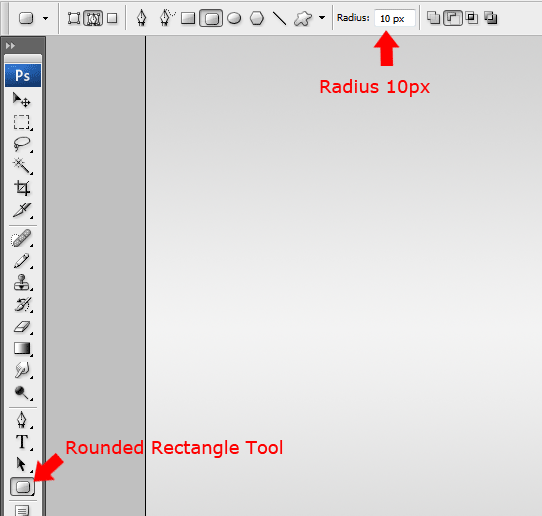
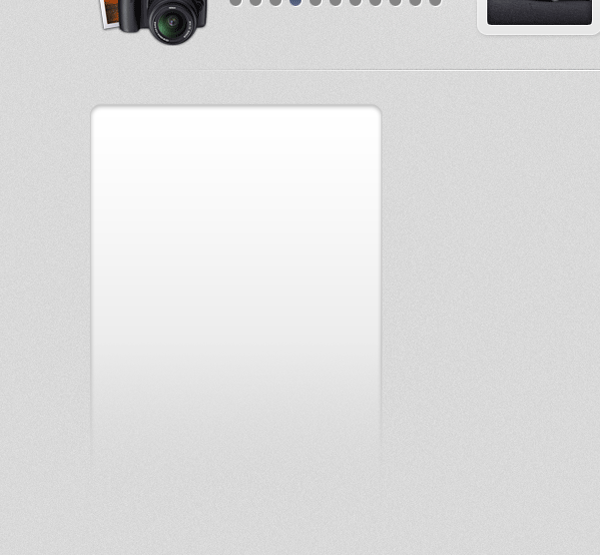
Set your Foreground color to #a57e4a and take the Rounded Rectangle Tool (U) set to either Fill Pixels or Shape Layers (whichever you prefer) and set its Radius to 10px.
Create a new layer on top of all your others and drag as to create a rounded corners rectangle that’d look something like this (here at 50% zoom) :

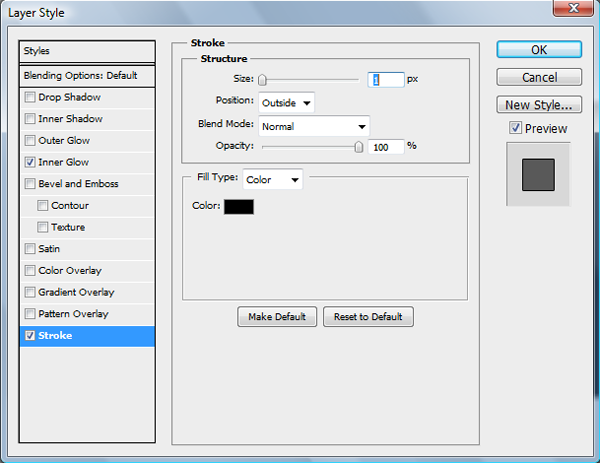
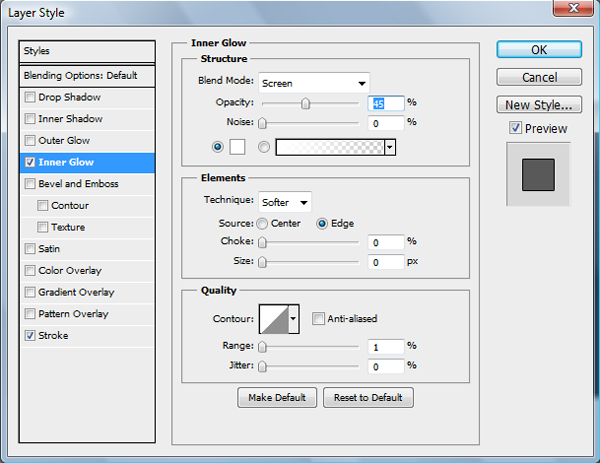
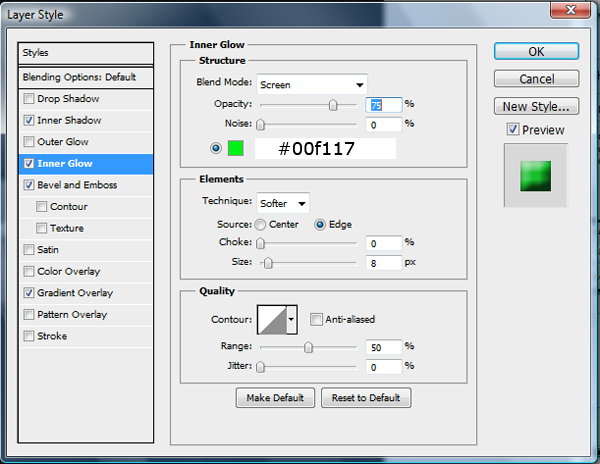
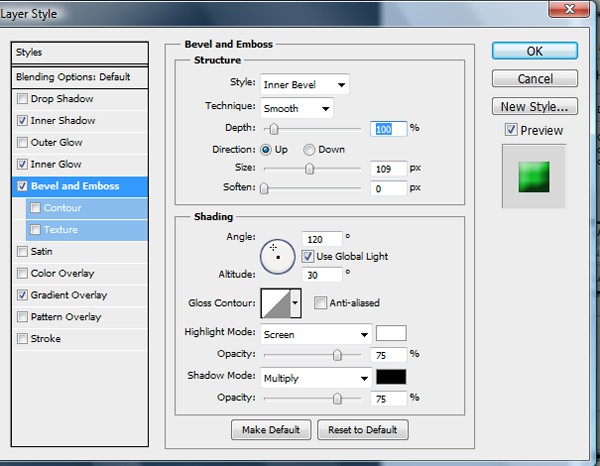
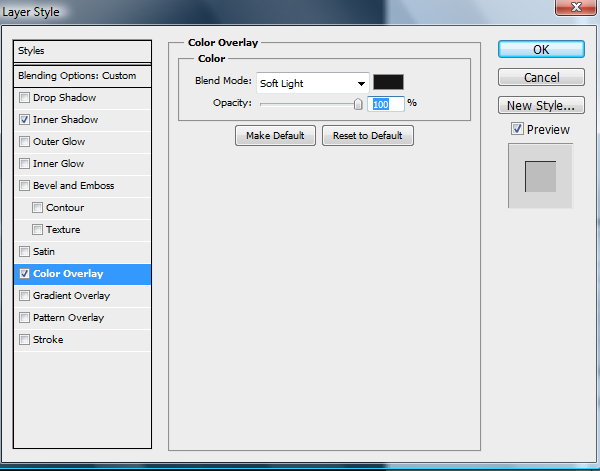
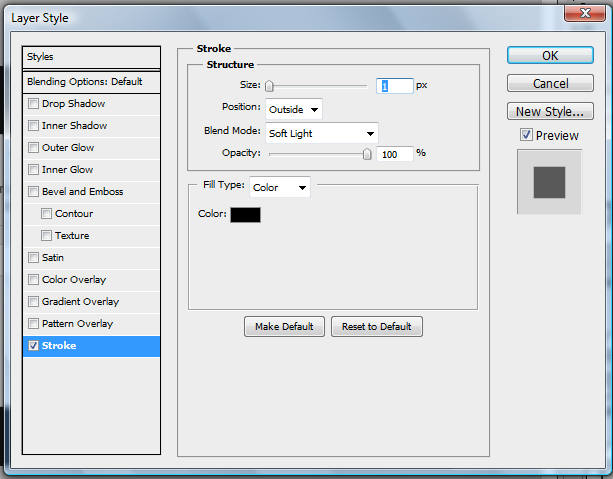
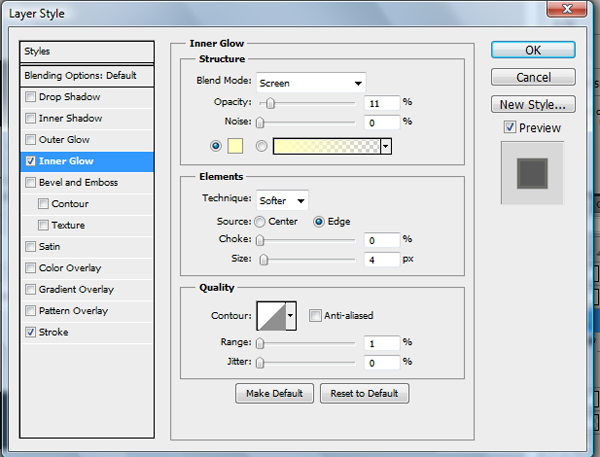
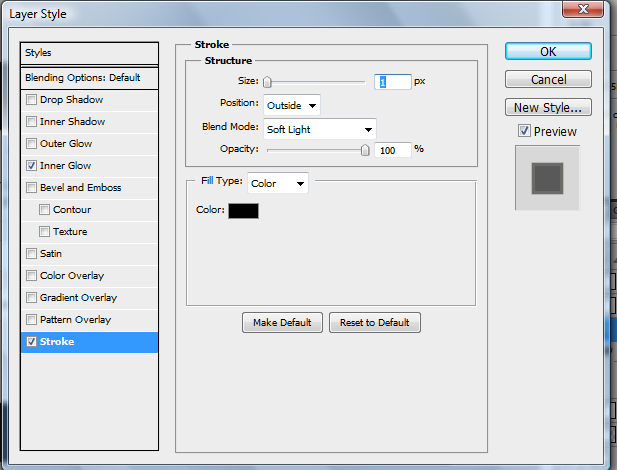
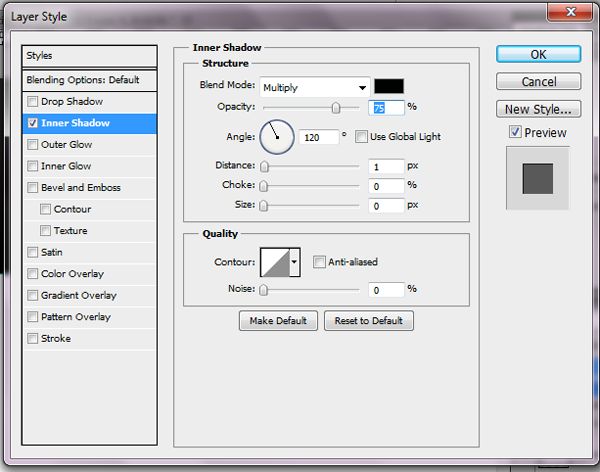
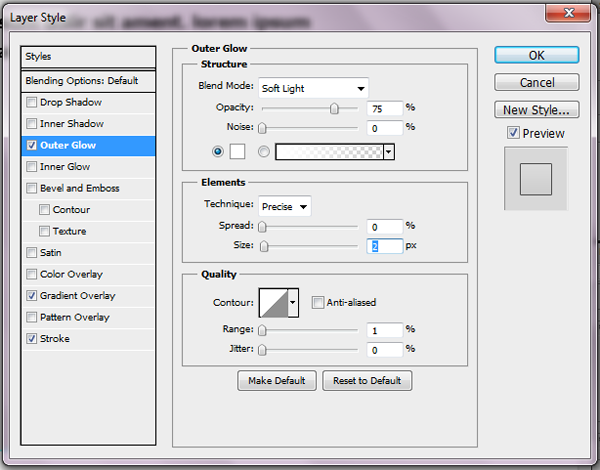
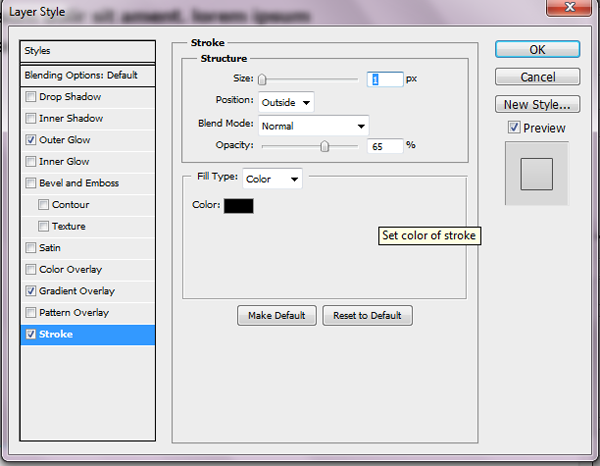
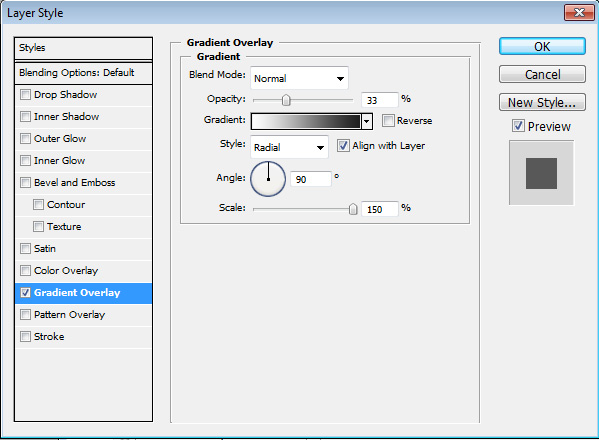
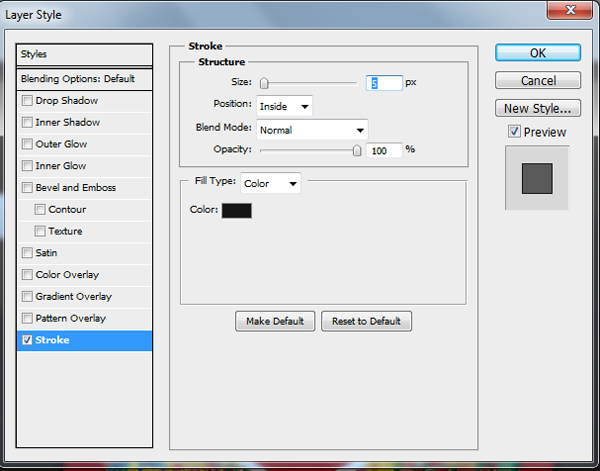
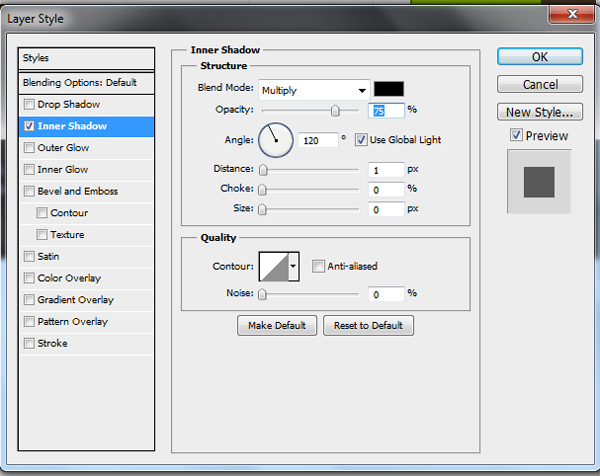
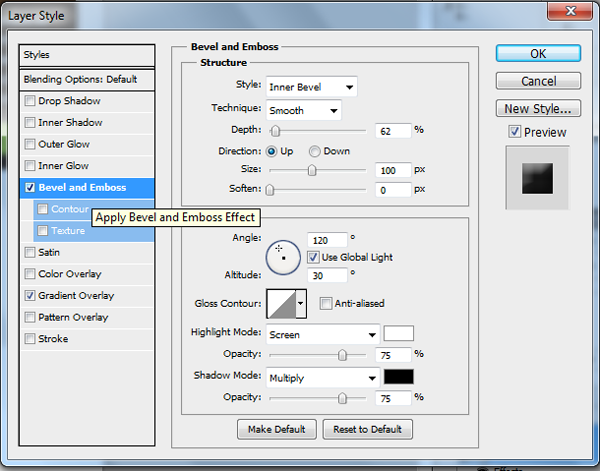
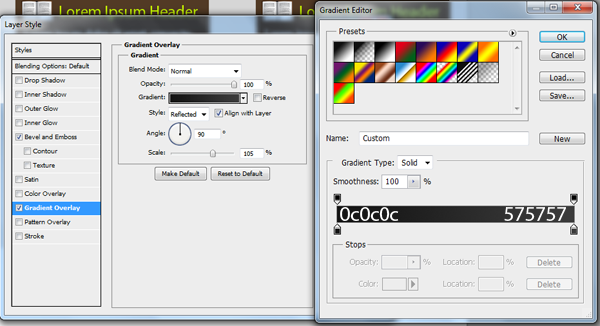
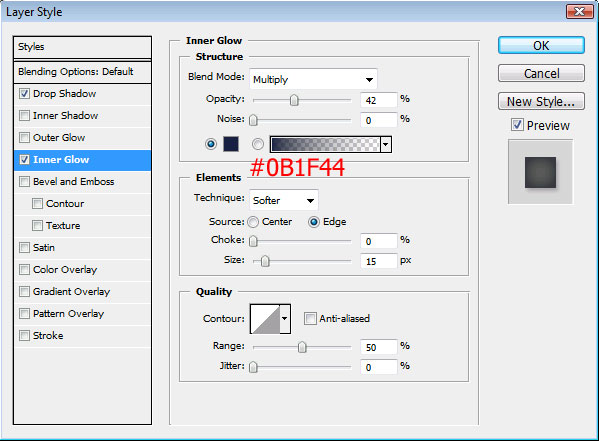
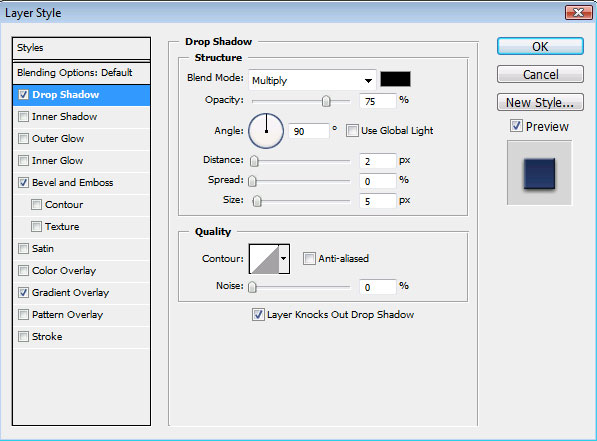
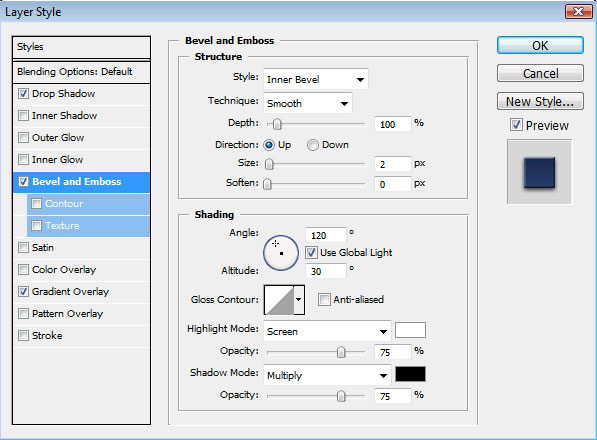
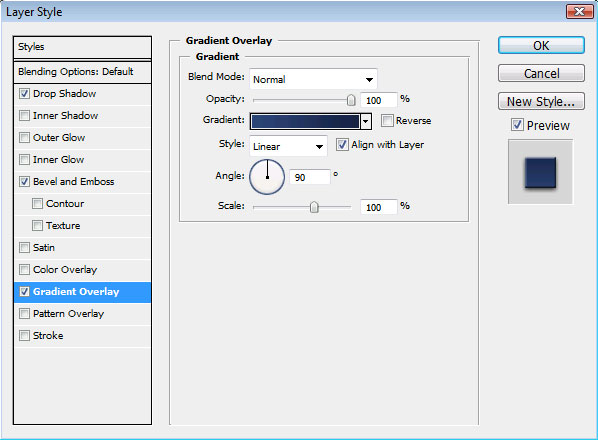
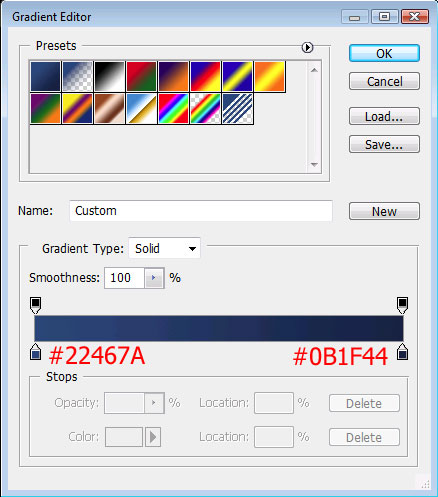
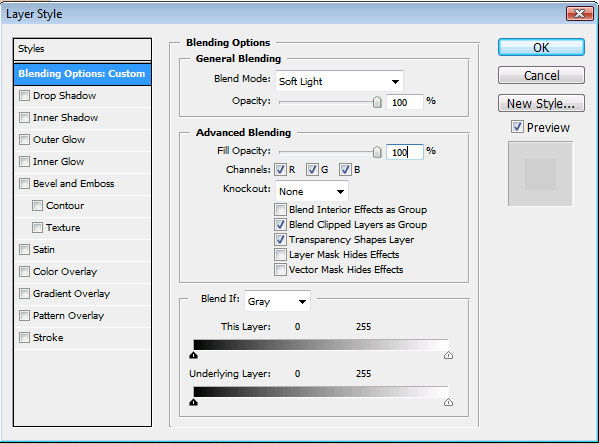
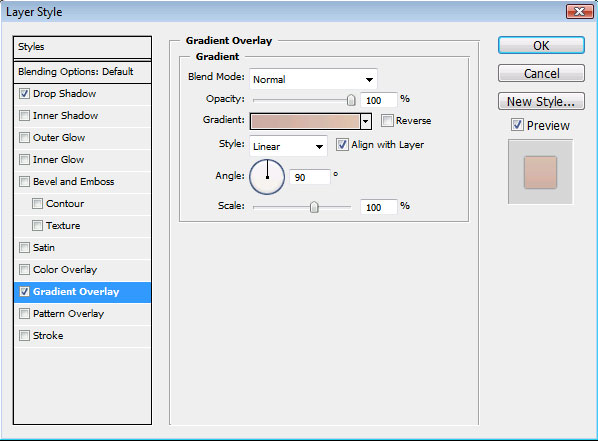
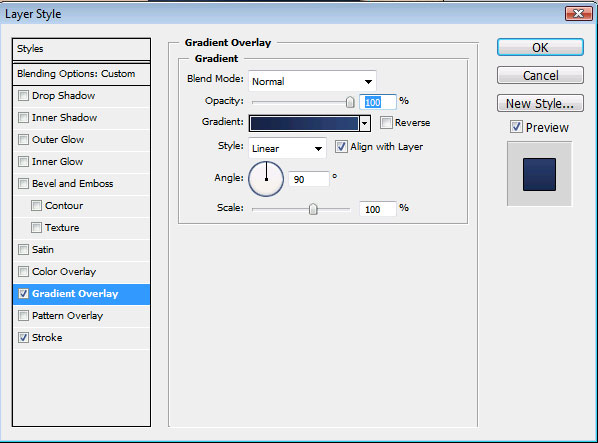
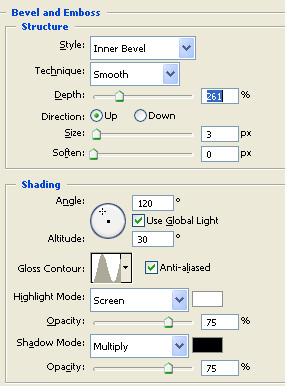
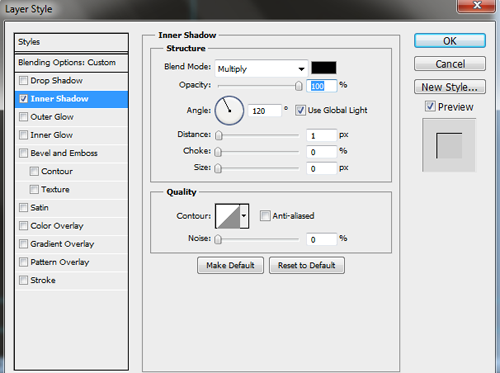
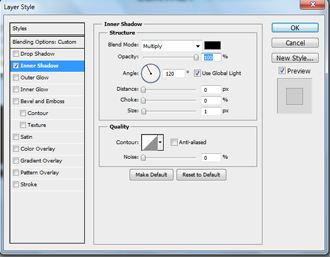
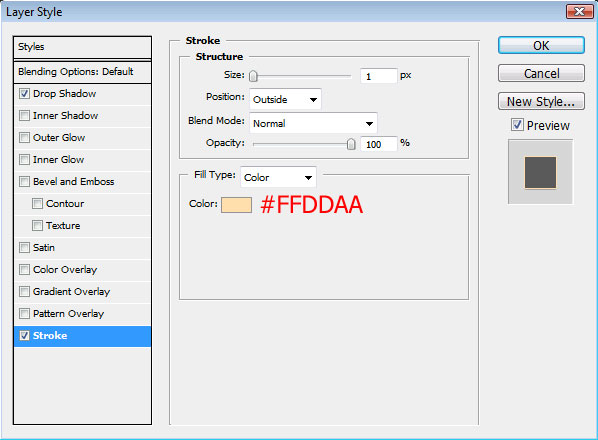
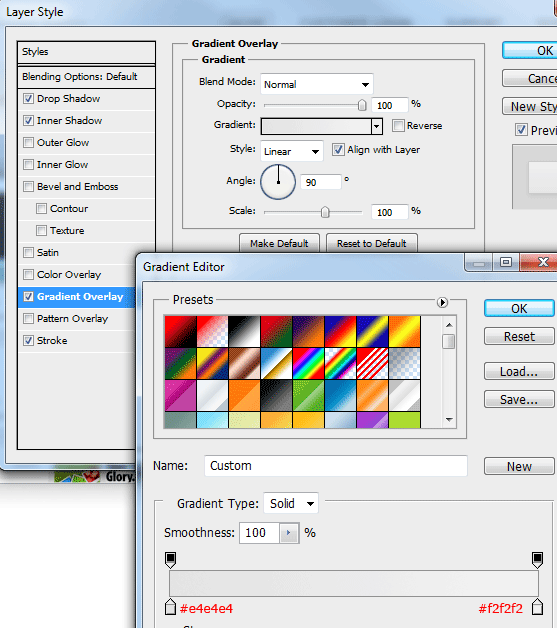
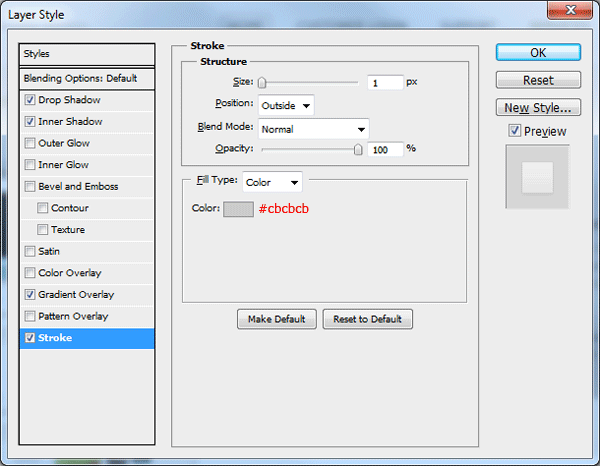
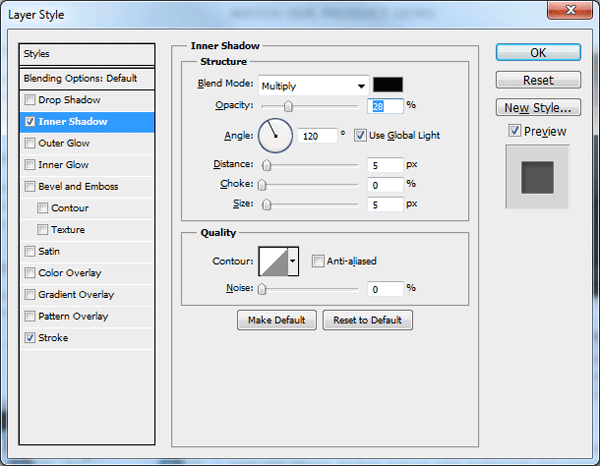
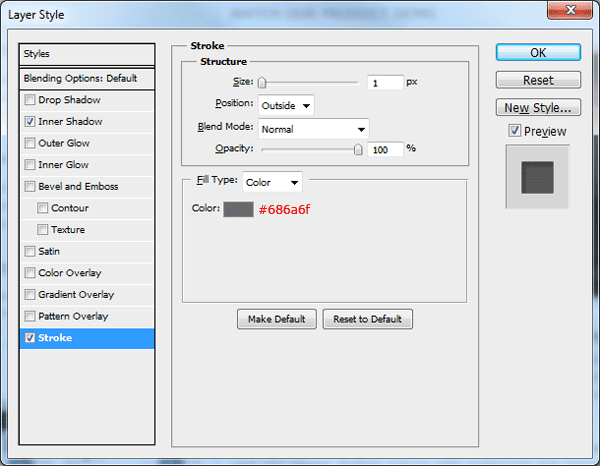
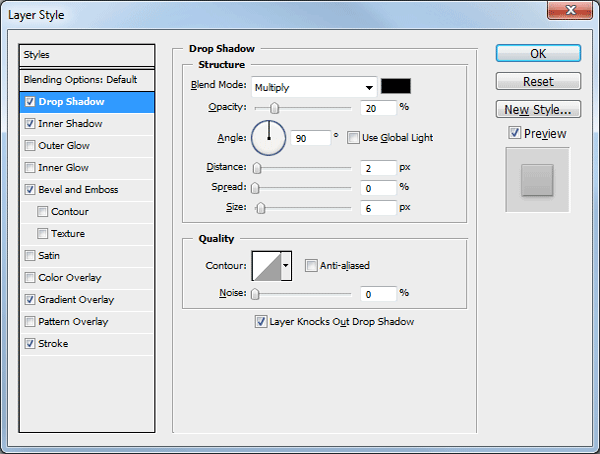
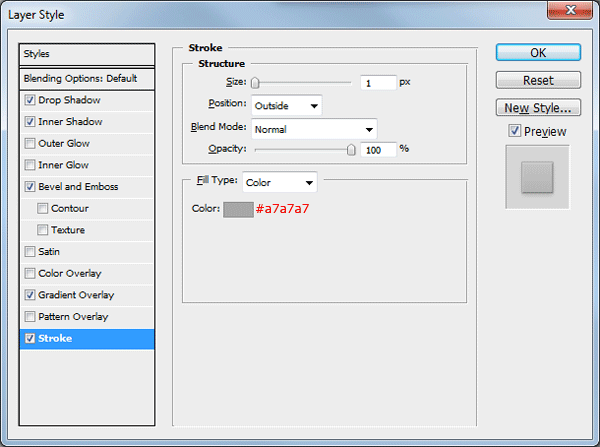
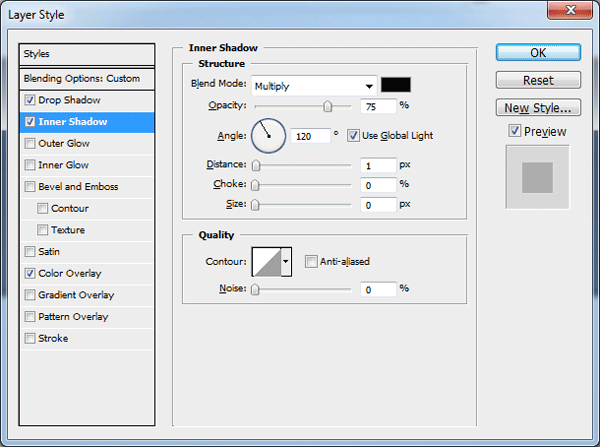
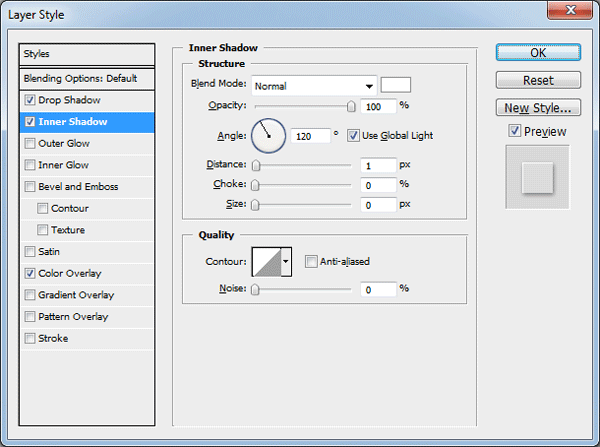
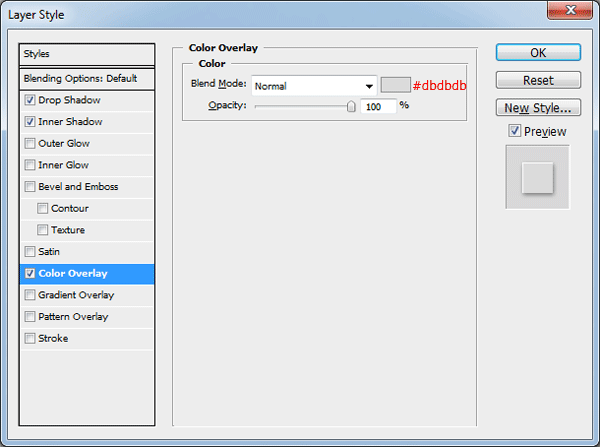
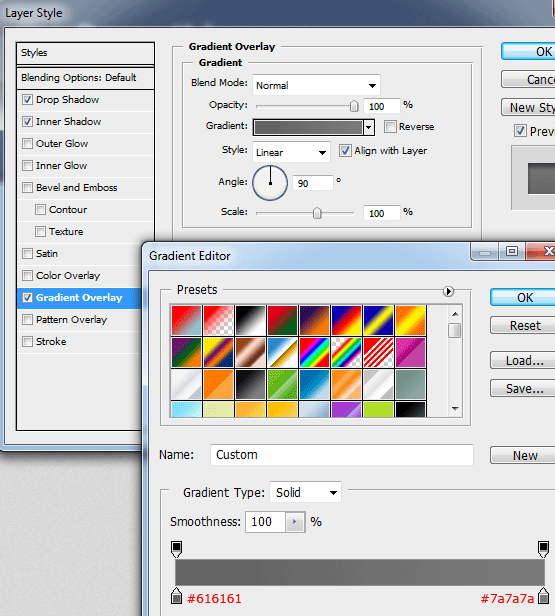
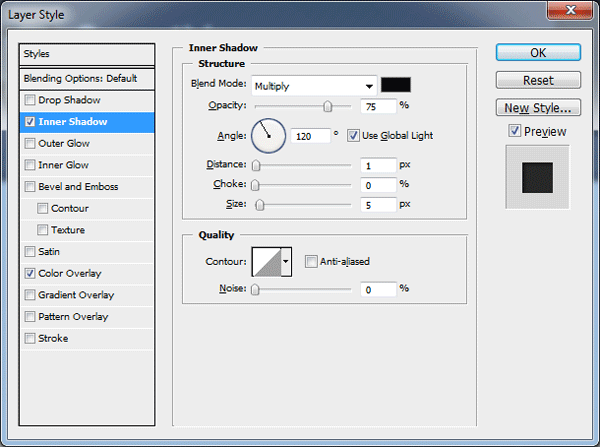
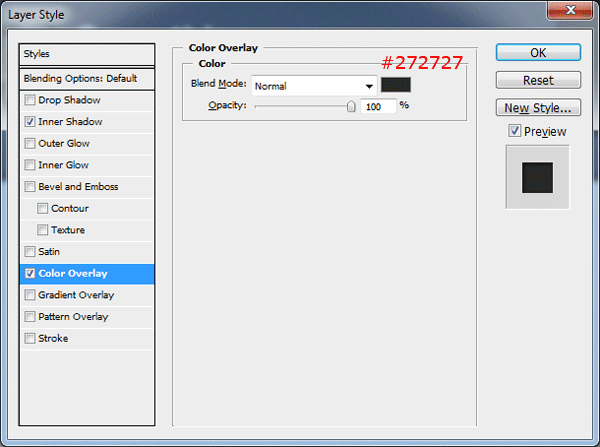
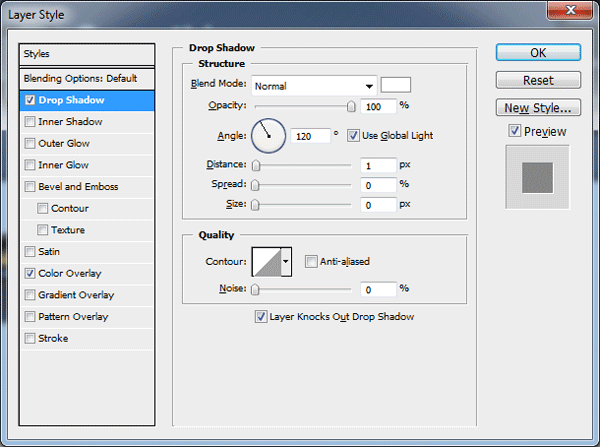
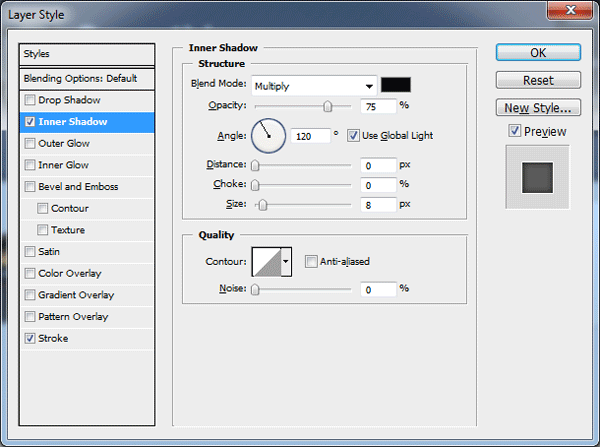
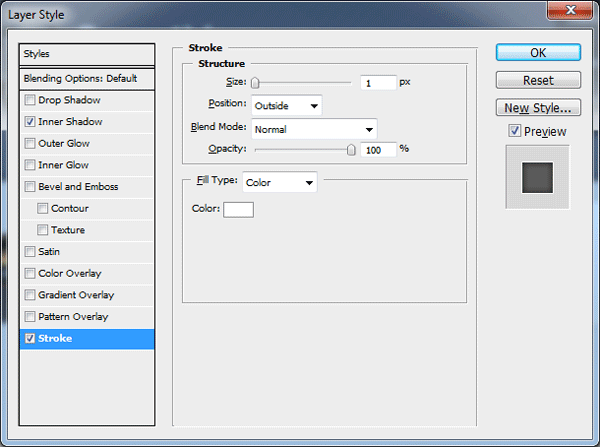
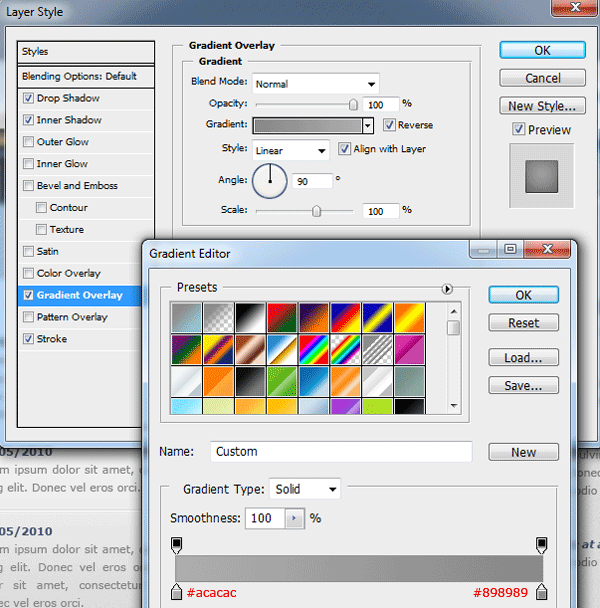
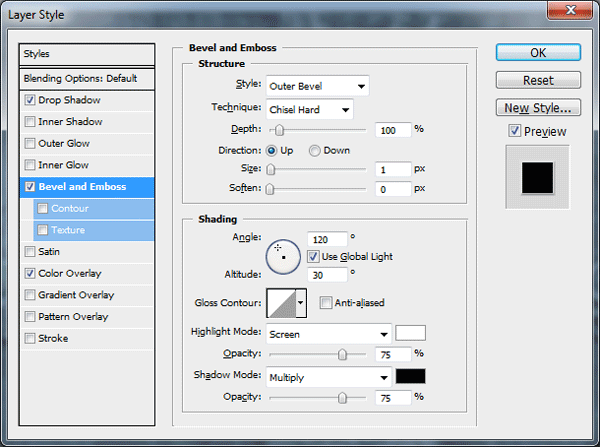
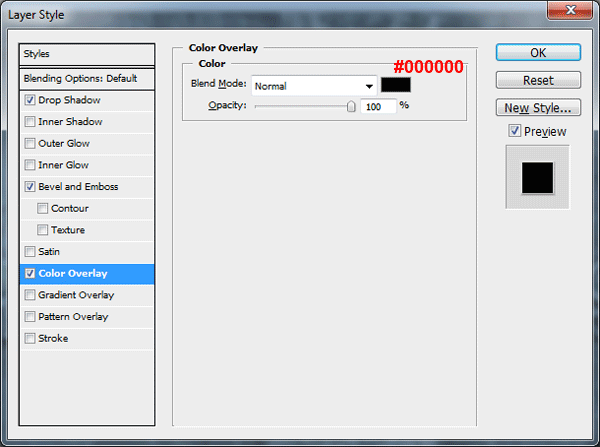
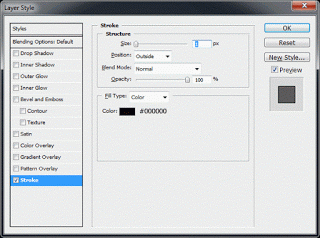
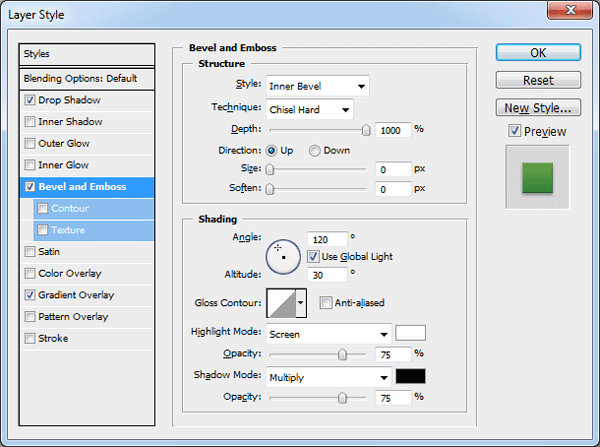
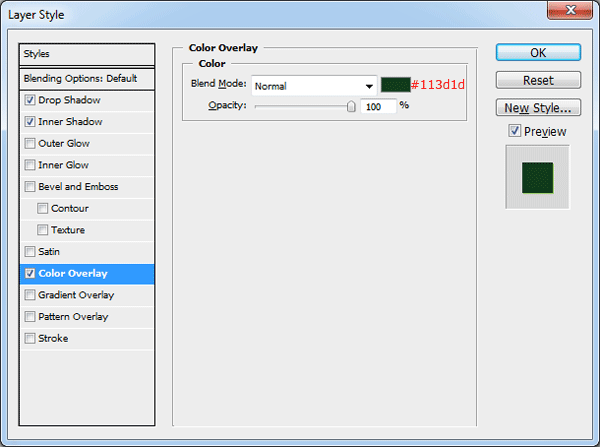
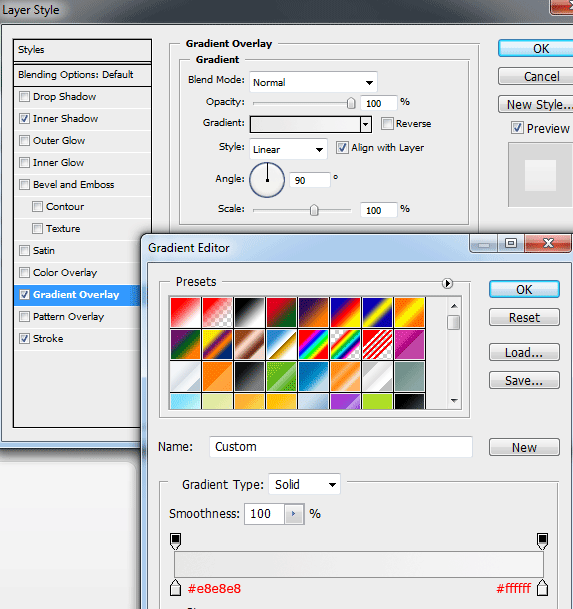
Good, now go to its Blending Options (either double-click layer or go to Layer->Layer Style->Blending Options…OR right-click on the layer in the Layers Palette and choose Blending Options, hehehehe) ^____^

…….and give it these sweet settings ^_~


  • Step 8:

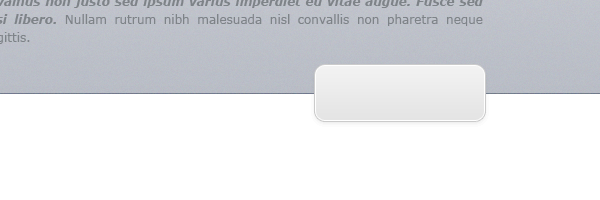
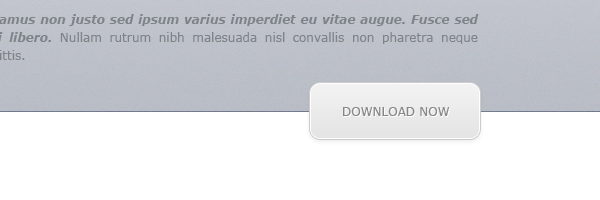
Kay, now your stuffie should look something like mine ..oo…majik happendzzzz… o___o

professional-blog-layout-tutorial-8-1

Now let’s name this layer “Notepad-BG”…we don’t want it to get an identity crisis do we ^_~

Sweeet! :)

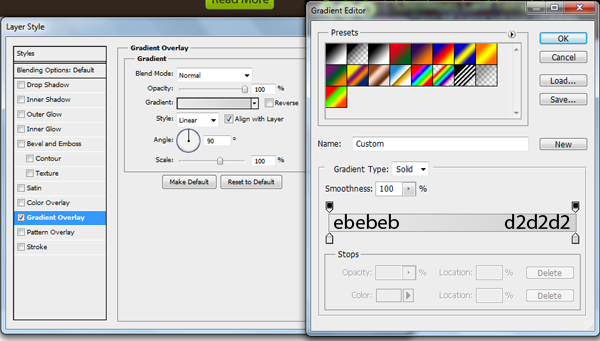
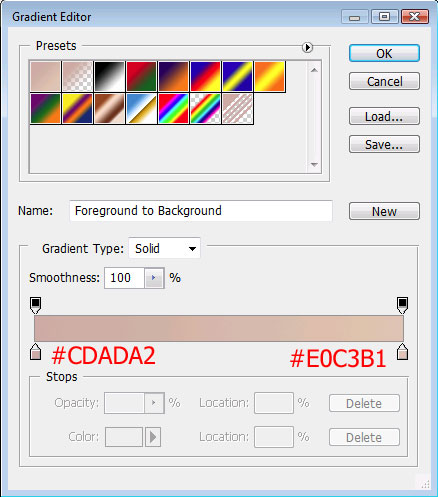
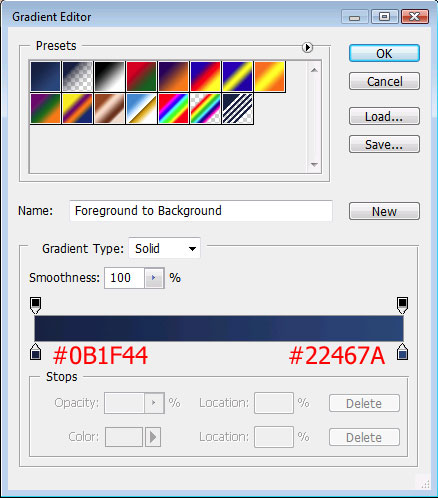
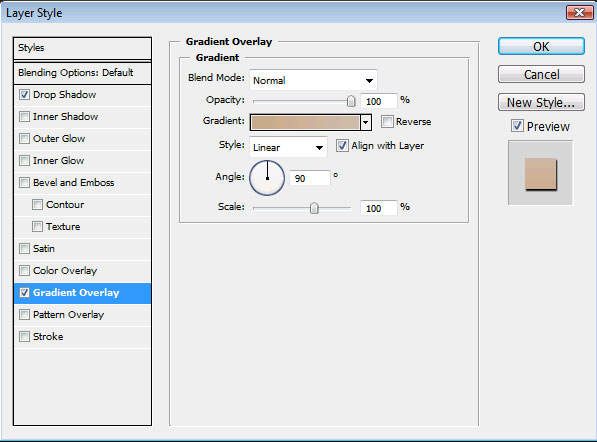
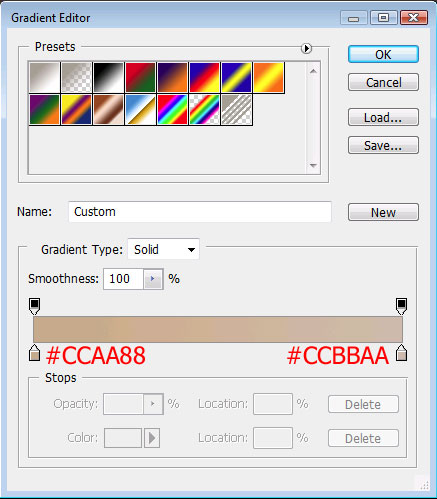
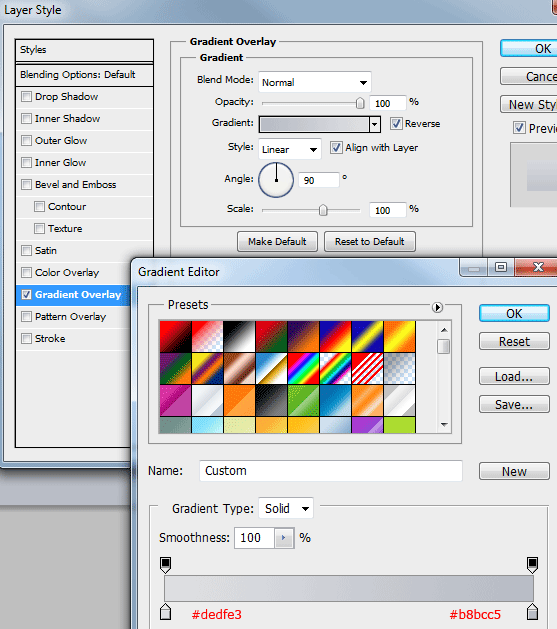
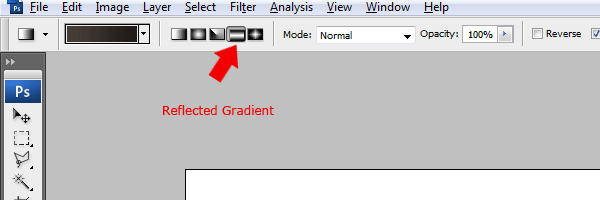
Now Ctrl(Cmd)+click on the “Notepad-BG” layer’s thumbnail in your Layers Palette, to obtain its selection. Set your Foreground color to #ffd286 and your Background one to #fcba68.
Then, create a new layer above all your others and taking your Gradient Tool (G) set to Reflected Gradient, Foreground to Background, click somewhere in middle of the selection and drag upwards to meet the top margin, like so:

Now deselect…goooood…….and press Ctrl(Cmd) + T to transform this layer. We need to make it look like a page so we’ll just squeeezzzeeee it a bit from the left, right and bottom, and then drag a bit upwards at the top to make it overlap the top margin of the “Notepad-BG” layer. Like so:

Sweeeeeeeeeet! >w<
Next step!

  • Step 9:

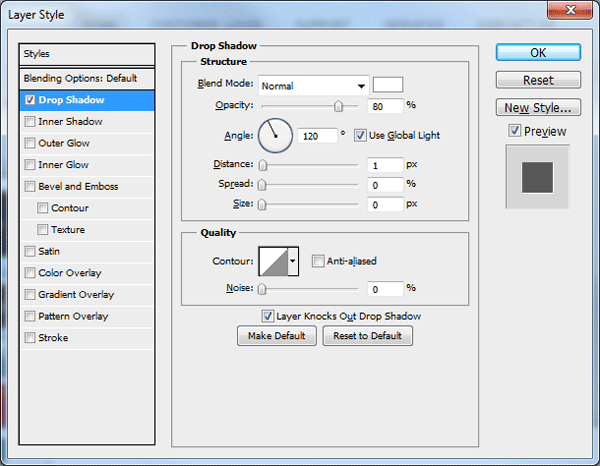
So. Now we need to make it look 3D, he current front view is boooo-reeeeeng! >____>;;
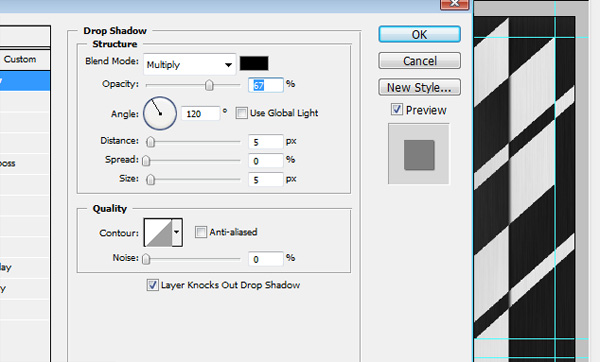
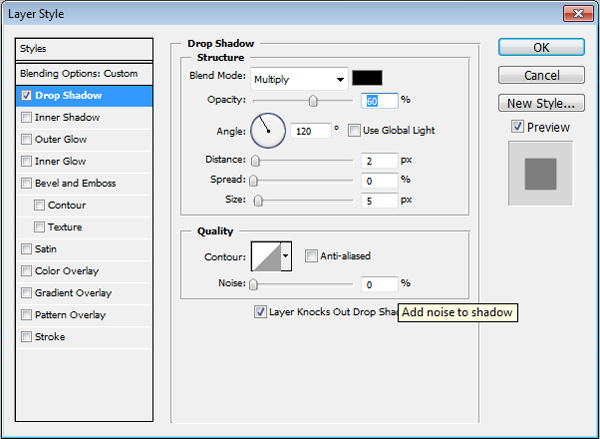
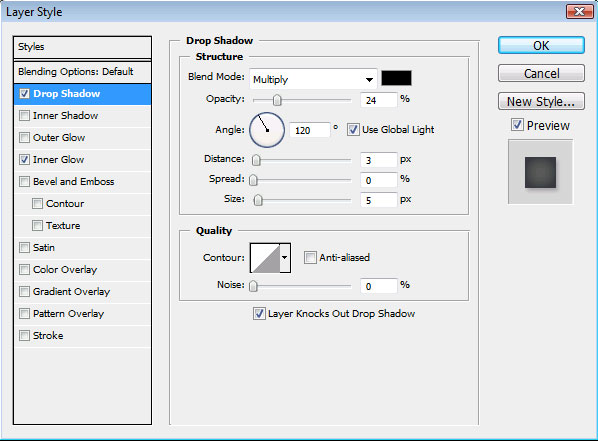
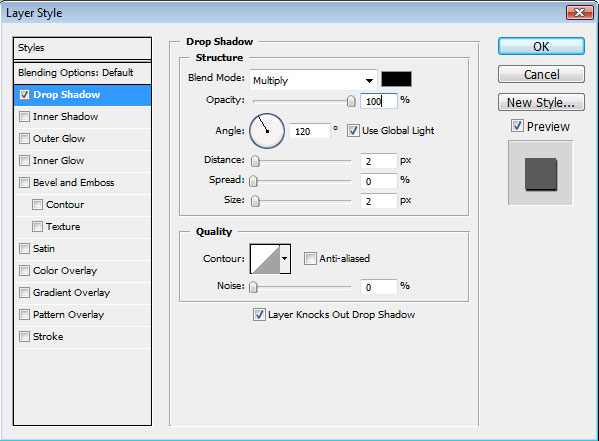
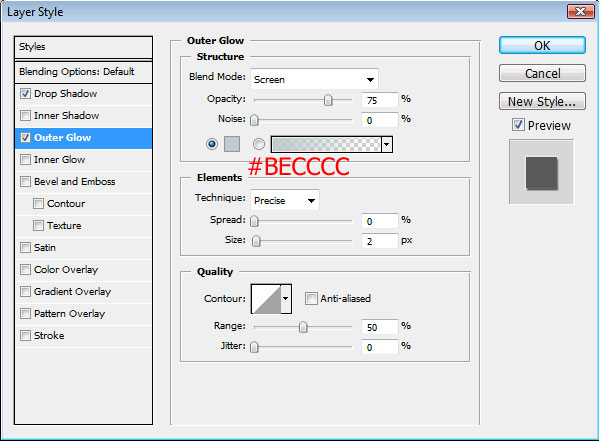
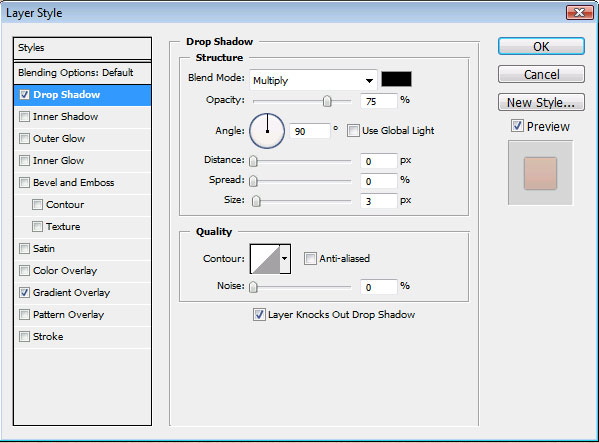
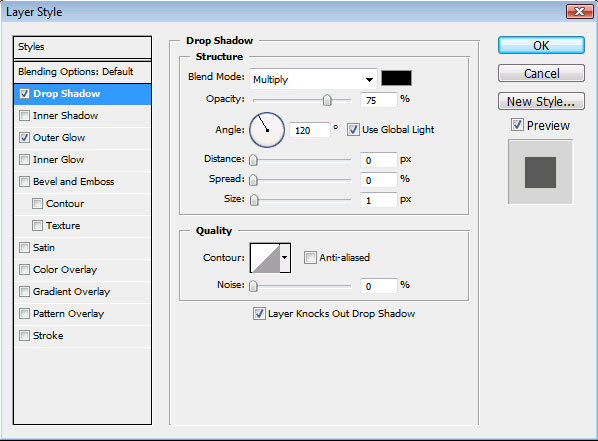
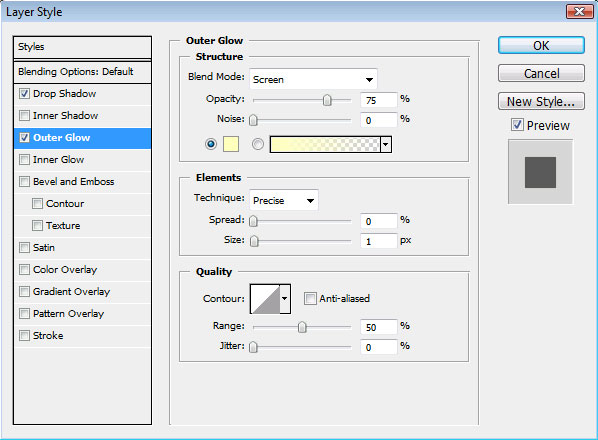
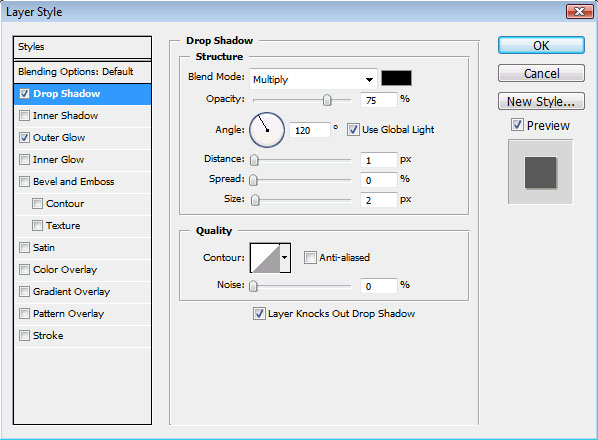
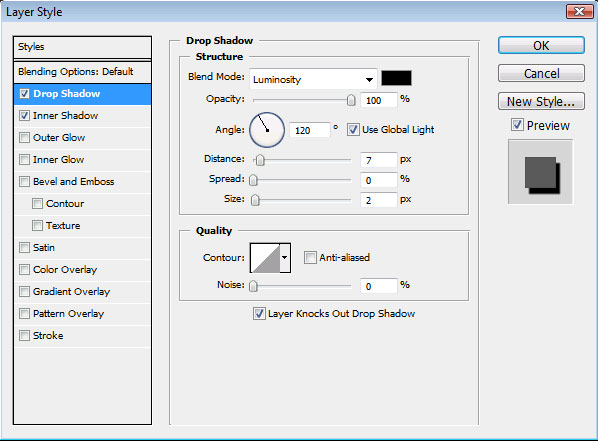
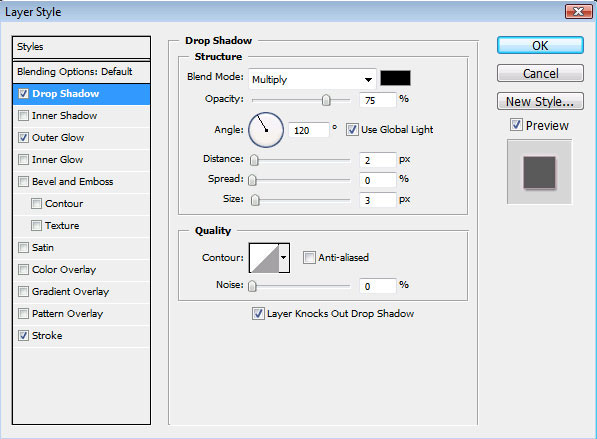
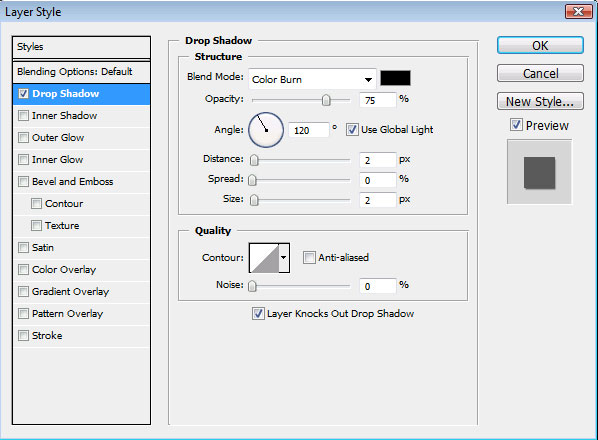
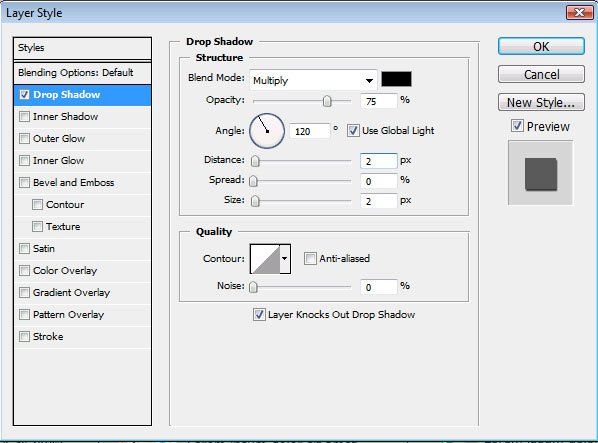
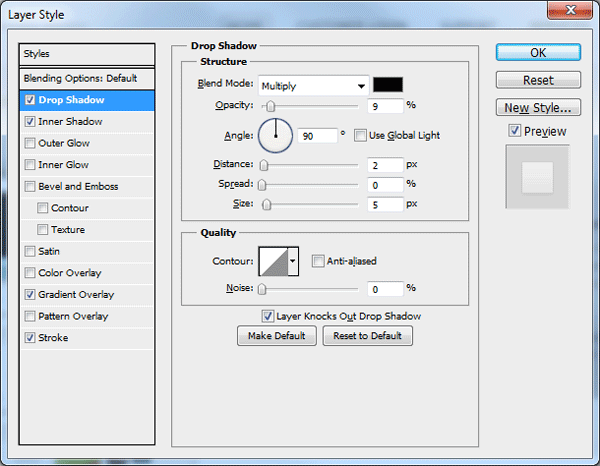
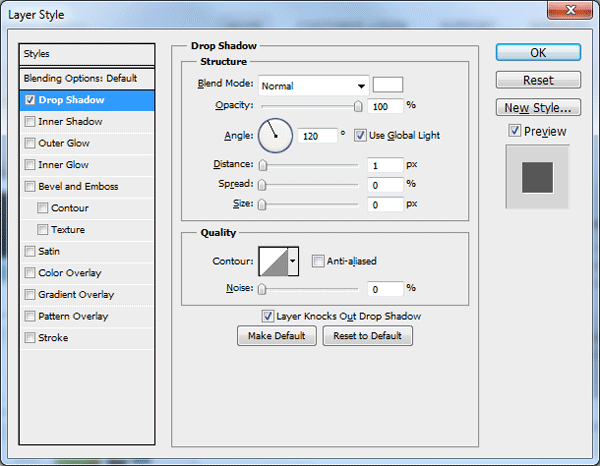
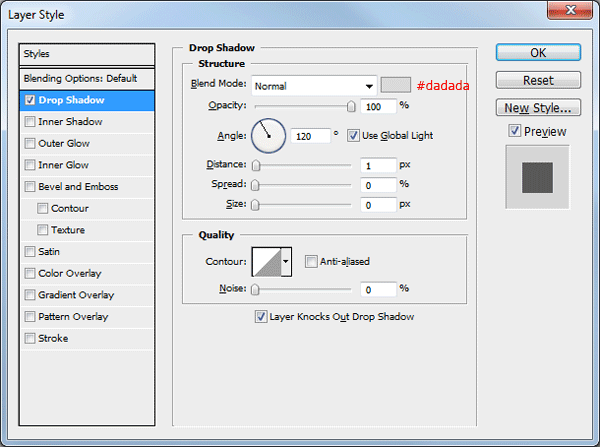
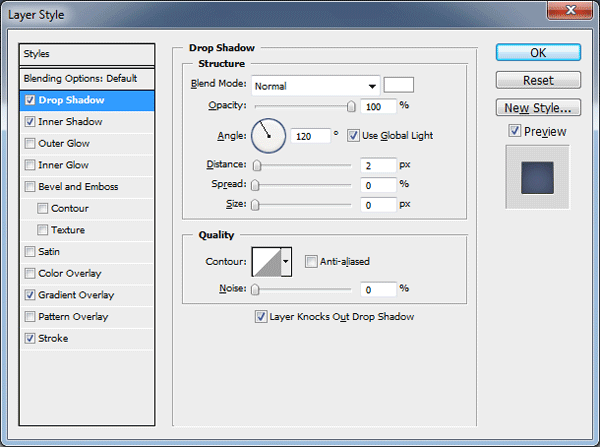
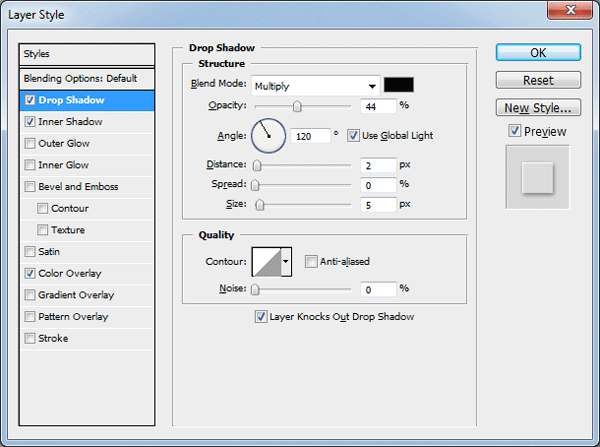
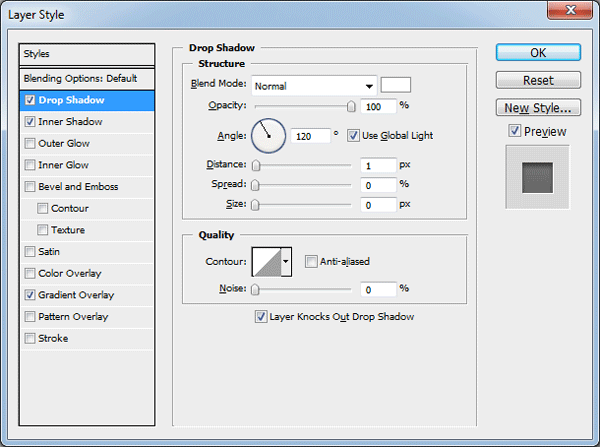
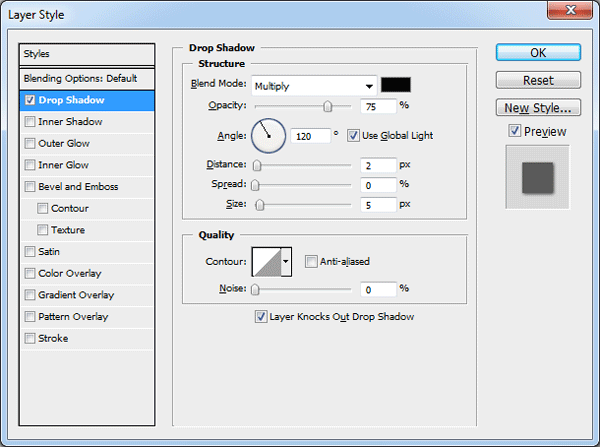
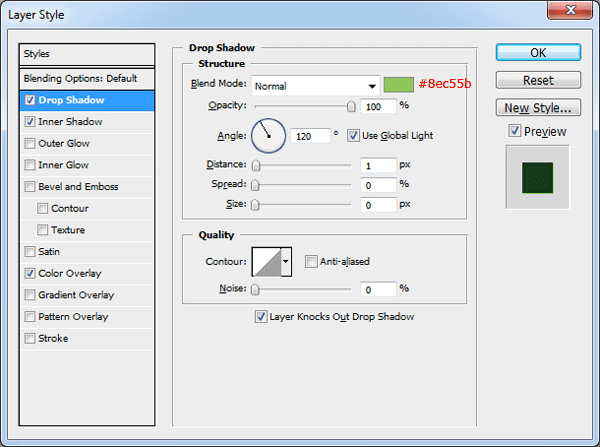
First we’ll give it a Drop Shadow blending style, like so:

What we’ll do next is to duplicate the current layer 2 times, so that we have 3 copies of the same layer in total. OMG triplets! =O
Buuuut not for long ^__^

Let’s name them =D
Name the bottom most page..well..err….”Page 1″..? xD
Yea..I know, inventivity hahaha.
‘neway! Name the middle one “Page 2″ and the topmost one…”Page 3″.
Now, to obtain that 3D look we are aiming for, we’ll use Ctrl(Cmd) + T ont he Page 2&3 layers. Let’s start with the “Page 2″ one.
Press Ctrl(Cmd) + T and zoom in to 300-400% and squeeze it a little bit from the right and bottom, like so:

Okay…now on to the topmost page, our “Page 3″. For this baby we have speeeeeshul plans <3
Let’s put these plans in motion now ^^ Start by pressing Ctrl(Cmd) + T to transform it just like we did for the “Page 2″ layer, squeeze it a bit from the right&bottom. Liiike so:

  • Step 10:

Okay, now we’ll start giving our “Page 3″ a makeover ^^
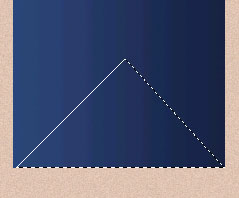
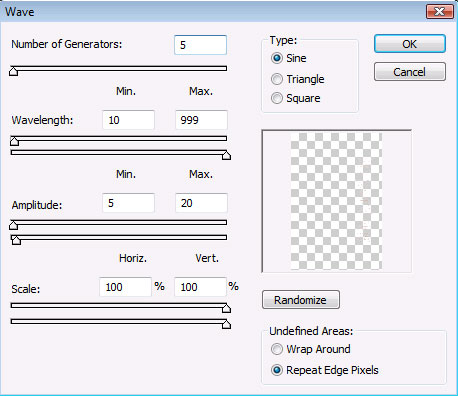
Take the Pen Tool (P) and set it to Shape Layers. Then use the Direct Selection Tool and the Convert Point Tool to obtain a shape like this:

This will be our page curl ^__^

Next, Ctrl(Cmd) + click on the layer thumbnail of the shape we just created (in the Layers Palette of course) to obtain its selection….and taking the Eraser Tool (E) set it to a hard-edged, round brush.
Press Ctrl(Cmd)+Shift+I  (or go to Select–>Inverse) to inverse the selection and click on the “Page 3″ layer in the Layers Palette to make it your active layer.

Now with the Eraser Tool erase slowly&carefully the bottom-right corner of the “Page 3″ until it meets the edge of the curled corner, like this (notice that in the next picture I hid the Page1&2 to make the erased corner more visible) :

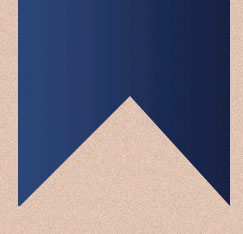
Oki, now we’ll give our page curl some shading. Set your Foreground color to #ffd286 and your Background one to #cc924a
Create a new layer on top of the Page Curl shape, right-click on it and choose Create Clipping Mask…..and then Ctrl(Cmd) + click on the Page Curl layer’s thumb in the layers palette to obtain its selection.

Then take the Gradient Tool, set it to Reflected Gradient, oreground to Background and drag like so, to create a slight 3D effct for that curl:

This is what you should have so far…or something close:

  • Step 11:

Buuut that curl effect is still a bit too..2D looking so we’ll take good care of it and make it look like a native page curl, what’cha say? ^__^

So! create a new layer above all your others and right-click on it—>Create Clipping Mask. Right now your Layers Palette should look like so:

Kayyy. Set your Foreground color to #795130 and take the Brush Tool (B), set it to a hard, round edged brush and brush the bottom of the curl like so:

Now set the layer to Linear Burn blending mode, to make it darrrkerrr…and lower Opacity to about 65%

Next we’ll smudge it a bit okay? We can’t let our page have such a choppy shadow ..hehehe ^__^
So take the Smudge Tool (R) …set it to a round, soft brush and brush in these directions to even the shadow out, like so (see the arrows) :

We can haz shadow, yey! =D

  • Step 12:

Just a few more tweaks to the flip to make it look “real” you know? :)
Kay, you know how real pages (the high quality ones) have a semi-glossy look&feel to them? Okay so we need to give our page curl an ambiental light reflection, and we’ll do it like this:

——create a new layer above all your others. Right-click on it, Create Clipping Mask. Next, set your Foreground color to #e5b16d and take the Brush Tool (B) and brush eeeever so slightly around the edge of the curl…like this:

Lower the layer’s opacity to around 65% and using the Smudge Tool (R) even it out a bit….to make it smoother…like so:

Kay, now one more thing: the shadows. Can’t have a real-looking flip without shadows now can we ^__^
Create a new layer and move it on top of the “Page 3″ layer. Then right-click on it—->Create Clipping Mask. Also set it to Multiply blending mode and lower its Opacity to about 80% .

Okay now obtain a selection of your Page Curl shape layer by Ctrl(Cmd) + clicking on its thumbnail in the Layers Palette and setting your Foreground color to #7e573a fill that selection using the Paint Bucket Tool (G). Deselect. Then we need to transform the shadow a bit so it is visible…like so:

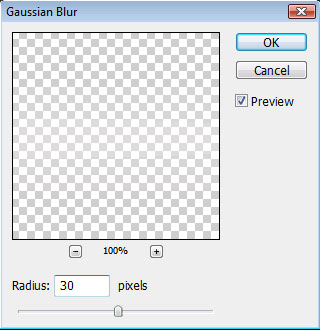
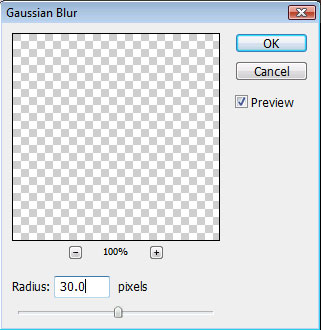
Mmkay, then go to Filter–>Blur–>Gaussian Blur and give it a blur of about 3.

Okay, now your piccy should look something like…so:

Okay, name this layer…”Shadow Page 3″. For ID-ing sake hehehe.

Make a new layer and move it on top of the “Page 2″ one. Right-click on this new layer and..well of course Create Clipping Mask! ^__^
Set it to Multiply and lower Fill to 90%.
Take the same #7e573a color for the Foreground that we use just before and the saaame Brush Tool (B) and brush baby, brush! =D
…oh wait, I forgot to tell you where to brush..well pictures describe it best ^^
Here:

Press Ctrl(Cmd)+F to repeat the previous filter (you know, that Gaussian Blur we just used?) and right now your stuffie should be looking….well…somehting like this:

  • Step 13:

Mmkay, now some m0ar fine tuning for the pages corners, okay?
Take the Dodge Tool (O), set it to a soft, round brush of…say some 70px in size and give it these settings: Range: Midtones, Exposure: 9%, Airbrush: NOT checked.

Click on the “Page 2″ layer to make it your active one and brush liightly the right-bottom corner, so it looks like so (see the Before&After difference) :

Kay, do exactly the same for the “Page 3″ layer, and all of its 3 corners.

  • Step 14:

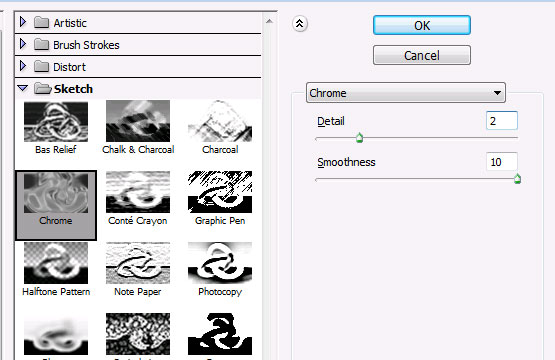
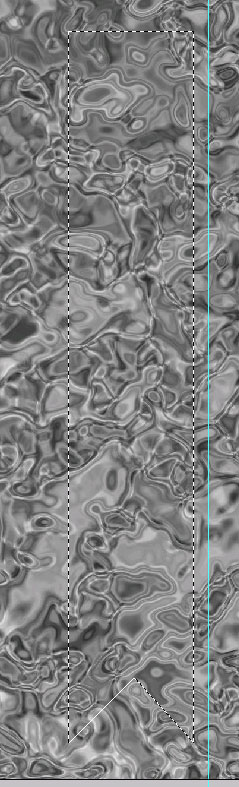
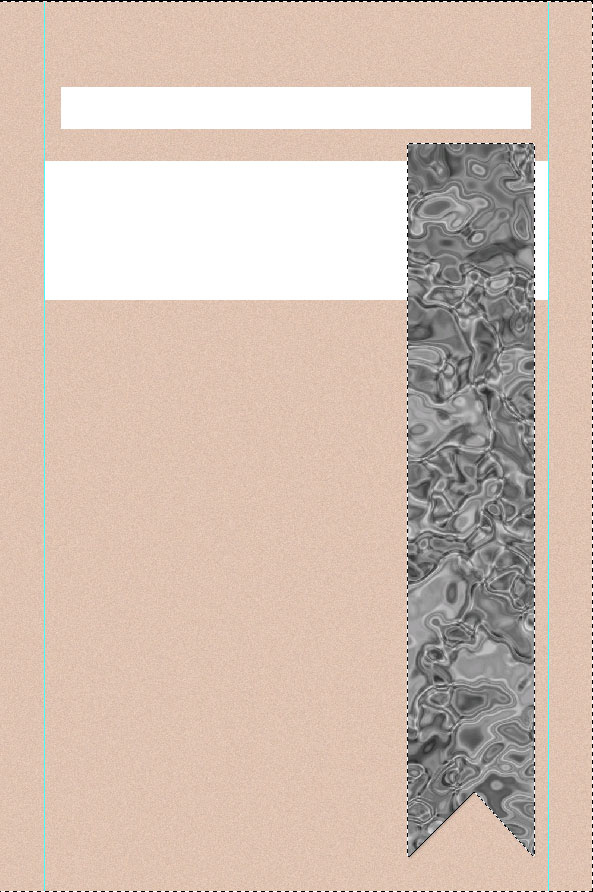
Now time to take care of the spiral spine ^^

Set your Foreground color to #1c0f07 and taking the Rounded Rectangle Tool (U), set its Radius to 4px and draw s rectangle like this:

Now give these blending Options to it:

Duplicate this layer so that you have a total of 11 spirals…11 copies of the same layer…then move them at equal intervals, like so:

  • Step 15:

Kay, good =D

Now it’s safe to merge these buddies all into one..single..layer…goood….

Now notice that they don’t really look well in black…so let’s give them an oange-ish tint okay?
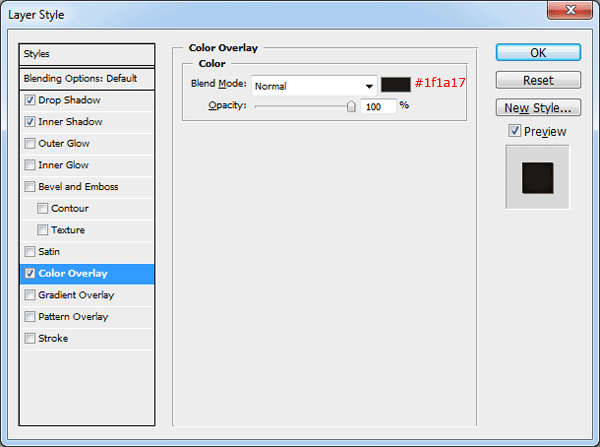
Ctrl(Cmd)+click on the layer thumbnail in the Layers Palette and obtain the spiral’s selection, then go to Image—>Adjustments–>Photo Filter. Choose Warming Filter 85, Density 65, Preserve Luminosity checked.

Lower its Opacity to about 75, then obtain the spiral’s selection again and choose this time Image–>Adjustments–>Hue/Saturation. Increase the Saturaion to +54, click OK to confirm then lower the layer’s Opacity to 70%.

Better now huh? ^^
Feel free now to press Ctrl(Cmd)+E to merge the two adjustment layers with the spiral binding one..and then re-name the spiral one to ‘Spiral Binding”. Original huh? xD;

Now it should look something like this:

  • Step 16:

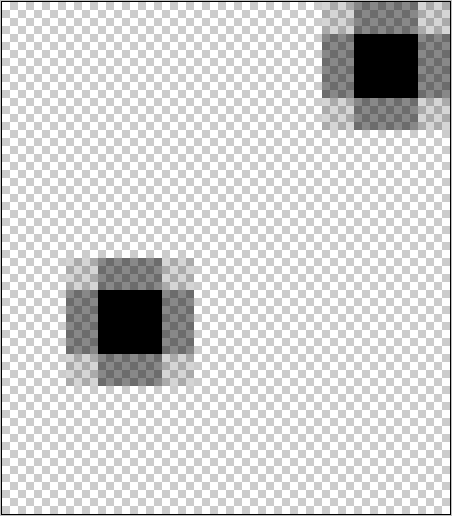
Now let’s make them holes ^_~
Okay, click on the “Page 3″ layer to make it your active one.
Then take the Eraser Tool and set it to a hard, round brush of 10px in size. Erase with it at the bottom of the spirals…like this (use the Ruler if you need a guide to keep them straight) :

Okay, now take the Sharpen Tool (R) and give it a round, soft brush setting, with a size of about 30px, Mode: Normal, Strength: 25%.
Sharpen slightly around the holes we just created, kk?

Once you are done with the sharpening, take the good ol’ Dodge Tool (O), give it a soft brush of a 20px size, Range: Highlights, Exposure: 9% and Airbrush NOT checked.
Dodge around the holes, to simulate the lighting that would be around bent paper..iunno?
Especially dodge around the right-hand side of each hole, like so:

Now, you might not see much of a difference but zoom out, and you’ll see it:

Your ads will be inserted here by

AdSense Now!.

Please go to the plugin admin page to paste your ad code.

  • Step 17:

Sweeeet! ^^

Now let’s give some titles/text/links/blabla…yada-yada…to our blog layout heh?

Let’s start with the title!
Well you can use ANY title you want, and for convenience’s sake I used err…”YourBlog.com”
…lulz -____-;;

Use any title you want, and any font you fancy now :)
I’d suggest you use a font that looks good in bold or faux bold, but whatever flies your plane is good hehehe ^__^

I use the Vila Morena font, which you can find here: http://www.dafont.com/vila-morena.font

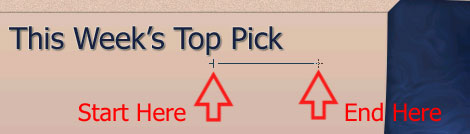
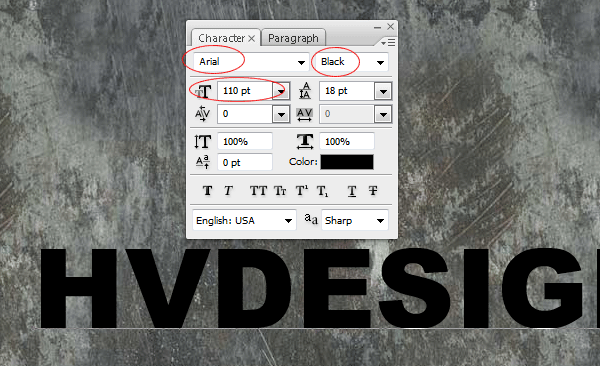
Okay so….set your Foreground color to #de9107 and taking the Type Tool (T) write the title of the blog. Like so:

Mmkay, for prettiness’s sake, let’s double-color our title hehe ^_~
Take the Type Tool and select only the first part of the name…for example “your” …or if you named your blog “HV-DESIGNS’s Blog” hightlight only HV-DESIGNS…etc. You get the point riiiteee? >__o

Hightlight that first half, like so:

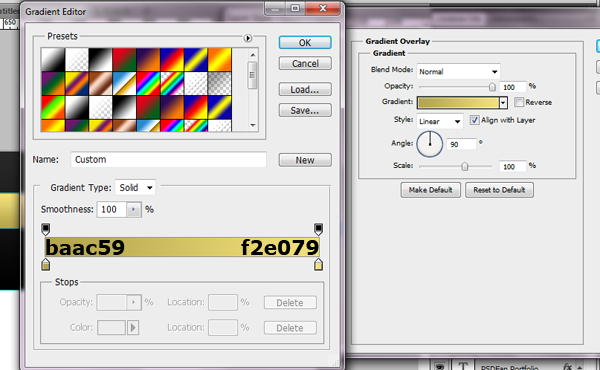
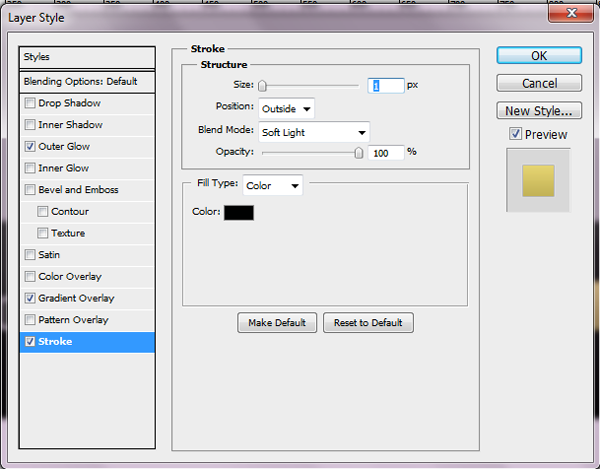
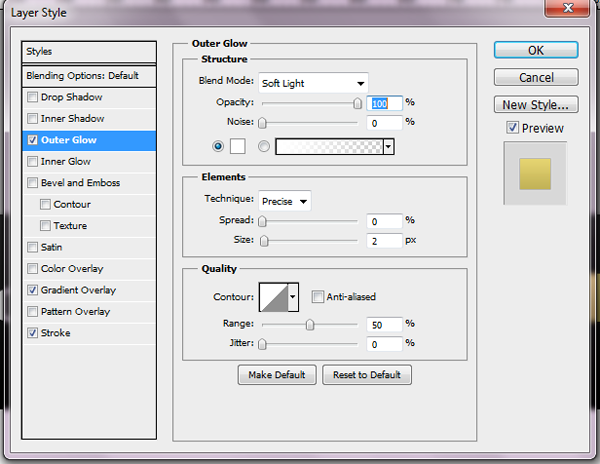
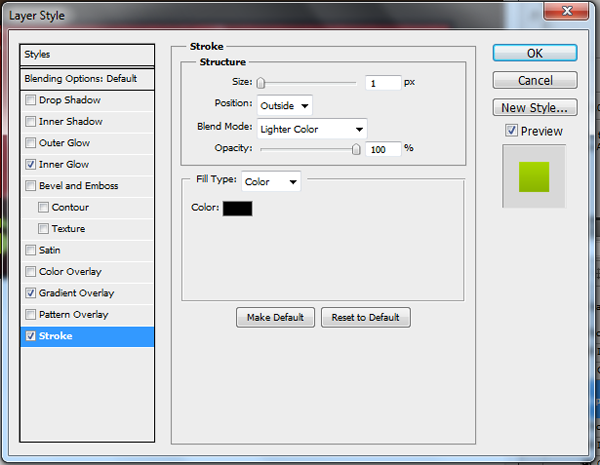
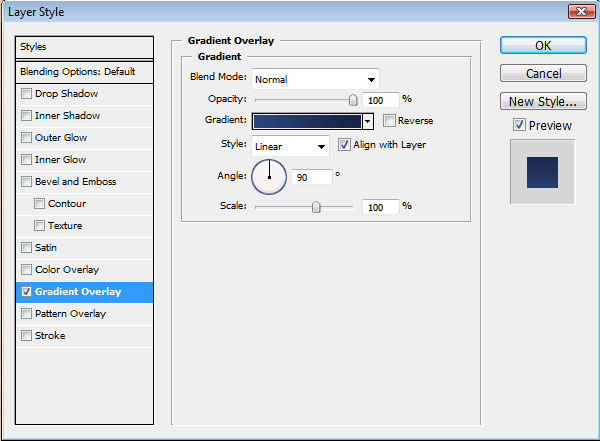
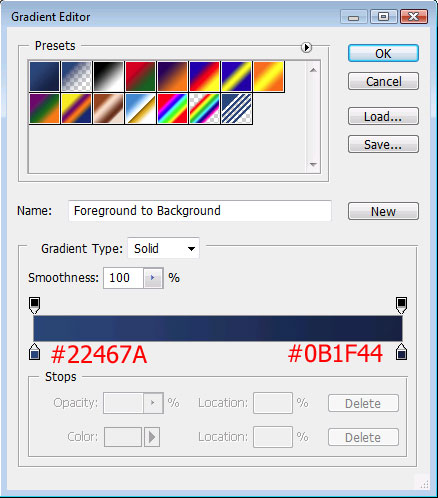
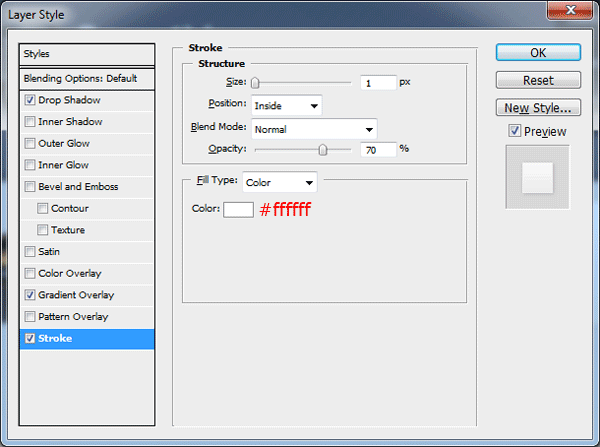
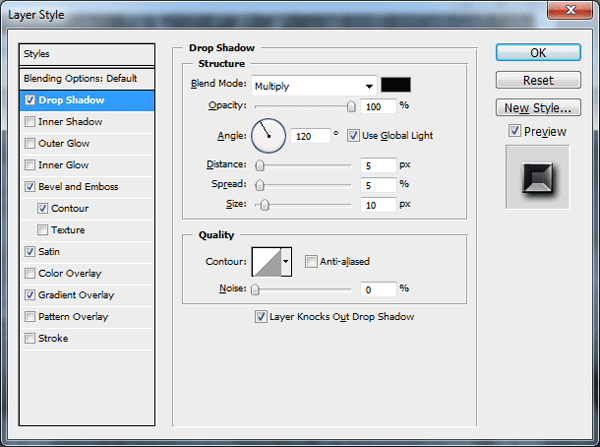
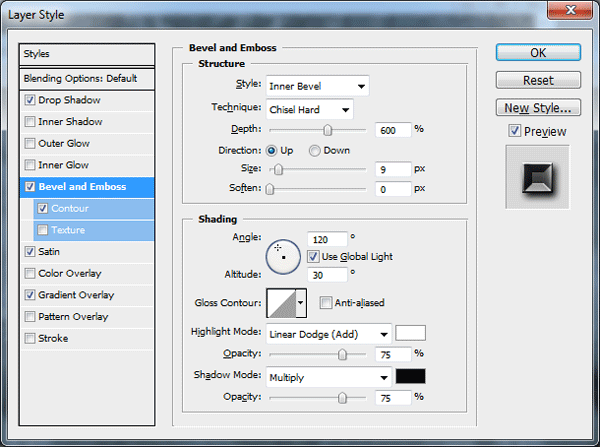
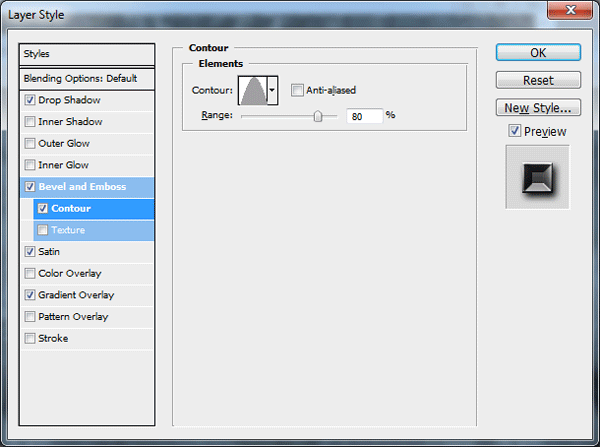
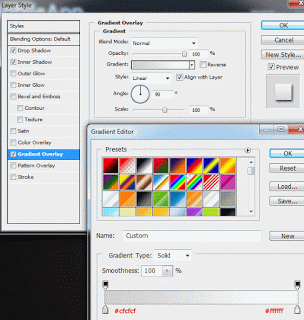
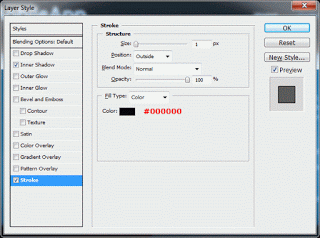
Kay, set the selected bit’s color to #fbf6ee and then give it these layer styles:

  • Step 18:

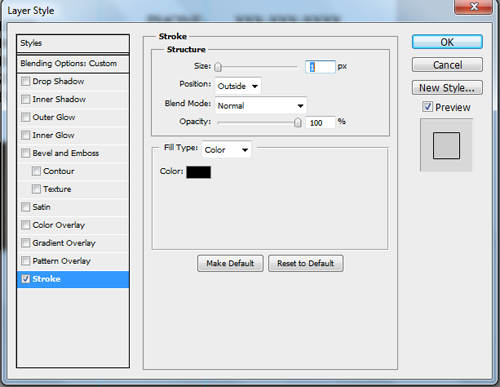
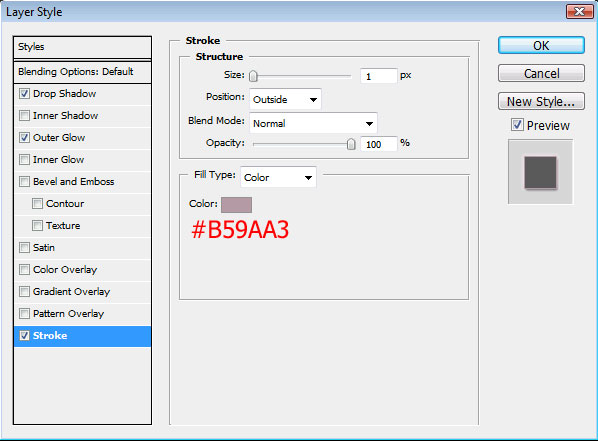
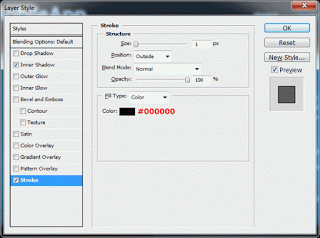
We’ll now give our title a nice stroke ^^
But we’ll give it manually, because it looks better huh?

So, set your Foreground color to #e9bb68 and then Ctrl(Cmd)+click on the text layer’s thumbnail in the layers palette to obtain its selection..yea…..and then create a new layer just above the text one. Ready, set,….stroke!
I mean, go to Edit–>Stroke–>1px, Center.

Then take the Rectangular Marquee Tool (M) and select&delete the bit of stroke that encompasses the whiter part of the title.
Then set the layer to Linear Dodge mode, lower its Opacity to 60% and its Fill to 40% .

Okii..now let’s take a step back and admiiire our work-in-progress masterpieceeee… =D

  • Step 19:

Sweeetness <3

Now let’s add a subtitle.
Take the #fbf6ee color and the Type Tool…and set the size of the Vila Morena font (well the next sizes might differ if you chose a different font)…set it to 8px.
Type the subtitle…….careful, that Vila Morena doesn’t have special characters like & and stuff, so if you need those just replace them with the Verdana font, size 10px should be a good fit :)

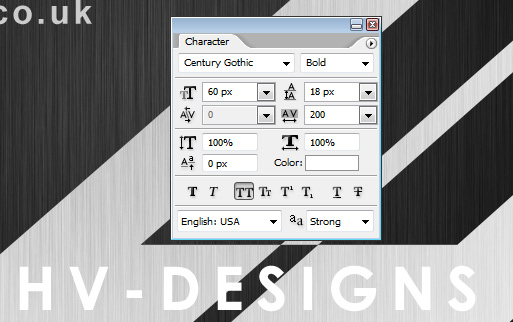
Go to the Type Tool, then to the Toggle the Character and Paragraph Palettes button, here:

…and set the character spacing to 200. This will give a modern and aired feel to the text :)

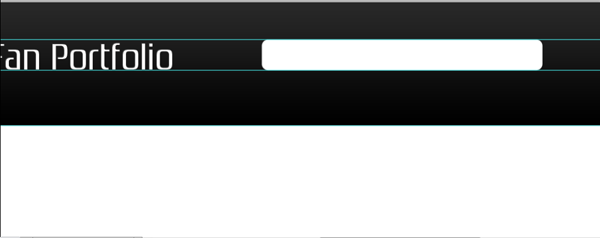
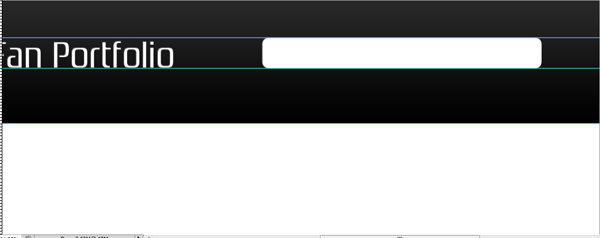
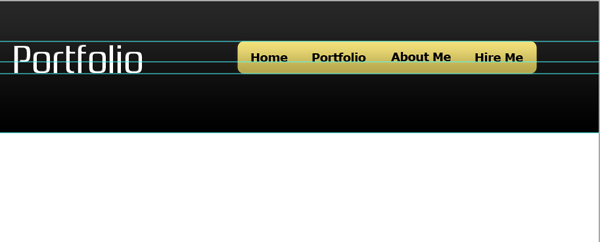
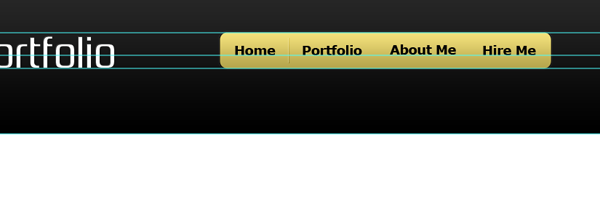
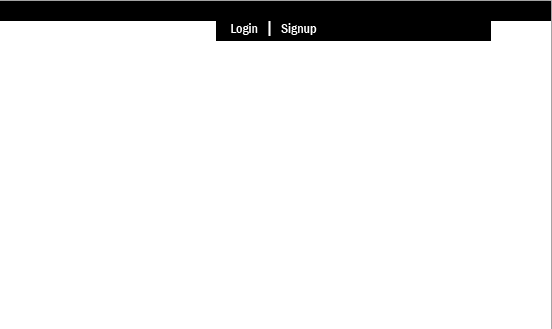
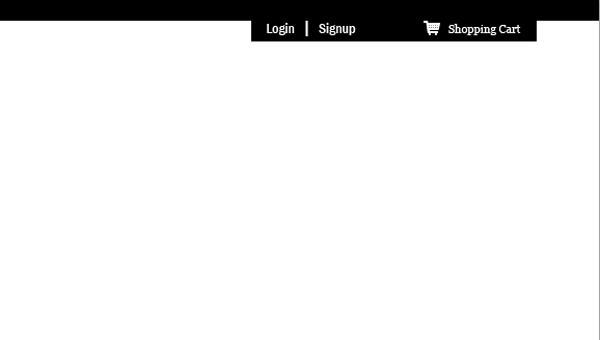
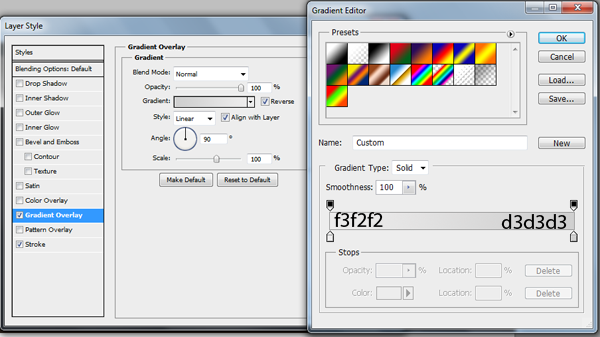
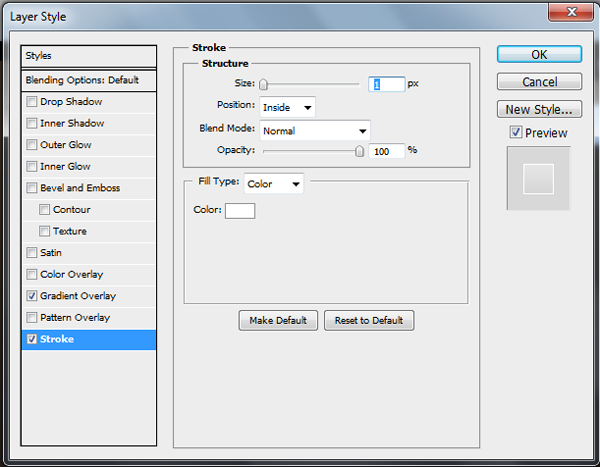
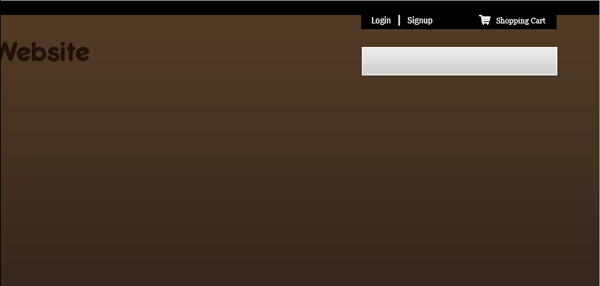
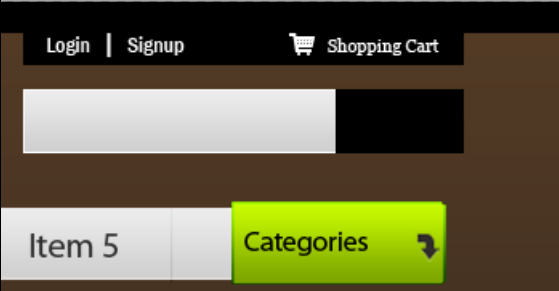
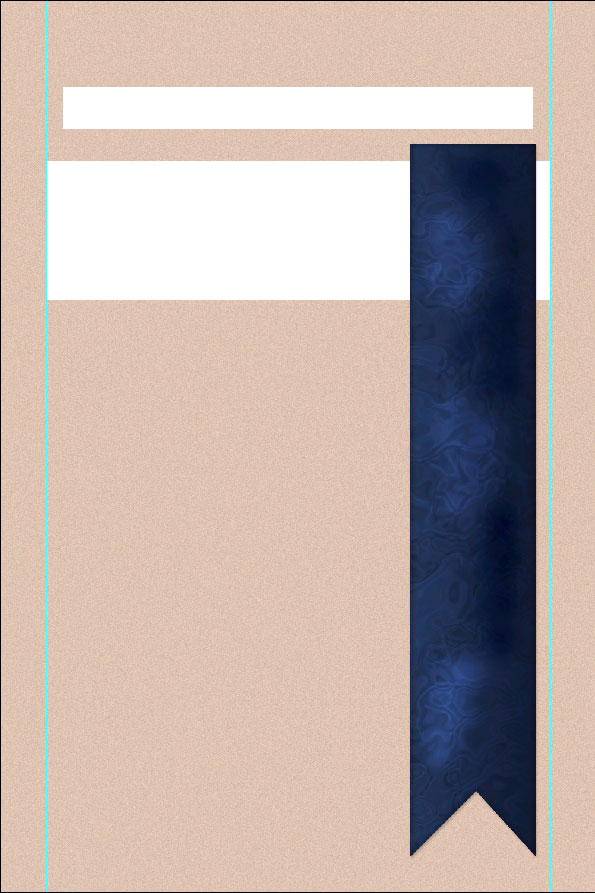
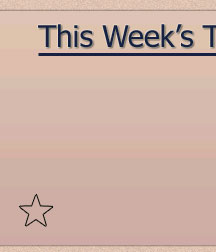
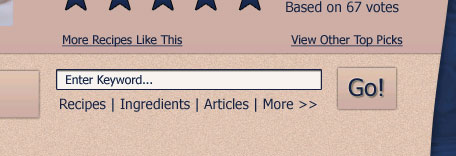
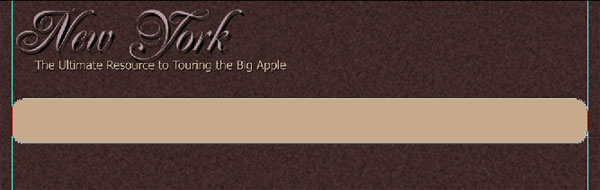
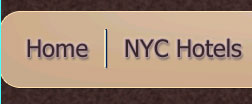
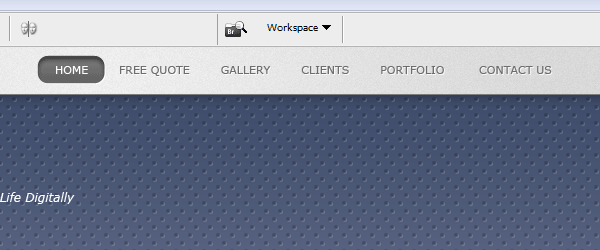
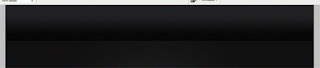
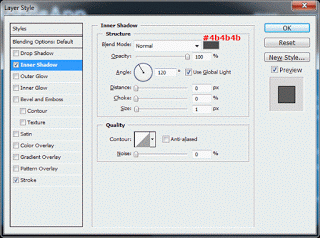
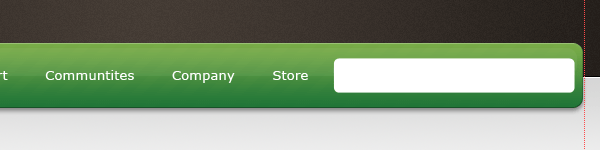
Oki, m0ar stuff to do…know that top orange bar we worked on in the beginning? Now it’s time to put it to good use =D

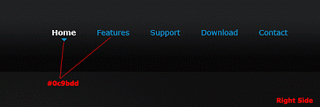
Take the Type Tool, Foreground color set to #fbf6ee of course, and on a new layer above all the others type…uhh..let’s say…”Login”..”Register”….mmm..what else…”Next Blog”….or whatever you think of/have need of.

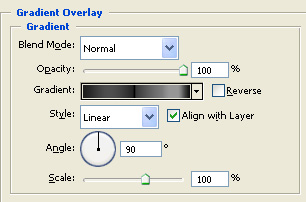
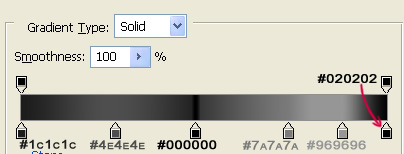
Now give the layer(s) these Blending Option:

Now it should look…

…………Like so:

  • Step 20:

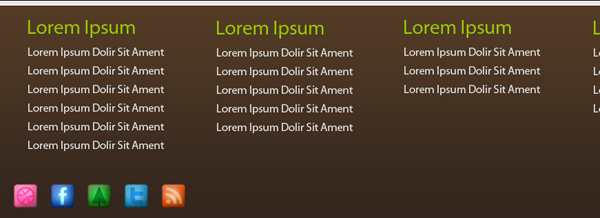
Now let’s add some buttons :)
Aaand in the faithful style of notepads, ESPECIALLY student/artists ones, we have looots of bookmarks hehehe

Create a new layer and move it between the “Page 2″ and the “Page 3″ layers (make sure this new layer you just created is not transformed into a clipping mask to either the Page 2 or the Page 3) and then take the Rectangle Tool (U) and set it to “Shape Layers”.

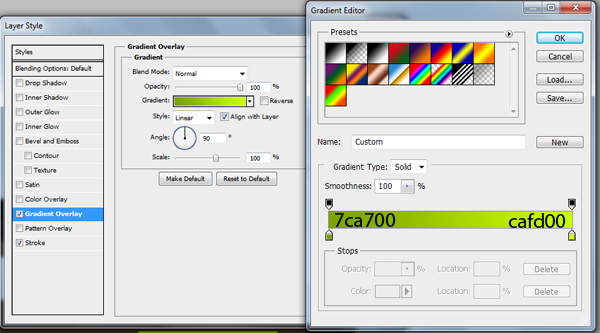
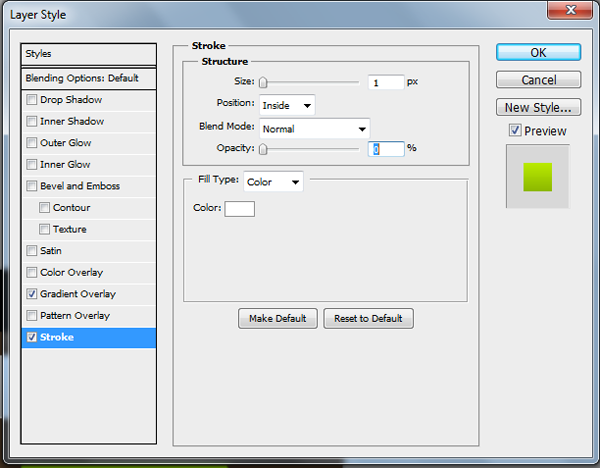
Set your Foreground color to #8cb02a and draw a rectangle…like so:

Okay, click Ctrl(Cmd)+T to transform it, like so:

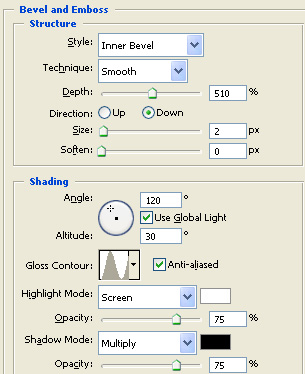
Next, give it these layer styles:

Now it should look like this:

  • Step 21:

Soo..let’s make a few more bookmarks, kay?
So, name this shape layer bookmark we just worked on to “Bookmark Green”.

Take the Rectangle Tool (U) and set your Foreground color to #e09508 and create a new layer on top of the “Bookmark” one.
Draw a new shape layer rectangle..just like before…only this time when you transform it, rotate counter-clickwise like so:

Ooouh-kaaay…now give it these layer settings:

Name this layer “Bookmark Orange”.

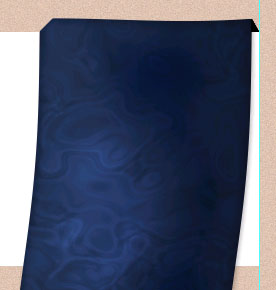
One more bookmark to make, let’s do it blue to add a landmark of color okay? :)

Set your Foreground color to #2890a6 and take the Rectangle Tool again…etc etc etc….on a layer above your two previous Bookmarks….make the third…rotate…like so:

  • Step 22:

Pffft…..a bit more and we’ll be done with the buttons..err..I mean Bookmarks ^^

Now name this last layer we created “Bookmark Blue” and give it these layer styles:


Now let’s do a neat trick, for eyecandy sake ^^

Lower the Opacity of all 3 Bookmark layers to 93%, so that they are a tiiiny biiiit transparent.

Liike…soooo…:

  • Step 23:

Oookay, more neat little tricks. PAGE FLIPS WAR TIMEEEE! *indian battlecry*

Uh, I mean..let’s make our bookmarks flip a bit hey? ^^
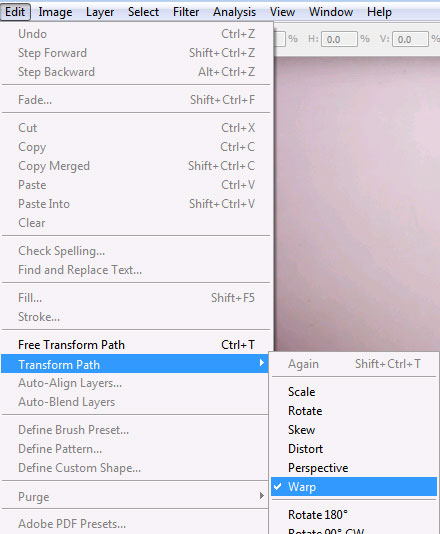
Mmkay, choose your “Bookmark Blue” layer as your active one, and go to Edit–>Transform–>Warp.
Drag the bottom-right corner like so:

Now what we absolutely must do now is get rid of the layer styles our blue mark has…but while keeping the err…well..”after-effects” of them.
Well do this quite simply by creating  anew layer on top of the “Bookmark Blue” one, then Ctrl(Cmd)+clicking on the blue mark layer in the layers palette so we have both of them in a dark blue color, like so:

..ouh-kaaaay..now press Ctrl(Cmd) + E to merge them buggers ^___^

This will help get rid of the layer styles while preserving their “look” effects :)

Which is precisely what we need, because we need now to highlight the tiny flip we just gave to the bottom-right corner. Since the corner is flipped up, light hits it more, right? Well, this is why we’ll dodge it now :)

Take the Dodge Tool (O), set it to a soft, round brush, size about 40px, Range: Highlights, Exposure: 9%, Airbrush not checked.

Brush a bit…lightly…the bottom-right corner, so you get something like so:

Okay now let’s follow the exact same process for the green bookmark thingy, only this time the top-right corner.
So you get a result like this:

Now let’s set our Foreground color to #fbf6ed and let’s give a name to our buttons..err..bookmarks…..let’s say…”About”…”Contact”…and…”Sketches”?
Or whatever floats your boat ^^

Create a 3 new layer above your bookmarks ones and taking the Type Tool type the names of the pages you need. Transform&Rotate them to align with the marks…like so:

Well here I used the Jellyka – Estrya’s Handwriting font which you can find here: http://www.dafont.com/jellyka-estrya-s-handwriting.font

These are the settings I gave my buttons (taken from the Type Tool–>Toggle Character and Paragraph Palettes window) :

Now lower each of theese 3 layer’s opacity to about 85% to blend them in with the note color….aaand we’re done with the notes =D

  • Step 24:

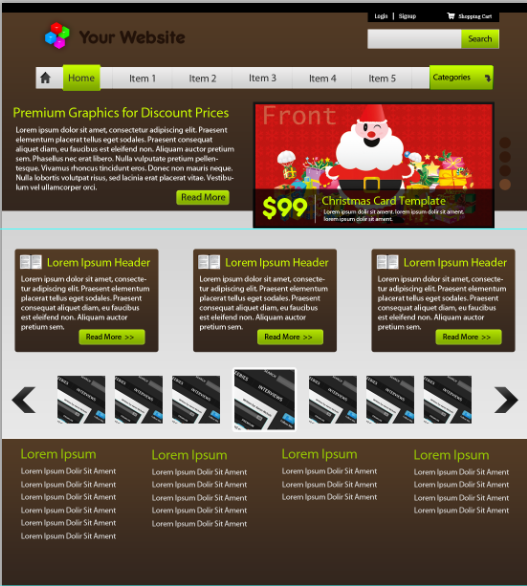
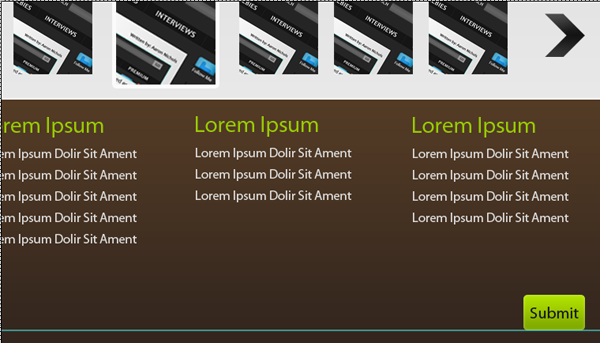
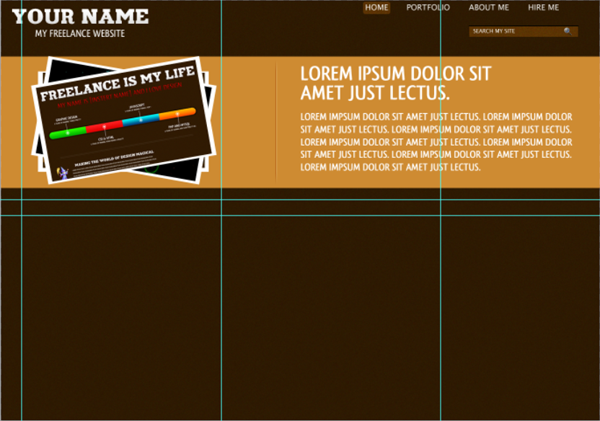
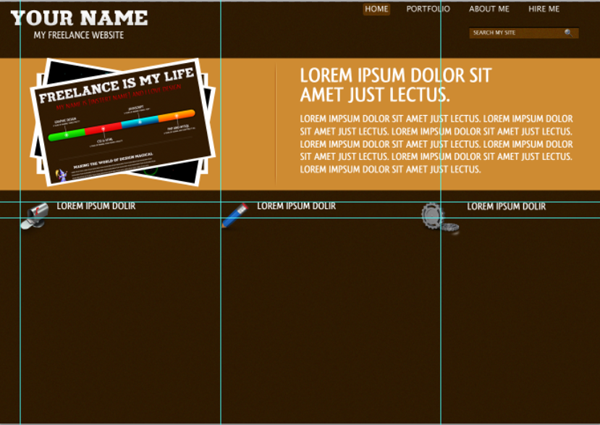
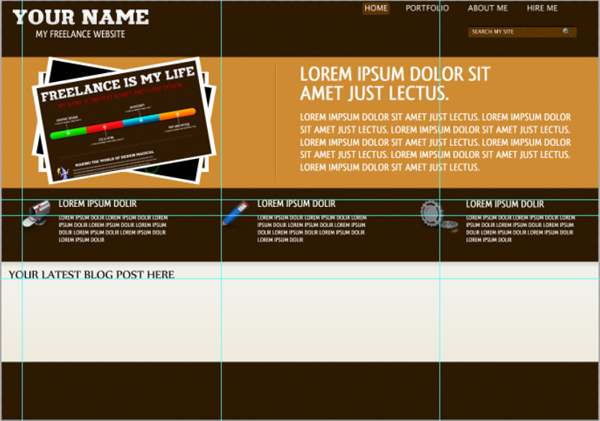
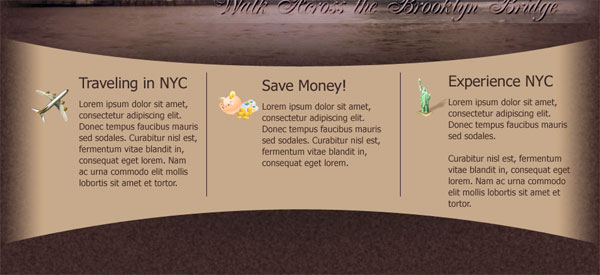
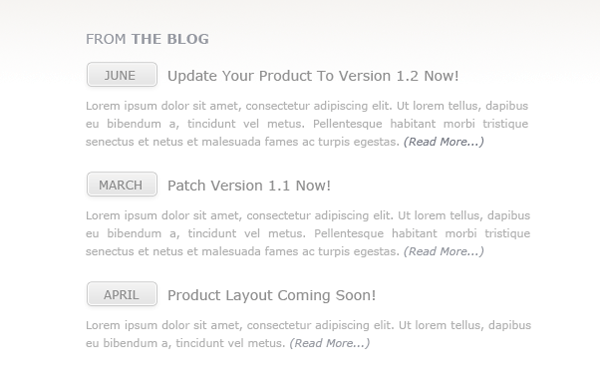
Time to think of the layout for our blog….that is the way our posts will be displayed.

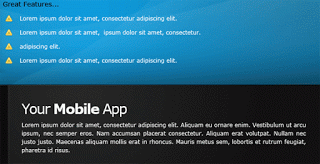
Let’s do a main top post (most recent one) and smaller ones (older posts) below…….sounds practical enough heh?

Okay, set your Foreground color to #61331b and choose…say..Vrinda as your font….because remember! the text you will write in your blog posts can only be shown by a web-safe font…Arial..Verdana..Times…Vrinda…so on. If we’d use Vila Morena, a person who doesn’t have Vila Morena font installed on their computer would not be able to read anyyyything of what we wrote….we don’t want that do we? …unless we pretend we beeeee spiezzz and zending zecret mezzagez thehehehe >u>…<u<….

Buuut we are not spies so we’ll stick to the letter..literally ^___^

Type the title of your blog in lowercase, and give it these settings:

Set then your Foreground color to #67861e and write the sub-title…the short description of the post..and give it these settings:

So far your thingy should looks like this:

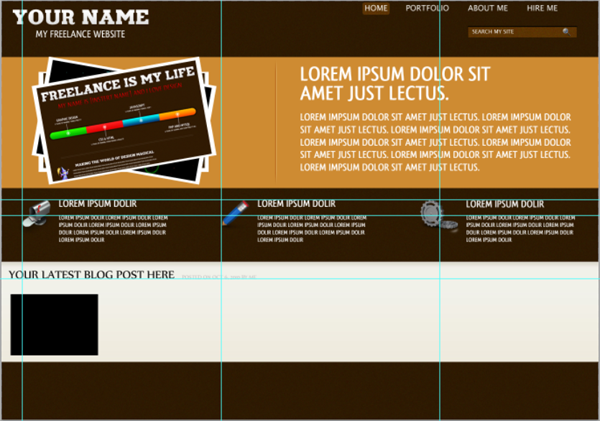
Now each blog should have a piccy next to it yea? So let’s set the Foreground color to #abc034, then take that Rectangle Tool, same settings as before and give it these settings:

  • Step 25:

Okaaaay, alllmost there. Set your Foregtound color to #61331b and well..this will be the font and text style for your main post….give it these settings:

At the end of the text, write a “Read more”….and select it with the Type Tool and give it a particular blue color…since it is a link, this color will set it apart from the rest of the text. Give it a #31a0b6 color ^__^

Dundundun……one more layer…and write something like you see at the end of posts usually…”Posted by…etc….XYZ comments…you know it” ^^

Again, to set this new text layer apart from the main writing, give it a #62871d color, and highlight the links parts with the #31a0b6  color :)

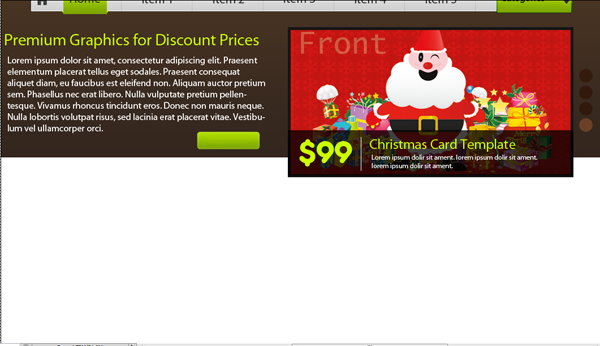
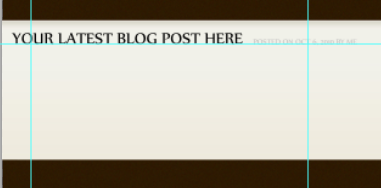
In the end, you should get something sooomewhat similar to this:

Now, just follow the same steps as in this previous step an create the “older posts” ^___^
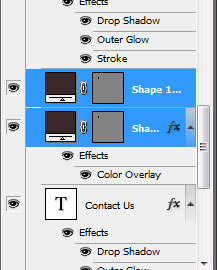
After you finish writing them, merge them all in one single layer (using the “get rid of layer styles” method we undertook earlier might be of help) and name this layer “Older Posts”
Move it afterwards so that it is a clipping mask to the “Page 3″ layer, and the “Shadow Page 3″ is above it, okay? In other words, you have: Page 3 then right above it this Older Posts layer (which is now a clipping mask to Page 3) and above the Older Posts there is the Shadow Page 3 layer (also a clipping mask to Page 3). Got it? ^__~

Here’s my result:

  • Step 26:

Let’s take care of the inset now :)
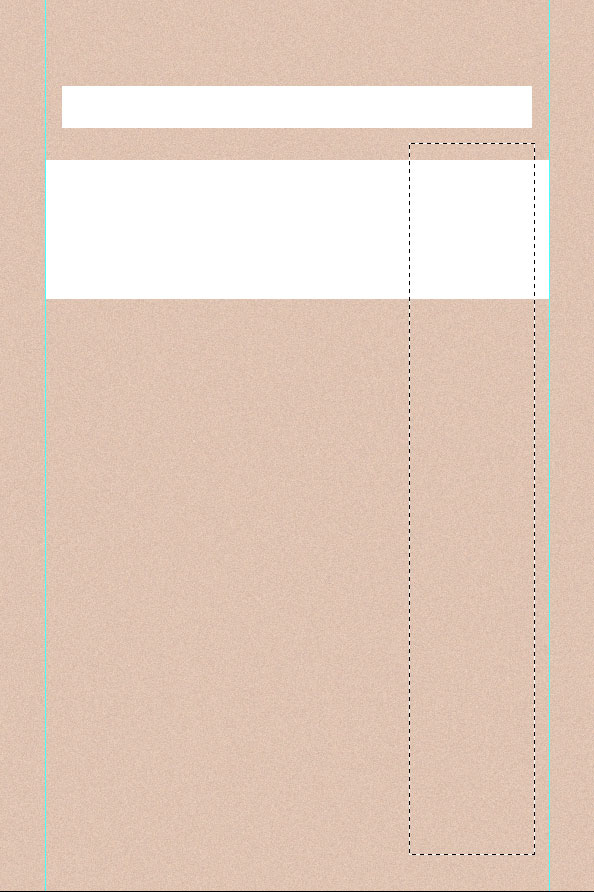
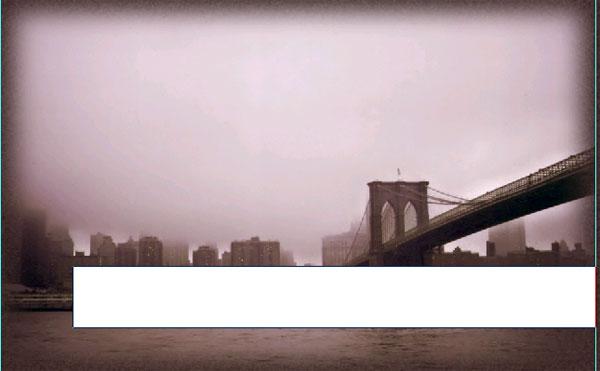
Remember that iset we made in one of the first steps? Good!
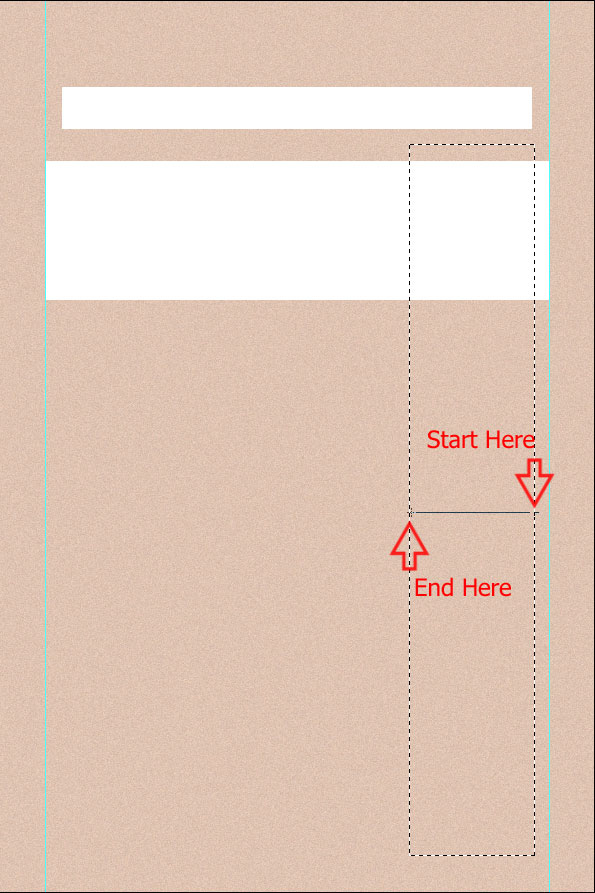
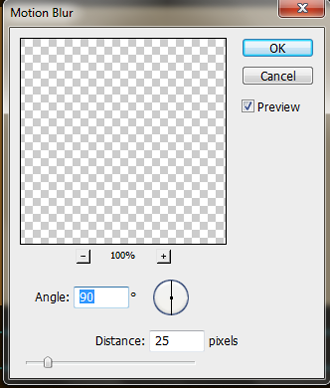
Go and find the layer in the Layer Palette….and duplicate it.
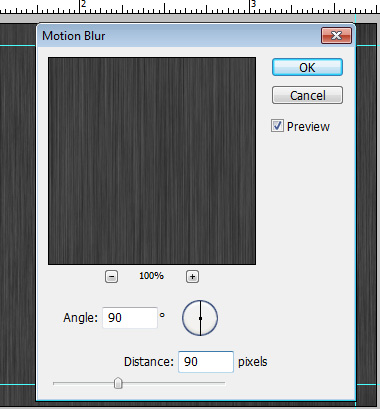
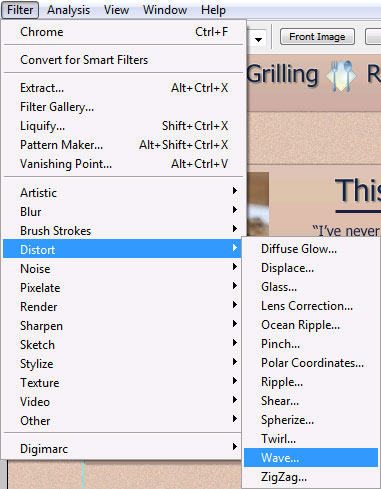
Then move it on top of your other layers. Zoom in 300-400% and press Ctrl*Cmd)+T to transform it, and resize it horizontally to fit inside the page….then press Enter to confirm the transformation, then go to Filter–>Blur–>Motion Blur. Give an Angle: 0 and Distance: 29px

If needed, transform it again after that to make it fit inside the “Page 3″ ^___^

Set it to Overlay mode….and lower its Fill to about 90%.

This is what you should be getting now:

  • Step 27:

Mmmkay, last-minute fine tuning.
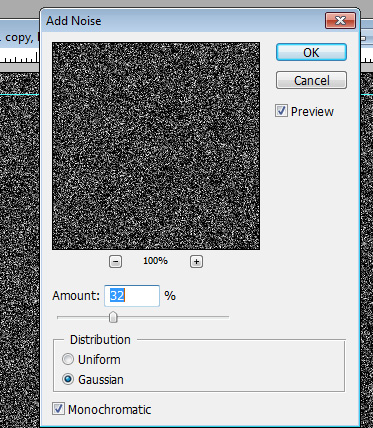
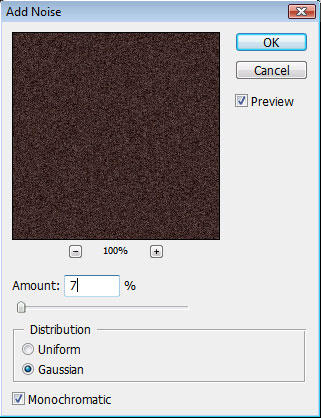
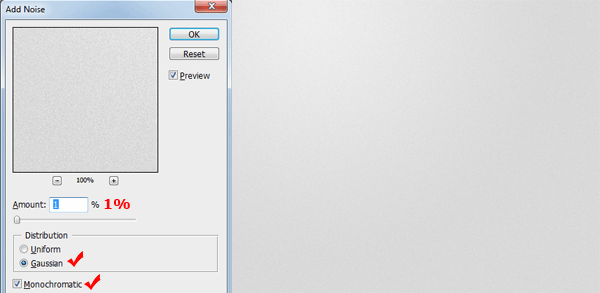
Go to your Background layer, and duplicate it.
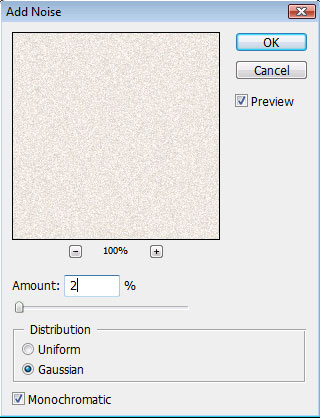
Give the copy a Filter–>Noise–>Add Noise and give it these settings:

Then go to Filter–>Sharpen–>Sharpen. After this press Ctrl(Cmd)+F a couple of times more to repeat the Sharpen filter until you get a result that looks best to you….then you can press Ctrl(Cmd)+E to merge the to background layers into one ^____^

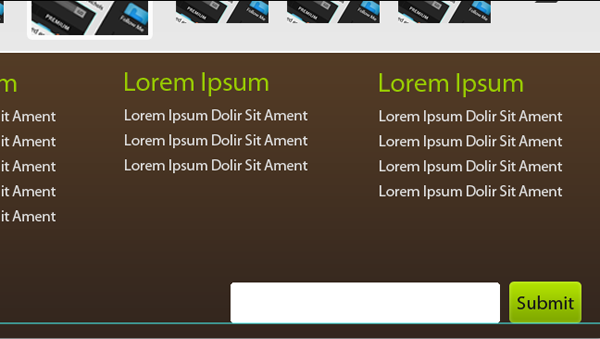
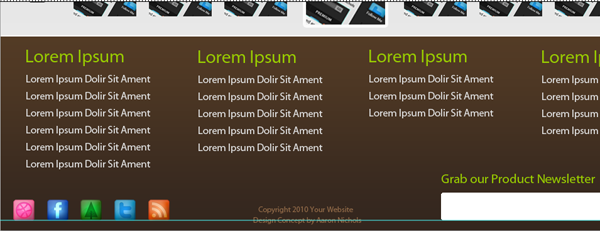
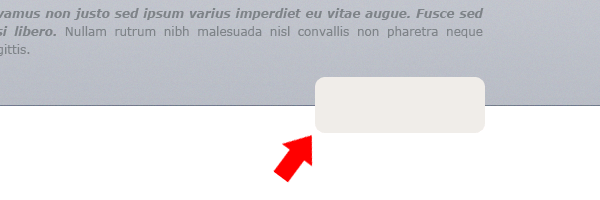
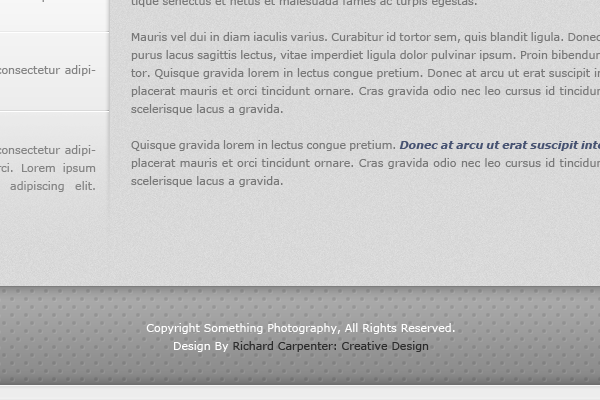
Let’s also add a copyright thingy at the bottom, like all proper blogs have heh? >u>…<u<…..

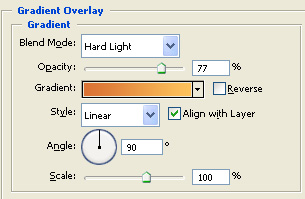
Set your Foreground color to #d97f00 and take the same Type Tool as before, and write something like…”Copyright *yournamehere* 2011″…or whatever makes sense to you, hehehe :)

Give your text these settings:

Next, give it these two Blending Options:


Lower its Fill to about 84%…………………

…………………………..

………………………………………..

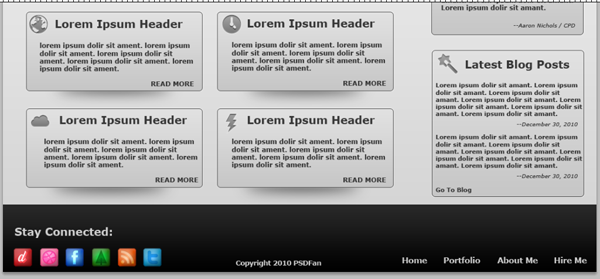
OMG, we’re done! o______o
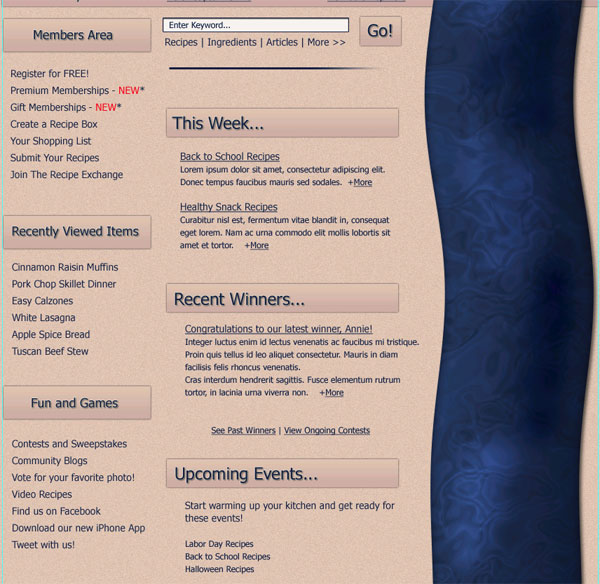
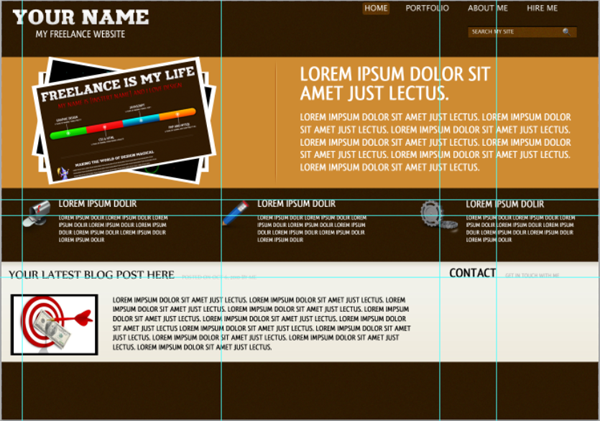
Final result:

Wohaaaaaaaaaa, partyyyyy!! ^____^
Okay, now it’s time for you to yell out loud “YEPEEEE!” and for me to go eat some..errr…rest my hands *fingers hurt from all this typing hahaha*

As usual, I really hope you enjoyed it and if you hit any trouble OR/AND want to show me your final result (which is just awesome, I love seeing what people get from my tutorials ^__^) feel free to contact me via my DevArt account, http://seiorai.deviantart.com/ or my Facebook page: http://www.facebook.com/profile.php?id=100001907117980

See ya ^__^

Your ads will be inserted here by

AdSense Now!.

Please go to the plugin admin page to paste your ad code.

Minimalist Layout Tutorial

Your ads will be inserted here by

AdSense Now!.

Please go to the plugin admin page to paste your ad code.

I am proud to be releasing this tutorial for the readers today! I will be walking you through the simple process of creating a minimalistic profile design in Photoshop.

Just to be clear I am using Photoshop CS5 so a few of the steps may not work exactly the same. For instance copying layer styles may not work in your version so you will have to manually add the layer styles again. This tutorial will be easily followed in any version of Photoshop though, even with a few minor changes.

As always here is what we will be creating:

Resources

Zrnic Font: http://www.dafont.com/zrnic.font

Android Icons: http://www.androidicons.com/#free-icons

Getting Started

Start out by creating a new document that is 1100×1150. Now we are going to be setting up our guides for our four main areas. Set up the guides as follows:

Now, we will set up our top area, and focus on the space before our first guide for a little while. Make a selection with your rectangular marquee tool that goes from the top of your document to your first guide.

Create a new layer and fill it with black. Once you have filled it add the following layer styles:

Alright, grab the font we downloaded earlier. Change your foreground color to white and type out whatever text you want to. I have my text set at 60pt, with the default settings for spacing. Now apply the following simple inner shadow:

Top Menu

Alright, that’s it for our simple logo. Now we will be starting on our menu item.

We will be setting up another quick guide for our naviagation. Use this image for your guides:

Grab your rounded rectangle tool and set its radius to 15px, with white selected as your foreground color. Drag out a rectangle that fits between our guides and that is 455px long.

Alright, now we will give our menu some styling. Apply the following layer styles:

Alright, now we just need to add the content to our navigation. Grab your text tool again and choose Verdana Bold for your font face, black for your color, and 18px for your size. Type out whatever you want for the navigation. Space it 20px from the left of your rectangle (not including the stroke) and 18px from the top of your rectangle (again not including the stroke).

Now type out the rest of your navigation using the same font styles. Space them all 37px from each other, which will ensure that the final navigation is 20px from the right end of your rectangle.

NOTE: This is with a four button navigation menu. If you want to add more buttons just make the spacing even, ensuring that both the left and right side of your rectangle have a 20px spacing.

Now we need to splash up our navigation a little bit with a spacer. Zoom in to our document 985% onto your menu so we can set up our spacer. Grab your line tool, choose 1px for the weight, color white, and draw out a line that is 35px tall. Change your foreground color to black and repeat the process, drawing the line directly next to your white line. Change both blend modes to Soft Light.

You will want to center it vertically on your menu. You will also want to space it 17px from the left of your navigation (horizantal center).

Repeat the process for the remainder of your navigation.

Slider

Alright, now to set up the background for our slider. Make a selection from the first guide to the second, like this:

Now, create a new layer on top of our top background layer. Go ahead and fill it with black as we are adding layer styles.

Alright, now you will want to create another new layer at the top of our document. Grab your rectangle marquee tool and create a fixed size rectangle of 965(w)x315(h). Go ahead and fill it with a simple grey for now to make it stand out and add the following spacing.

Alright, now open up an image from your portfolio that you want to use on your home page and resize it down. You can make it the same width as your box or keep it wider, depending on what you want to display.

Bring it over to our document and place it over our grey box. Click the thumbnail of our greybox while holding the CTRL key to make a selection. Right click, hit select inverse, and then hit your delete key to remove the extra.

Now, open up your layer styles and give your image a 1px black stroke.

Alright, now to create our slider navigation. Grab your rounded rectangle tool. This time change your radius to 55px and drag out a rectangle that is 15px(w)x80px(h). Black is fine for the color as we will be adding a layer style in the next step.

Now space your slider nav 10px from the top and left of our slider, not including our stroke. Rasterize your shape layer.

Change your foreground color to white. Now grab your ellipse tool and draw out a 10px perfect circle (hold the SHIFT key down to do this). Place it 9px from the top of your rounded rectangle and center it horizantally with your rectangle.

Alright, draw three more circles, exactly the same, and space them 5px from each other.

Alright, now go back to your first circle and double click the white box to change the color. Change the color to #f0de79. Now apply this inner shadow style:

Your ads will be inserted here by

AdSense Now!.

Please go to the plugin admin page to paste your ad code.

Main Content Area

Alright, we are done with our slider. Now let’s move on to our main content area. If you have hidden your guides at any point go ahead and unhide them. Create a new layer above your slider background layer and make a selection from the bottom of your slider bg and other guide. Go ahead and fill it with white as we will add a layer style.

Now apply the following layer style to that layer.

Grab your text tool and choose whatever font you want for your header and intro text. I am using the font Verdana.

Alright, now its time to get started on our four content boxes.

Within that group grab your rounded rectangle tool again. Change the radius to 5px and the foreground to black. Draw out a rectangle that is 325px(w)x145px(h). Space it 45px from the left of our document and 45px from the bottom of our text.

Now apply the following layer styles to our box layer:

Now duplicate your layer and space them 25px from white stroke to white stroke.

This time duplicate both your layers and space them 25px from each other.

Now lets give our boxes a little depth. Grab your elliptical marquee tool. Keep your foreground set as black and create a new layer underneath your first box. Make a selection like below:

Fill the layer with black. Then go to Filter–Blur–Gaussian Blur and choose 12.5. Now, move your layer up just a little bit.

Duplicate your layer three times and space them correctly with the other four boxes.

Alright, now to add the content. Open up four icons of your choosing from our Android Icon Set we downloaded earlier. Place your four icons 5px from the left of your boxes and 5px from top. Just to be clear each icon should be on a different box.

Ok, now to add your content. We will be adding a Header, our main text, and then a read more button. Here is what I used for those:

Header: Font Size 20px, Font Verdana Bold, Color #363636

Main Text: Font Size 12px, Font Verdana Bold, Color #363636

Read More: Font Size 12px, Font Verdana Bold, Color #363636, all CAPS.

Depending on your amount of content give it just a nice spacing. This is what I have for my content:

Alright, our four content boxes are done. Now time to start on our two right boxes. Our first right box will be a customer commendation box, and the second will be latest blog post.

Grab your rounded rectangle tool again and keep the radius at 5px. Draw out a rectangle that is 280px(w)x185px(h). You can leave it whatever color you want as we will be adding a layer style. Space it 25px from the right of your document and 25px from the bottom of your yellow slider bg.

Now go ahead and copy you layer styles from our four content boxes. To do this go to one of your boxes and right click. Choose copy layer styles and then right click your black box layer and go to paste layer styles.

Alright, now open up your icon set again and choose an icon that works for Customer Commendations (I am using the ribbon). You will want to keep using the 48px size. Place it on your box and space it 10px from the left and 10px from the top.

Now, add your content. We will be using the same font style and size for our headers and content as our other four boxes. The only part that changes is the name of the customer. For this I used Verdana, Italic, and a smaller size. Choose whichever size you thinks looks best.

Alright, now grab your rounded rectangle tool again, keep the same radius, and draw out a rectangle that is 280px(w) x 270px(h). Space it 30px from the bottom of our last box.

Alright, repeat the process of adding our layer styles, icons, and content as we have done in the other boxes. You may need to choose a different text size depending on how many blog posts you want to display.

The Footer

Alright, now to the last part of our site: the footer. Make a selection from the bottom of our document to the last guide.

Create a new layer above your main content layer, and go ahead and fill it with black. Now, go to your logo and navigation background and copy the layer styles. Paste it on your footer.

For your footer go ahead and grab your favorite icon set and place it on the left side of the footer. I am using this glowing icon set for my footer.

Now, all that is left is to add the copyright, to the middle, and the Bottom Menu. Line everything up on a guide and you are done.

Now, that footer is pretty basic and you can do a lot more with it, but I wanted to keep the design look clean and simple. Plus, I absolutely hate those extra large footers, but that is just me.

Conclusion

As you can see using simple layer styles and shapes you can create a very nice looking portfolio website. Again I hope you have enjoyed my tutorial and I am looking forward to regularly writing new tutorials for you, the readers. You can also find more tutorials and freebies on my blog, or follow me on Twitter.

Your ads will be inserted here by

AdSense Now!.

Please go to the plugin admin page to paste your ad code.

Stylish Print-Ready Business Card Design

Your ads will be inserted here by

AdSense Now!.

Please go to the plugin admin page to paste your ad code.

One of the most important aspects of business networking lies within your business card! With as many businesses that are out there today, it’s important to stand out amongst the crowd! Plain white or multi-colored cards are a thing of the past and the new dark business card designs are sure to set you apart from the competition!

In this tutorial, I am going to design up a print ready dark themed business card. Let we get in to the tutorial.

What we are going to craft

Step1

Before creating the new document, you should determine the size for your business card based on your location. According to ISO 7810 ID-1, the standard size for business card is 3.37 x 2.125 inches but in United States 3.5 x 2 inches (91mm x 55mm) is followed as standard. I will take the US standard size to make my business card design.

Step2

As we are going to print the card, we need to add some bleed area to our design. A bleed is nothing but an extra space given around the edges where our design should run on it. By doing this, we can avoid any white spaces on the edges of the printed output. I am going to use 0.125in as bleed area to the edges of our design 0.125(left) +3.5(center) + 0.125(right) and 0.125(top) + 2(middle) + 0.125(bottom).

So it is clear that we need to create a new document of size 3.75 x 2.25 inches with the settings below.

Width: 3.75in

Height: 2.25in

Resolution: 300pixels/inch

Color Mode: CMYK/8bit

Background: White

Step3

For the next step, you should add some guides to find out the bleed area.

Click on view -> New Guide and create a vertical position of 0.125in.

And by repeating the above, create 3 more guides at positions 3.625in vertical, 0.125in horizontal and 2.125in horizontal.

So now we are ready to start design our business card.

Step4

Draw a rectangle around the whole area of the document and fill it with color: #343434.

Then apply a gradient overlay over to it with the following styles

Gradient:
#ffffff and #000000

Step5

Now, duplicate the rectangle layer and name it as “Texture” or “Noise” or whatever you feel a name right for the next step. Then right click the duplicated layer and select “Clear Layer Style”. Then rasterize the same by right click it and select “Rasterize Layer”.

Step6

By selecting the duplicated layer, Go to Filter -> Noise -> Add Noise and set the values as below.

Step7

Now again, Go to Filter -> Blur -> Motion Blur and set the values as below.

Step8

Then you need to change the blending mode to “Overlay” and reduce the opacity to 52% for the duplicated layer. So you will have the result like below.

Step9

Ok, now we need to do the triangles part. I have used four shapes in it and actually the first three shapes are not triangles but the fourth one is. Before doing this part we need to switch to RGB mode. The reason for mode switching is that with CMYK we cannot get bright color results when blending. Because I am going to use blend “Difference” to get the alternate color effects between the triangles which will don’t work with CMYK color mode. Off course, we will switch back the design to CMYK before send it to print.

So let we switch the color mode to RGB by Image -> Mode -> RGB Color

Step10

After that create a new Group and then add a new layer inside it. Using the Pen tool, draw a shape similar to below one.

Once the shape is done, fill it with white color and change the blending mode to “Difference”.

Step11

Now, draw another bar like shown below over the previous one. Note that the right top corner of the second bar should touch the meeting point of the top side and right side guides.

Change the blending mode of the second bar’s layer to “Difference” and so you will get the result like this

Step12

Now we need to add another guide at the bottom of the design in order to place the third bar. So add a new guide of 2in horizontal orientation.

Once the guide is added, duplicate the second bar and move it downwards so the bottom face of the bar should reach the newly added guide. Once again move the bar towards right and so the right face of the bar should go to the right side end of the document.

Ensure that the layer’s blending mode is in “Difference” and thus you have the output like this

Your ads will be inserted here by

AdSense Now!.

Please go to the plugin admin page to paste your ad code.

Step13

And the final shape that we need to add is the triangle. This shape should be larger than the other 3 and place it in the location just like shown below.

Make the blending mode to “Difference” for this layer too. Also add a drop shadow effect to the triangle shape with the settings below.

Alright, now we have the basic design ready for our business card and the next part we need to do is fill it with texts.

Step14

Here, I need to tell you some important guidelines regarding the placement of texts. It is always a better idea to keep the texts within a safe zone because cutting may not be ever perfect. So keeping all your texts within 0.125in distance from the bleed is a good idea and by doing so we can ensure that no texts would trim off.

To do this, I will add another four guides inside the bleed of distance 0.125in from bleed.

Create 4 guides in the following positions

1. 0.25in vertical
2. 3.5in vertical
3. 0.25in horizontal
4. 2in horizontal (note: we have already made this guide in step12. No need to repeat. )

Step15

If you wish, you can put the texts in a new group for easier readability.
So for the next step, I have added my name and profession inside the safe zone that I mentioned above. Also apply the following size and color to the fonts.

Step16

Again I have placed some more details like my email id, website address and phone number below the texts created in step15.

Ok, now apply the size and colors to the texts as shown below.

Change the color of the marked texts to #99cc66

Note: The details I have given here is just an example and isn’t my real contact information except my name. So please do not try to contact me thro’ the above details :)

Step17

Now, I am going to add the Brand or Company name at the bottom, here I used HV-DESIGN. Apply the following styles to the text.

Now, in case the position of the text is not like in the image, slightly adjust the placement of the text and so the letter “S” should appear over both the inclined dark and light grey parts as shown below.

For this layer too, change the blend mode to “difference”.

After you switch the blend mode, you will notice a color change in the text because of “difference” blending.

Now apply a drop shadow effect using the below settings

and so you will get the result like this.

Perfect! We have all done!

Step18

Hope you remember, we are still in RGB mode. Before we send it to print, we should switch the color mode back to CMYK.

So again go to Image -> Mode -> CMYK Color. It will throw a message “Flatten image before switching mode” and click on “Flatten”.

Step19

We are in the final step of creating the Corner crop marks. To do this, go to File -> Print with preview and make settings as shown.

Click the Bleed button in the same pop-up and give it a bleed value of 0.125in and print it as a pdf document.

Once everything is done, you are ready to go for printing!

Hope you enjoyed my tutorial!

Your ads will be inserted here by

AdSense Now!.

Please go to the plugin admin page to paste your ad code.

Blog Writing professional icon

Your ads will be inserted here by

AdSense Now!.

Please go to the plugin admin page to paste your ad code.

Okay boys&girls, today we’ll learn about Blogs. I bet’cha know what sort of creature they are, crawling all over the net with their millions of tiny posts…I mean legs….I bet also you  rode…wrote..at least one yourself! :D

Okay, so. How about making a blog writing icon? =]

Yea?
Okay, leeeet’s ..roll….! ^__^

This is what we’ll be making:

So! Take up that Photoshop and…step to the beat =]

  • Step 1:

Okay, make a new document, say…around 400 width and 300 height…and fill it with a neutral gray :)
Say, #545454 for example.

Okay, now name this layer “Background”. Then make a new layer above it, name it “Bottom Cover”.

  • Step 2:

Okay, that done, grab the Rectangle Tool (U) and set it to Shape Layers. Then set your Foreground color to #e7c681 and on the Bottom Cover layer, drag to create a rectangle like this:

Then click Ctrl (or Cmd on Mac) +T and holding down Ctrl (Cmd) key click on the corners and transform it into something like this:

  • Step 3:

Kay, now duplicate the Bottom Cover layer, and then right-click on the topmost of the two and choose “Clear Layer Style”.
Then, take the Move Tool (V) and move the rectangle upwards, like so:

Then take the Line Tool (U) and with your Foreground color set to #e7c681, line set to Shape Layers and line thickness set to something around 20px, drag to create a line like this:

Then take the Direct Selection Tool (A) and drag the corner anchor points of the line’s path to get something like this (at 200% zoom so you can see better) :

Move this layer between the two bottom cover layers, like so:

  • Step 4:

Now let’s do the same for the other side of the pages…”body”..iunno.
Take the Line Tool again and with the same settings as before drag a line on the other side, like so:

Then, just like before, take the Direct Selection Tool and trag the anchor points in the corners to get something like this:

Super-awesomesauce =D Now your pic should look something like this:

So far so good. Now Ctrl(Cmd)+click on the 3 recent layers, so you have all of them selected in a dark blue color in your Layers Palette like so:

…and drag them 3 over the tiny square-like icon at the bottom of your Layers Palette, to duplicate them :) Hide one set of duplicates for later use :)

Then click Ctrl(Cmd)+E to merge the other 3 into one single layer, name this layer “Pages Body”.

Then go to your “Bottom Cover” layer and right-click on it, choose Copy Layer Style and return to your “Pages Body” layer, right-click on it, choose Paste Layer Style.
Awesome! ^___^

  • Step 5:

Okay, let’s make the pages look like…well…errr…pages? xD

See this image below? Right-click on it, save to disk. Then open it up in Photoshop :)
Go to Edit—>Define Pattern–>name it “Pages Pattern”.


Good!
Now make a new layer above your Pages Body one, name it “Pages1″ and fill it with this pattern using the Paint Bucket tool (G) set to Fill–>Pattern :)
Next, press Ctrl(Cmd)+T to resize it to about half the size and rotate it a bit, so you get something like this (so that the lines are parallel to the bottom edges of the pages body) :

Kay, now remember those duplicated parts of the pages body? Ctrl(Cmd)+click on the thumbnail of the layer corresponding to that size of the notebook’s pages, like this:

Niiiceee…now press Ctrl(Cmd)+Shift+I to inverse selection, then click….Delete =D  Deselect. Nice&easy =]

Now you should have something like this left:

  • Step 6:

Oki. Now obtain a selection of your Pages 1 layer by Ctrl(Cmd)+clicking on its layer thinmbail, and setting your foreground color to #b09e6e, take the Paint Bucket Tool (G) and on a new layer fill the selection with color. Careful, that your Bucket has remained set to “Fill With Pattern” from last time you used it so make sure it’s set to Fill with Foreground ^_~
Okay, name this layer “Pages 2″ and move it a couple of pixels down, so what you get is this:

Now make a new layer inbetween your Pages Body and the two Page1&2 ones, and…well wait, no need to name it anymore, it won’t stay around for long =]
Obtain a selection of that same hidden layer with which we worked earlier, like this:

Set your Foreground color to #61481f and fill the selection on the new layer you just created.
Then Ctrl(Cmd)+click on it AND the Pages Body one, to have them both in blue in the Layers Palette, and press Ctrl(Cmd)+E to merge them. This way we’ll get rid of the layer effects of the Pages Body =]

Next, take the Burn&Dodge tools, and setting them to soft, round brushes about 40px in size, and Range: Shadows/Exposure: 11%/NO Airbrush (for Burn) and Range: Highlights/Exposure: 11%/YES Airbrush for Dodge, burn&dodge a bit to get something similar to this after-effect:

Now follow the previous steps for the left side as well :) Since it’s a repetitive process, I’ll show just the screenshots :)

  • Step 7:

Niiice =]
Mooo-vin on ^__^

No now your layers palette should look something like this (maybe different layer names):

Re-name your ex-pages layer to “Pages Body”.

Now let’s take care of some shadows, okay? :)
Make a new layer inbetween your Bottom Cover and the Pages Body :) Name it “Pages Body Shadow”.
Now Ctrl(Cmd)+click on the Pages Body layer thumbnail to obtain its selection…then set your Foreground color to #663a16 and taking the Paint Bucket tool, fill the selection on the Pages Body Shadow layer.
Set the layer to Multiply blending mode and lower its Fill to about 90%, then move it a little bit down, just a few pixels ^^

Like so:

Take then the Blur Tool (R), set it to a soft, round brush of about 40px, Mode: Normal, Strength: 50%.
Blur a bit so you get something similar to this:

  • Step 8:

Okay, now we’ll make some leafy leaves..pages…well you get my meaning  >w<

Good, set your foreground color to #e7be8e and take the Rectangle Tool (U). Set it to Shape Layers and on a new layer, draw a rectangle….like so:

Take the Direct Selection Tool (A) and drag the 4 anchor points in the corner to make the rectangle follow the lines of the “Pages Body” like this:

Now duplicate the layer, and hide the duplicate =)
Then…well…..give your visible page these layer styles:

Suuper ^^ Let’s move on.

  • Step 9:

Okay now right-click on the layer, choose “Copy Layer Style”. we’ll need it later ^_~
Next name it to “Base Page”.
Then make a new layer on top of it, and right-click on the new layer….Create Clipping Mask.

Set your Foreground color to #faedca and taking the Gradient Tool (G) set to Foreground to Transparent, drag like so to create a highlight on the base page:

Then Ctrl(Cmd)+click on both layers in the Layers Palette and press Ctrl(Cmd)+E to merge them into one.
Mmkay, we’re done with this page (for now).
Remember the shape we duplicated? Okay, go back to it and duplicate it again, make sure one of the copies is hidden and another visible, and on the visible one right-click—>Paste Layer Style. Then take the Direct Selection Tool again and drag the anchor points a bit to resize and curve like so (you might find it useful to use the Convert Point Tool) :

Do the same with the clipping mask and gradient as before, so you get somehting like this:

Okay, now select both layers and merge them, as before then re-name it to “Page 2″  :)

  • Step 10:

Okay, more pages now =O
Duplicate the hidden shape layer again, so we always have a backup. make one of them visible (preferably the bottommost one) and with the Direct Selection Tool (A) drag the anchor points like so:

Paste the layer style……The same thing with the clipping mask and gradient…na-na-na…..merge the two (clipping mask and layer it is assigned to)…re-name the resulting layer to “Page 3″.

Okay, laaast fortre…err..page xD
Take the last one of the shape layers and make it visible. Paste layer style to it and re-shape using the Convert Point Tool and the Direct Selection Tool to a shape like this:

Same thing..new layer…clipping mask….gradient….blebleble…so you get something similar to this:

  • Step 11:

Okay, time to add ambiental lighting to these pages, what’d you reckon? ^___~
Let’s start from the bottommost one. The “Base Page” you know? Make a new layer and move it on top of the Base Page one. Then right-click on this new layer and Create Clipping Mask.
Then set your Foreground color to #804d27 and obtain a selection of the page layer ABOVE the page you are working on now (by Ctrl(Cmd)+clicking on its layer thumbnail), like so :

Using thr Paint Bucket Tool (G) fill the selection with your dark brown foreground color we just set…and then deselect.
Go to Edit–>Transform–>Warp and srag the controls to something similar to this:

Okay, now go to Filter—->Blur—>Gaussian Blur, give it a setting of about 1,7 let’s say :)
Set the layer to Multiply blending mode and lower its Fillto about 90%.
Then take the Burn tool (O) set it to a soft round brush of around 50px and Range: Shadows, Exposure: 11%, NO airbrush, then click here&there where the shadow would be deeper in reality (closer to the point where the page on which we are working now and the one above it meet).
Like..this!

You can use the dodge tool as well a bit on the lighter shadows since you’re at it…however you think it looks best for your own pic, it’s optional :)

  • Step 12:

Nice…=]

Kaykay, mooo-vin’ on ^^
This is how your Layers Palette should look now…well at least similar to this, maybe other names&such.

Kay, now press Ctrl(Cmd)+E to merge the shadow clipping mask with its “master” layer….yea that means to merge it with the layer that’s beneath, that’d be the Base Page ^_~

Now one more tweak and we’re totally finished with this page ^^
Take the Dodge Tool (O) and set it to a soft, round brush, of about 50px in size, Range: Highlights, Exposure: 11%, YES airbrush.
Then on the page layer where we worked till now dodge a bit around its edges, like so (I circled the area where you should use Dodge) :

Done!…

…with this page xD

Okay, on to the page above it =]
As before, make a new layer above it….transform that layer into a clipping mask…then obtain a selection of the page above and fill it on the freshly-made clipping mask with the Foreground color #804d27, deselect, warp it like so:

Set to Multiply, lower Fill to about 90%, blur it a bit like before…..ok =]
Burn it baby! =] Dodge it! Merge..ta-daaaa =D

Something similar to this is what you should be obtaining:

  • Step 13:

Last page time now.
Well..last page with shadows.
Do just the process we did before….warp it then blur, burn, dodge, merge, etc.

In the end, you’ll get something similar to:

Very well so far, now we should take care of the page flip, you know?
Oki, so. Take the Pen Tool (P), set it to Shape Layers, and set your Foreground color to #63821d. Take that Pen and on a new layer placed right above your top-most page layer, draw a shape like so (this is at 300% zoom, for you to see better) :

Okay, now set your Foreground color to #d0ba63 and your background one to #8e6c21 and make a new layer above the shape you just made. Right-click on it and choose Create Clipping Mask.
Niiiceee..now take the Gradient Tool, set it to Foreground to Background, Linear Gradient, make sure Reverse is NOT clicked……and drag from the tip to the base of the shape (which is in fact our page flip) like this:

You can use a bit of good ol’Burn&Dodge tools to lighten or darken the light&dark parts…and you should get something like this:

Okay, now make a new layer and make it into a clipping mask for our flip page shape as well (you should have: the flip shape layer, then above it the gradient clipping mask, then the layer you just made now which is ALSO a clipping mask…)
Oki so set your Foregroun color to #d58c1b draw on the freshly-made layer a liiiiittle orange tint, like the texture reflection off a semi-shiny surface, iunno?
Like so:

  • Step 14:

Ppffftt…kay, take a break….

………….okay come back :)

Your ads will be inserted here by

AdSense Now!.

Please go to the plugin admin page to paste your ad code.

Now let’s add text to our blog heh? ^_~
I use the font LainieDay SH, you can download it here: http://www.abstractfonts.com/font/11337

Download the font, install it to your compy and then make a new layer above all your others in Photoshop and get the Text Tool (T) and set it to about 11pt in size, aaaand..type ^^
Like so:

You might have to the Toggle the Character and Paragraph palettes button and use that to give your text a little ..boldness ^^
Like this:

Set your text layer to Multiply blending mode. Then we need to transform it so it looks right on paper ^^
Press Ctrl(Cmd)+T and drag a bit to the left..right…or resize it…rotate a bit counter-clockwise…oh well, you’ll get the right moves, don’t worry if it’s a bit frustrating at first ^_^. Like so:

You might need to duplicate the text layer and lower the copy’s opacity a little, to make the writing more visible.

Now move your text layer(s) below the page flip shape layers :)

  • Step 15:

Kay so now your pic should look something like this:

Now we’ll take care of the flipped page, kay?

Take the Pen tool same settings as before, and make a shape like this above all your other layers:

Now make a new layer above it and make this new layer into a clipping mask, and set your Foreground to #fee3b5 and Background to #b78557 and taking the Gradient Tool (G), set it to Foreground to Background and to Reflected Gradient, make sure Reverse is NOT clicked and click&drag like so:

This should give you a result like so:

  • Step 16:

Kay but you know, don’t you see anything amiss here?
Of course yea, there is a lighting difference between the flipped page and the rest of the notebook o.o
Let’s fix that =D

Oki, make a new layer abooove all your other notepad-related ones (that should place it just above the flip page layer and its gradient clipping mask) and transform it into a clipping mask as well. Set your Foreground color to #662802 and taking the Gradient Tool again, set it to Foreground-to-Transparent, Linear Gradient and drag to create a shadow like this:

Mmkay, you can play with the Fill a bit if you think it’s too much shadow. Now press Ctrl(Cmd)+E to merge the shadowy layer with the gradient layer…and taking the Dodge tool with the same settings as before give our …flipped page… a bit o’good ol’highlight =]
Like so 9I circled the area where you must add highlight) :

But wait! We’re STILL missing something. Can you tell what it is? ^_~

……..it’s the ancient paper texture of course.
Okay so. Obtain a selection of your flip page shape we made earlier with the Pen Tool, and then go to Select–>Modify–>Expand–>1px.
Sweeet, now press Ctrl(Cmd)+Shift+I to inverse selection or go to Select–>Inverse…and …..on your gradient layer of course (that’s the clipping mask of the flip shape)…press Delete =O
Oki, now right-click on the gradient layer in the Layers Palette and choose Paste Layer Style…and ta-daaaa, our flip has the nice ancient page effect =D

There is just one more thing we need to do for it all to look okay.
Select both the gradient layer (aka, the clipping mask) and its “master” layer (aka, the flip page shape) and merge them into one.This might cause your flip page to vanish, because it became a clipping mask of the group below it, but it’s okay, don’t panic :)
Just right-click on it and choose “Release Clipping Mask”.
That’ll make it visible again =D
Okay now lock the transparent pixels on it..this is the button:

…and taking the Smudge Tool (R) set to a large (say 30px), round, semi-hard (say hardness about 50%) brush, drag in the direction of the arrows to get rid of the edge burn effect where we don’t want it:

  • Step 17:

Kay so now you should have something like this:

More lighting adjustments on the way =]
Go back to the layer where you have the topmost page. The one with the writing you know? You should have the page on one layer, and the text on another layer, just above the page one. Yes? Okay.
Make a new layer and move it INBETWEEN the page and the text :)
Next, right-click on the new layer to transform it into a superhero…err……..I mean into a Clipping Mask..>u>..<u<……

Set the layer blending mode to Multiply.
Then, with your Foreground color set to #834227, take the Gradient Tool and make sure it’s set to Foreground-to-Transparent, Linear Gradient. Once you got that done, drag like this on the new clipping mask you just created:

Lower the layer’s Opacity to about 70% then make a new layer above it, right-click–>Create Clipping Mask. Set this layer to Multiply as well, but lower its Opacity to only about 90%.
Drag almost as before, only shorter span:

Kay, now press Ctrl(Cmd)+E to merge the two Multiply layers into one =D

  • Step 18:

Mooo-vin’ on ^o^

On the Multiply shadow layer go to Layer–>Layer Mask–>Reveal All.
Take the Gradient Tool again, make sure your Foreground is black (#000000) and drag like this to lower the density of the shadow on the left:

After which, you should be left with this:

Okay, just a bit more and we’re done…with the notepad ^_~

  • Step 19:

Now make a new layer and move under all your other layers…well except the background one. Move it so that it’s the first layer over the background one.
The take the Pen Tool and draw a shape like this (here at 200% zoom for you to see better) :

…and here it is with the notebook on top of it:

Kay, now make a new layer above it and transform it into a Clipping Mask. Then set your Foreground color to #8d5223 and your Background one to #f6cd99 and taking the Gradient Tool, set it to Linear Gradient, Foreground-to-Background and drag like so:

Now make a new layer ABOVE this one…pfft, you’re getting tired of new layers aren’t you? Oh well, necessary evil as they say… ^__^

So yea, make a new layer above it and transform it too into a ..well..Clipping Mask.
Then set your Gradient to Foreground-to-Transparent and to Radial Gradient, set your layer to Multiply blending mode and drag like so:

  • Step 20:

Now press Ctrl(Cmd)+E to merge the multiply layer with the gradient one. Next, obtain a selection of the shape of the “master” layer, and go to Select—>Modify–>Expand–>1px, the go to Select–>Inverse..press Delete.

Paste the layer style to the gradient layer (the one on which you just deleted) and you should have something like this:

Name the layer “Gradient Page Under”.

Now let’s take care of some shadows. Make a new layer above the Gradient Page Under and transform it into a Clipping Mask…gooood…..then obtain a selection of your Bottom Cover layer…and with the Foreground color set to #8d5223 fill the selection with color using the Paint Bucket Tool (U).
Deselect, then set the layer to Multiply.
Then move it a liiittle to the left, as so:

Give it a Filter–>Blur—>Gaussian Blur of about 2. Now it also depends on what you think looks good, iunno.

Oki…now your thingy should look something like this:

  • Step 21:

Text time!
Remember how we did the text for the top page?
Good, let’s do that for the bottom page as well :)
So. Make a new layer and start typing with the LainieDay font we used earlier. Then skew it, warp it, resize it…to fit it on the page =D

I’m forgetting something, set your Foreground color to #d09a6b before you start typing, hehehehe ^___~
You might have to the Toggle the Character and Paragraph palettes button and use that to give your text a little ..boldness ^^
Like this:

Take the Dodge Tool (O) and with the same settings as before dodge a bit the text where light falls hardest.
Liiiii3k diiiiz (I circled the area where you should use Dodge) :

Aweeeezuuum <33
Now the notebook is…well…FINISHED! =D

It should look like this..or close:

  • Step 22:

Well what’s the point of a Blog Writing icon if we don’t have a toll to write with?

Make a new layer above all your others.
Take the Line Tool (U) and set it to Shape Layers, thickness of 4px.
Set your Foreground color to #531f0b and with the Line Tool, draw a ine like this:

Duplicate this line layer and set the copy’s color to #94451a. Move this second line a bit to the up-left, like so:

Next, duplicate the line again and set this third’s copy color to #bb6d2f. Move it to the up-left…like so:

New line copy set its clor to #fadb75 and move it like before….then yet another copy..set its color to #e7b25d and move it….so you have this:

  • Step 23:

Now merge all these lines into a single layer.
That is done by Ctrl(Cmd)+clicking on them all each one by one in the layers palette, so that they are all in a dark blue color. then press Ctrl(Cmd)+E to merge ^_^

Okay once merged, take the Eraser Tool (E) set to a hard round brush and erase what bits go over, to lever the edges out like so:

With the Eraser Tool, erase at the …well..tip… (the edge closer to the paper) so that it has a nice roundish shape.

Then name the layer “Pencil Body”.

Make a new layer and move it under the pencil Body one.
Then take the Polygonal Lasso Tool (L) and on the new layer, create the selection of..well..sort of triangle, like this:

Set your Foreground color to #f2d6a7 and your Background one to #744219 and taking the Gradient Tool (G), set it to Linear Gradient, Foreground to Background, and drag like this:

Note that I’ve hidden the layers of the notebook to make the pencil more visible for you. So no worry, it’s not a ghost ^___^

Name this layer ..”Pencil Tip”.

Kay, now remember how we locked the Transparent Pixels in Step 16?
Do it again for the Pencil Tip layer.

Then set your Foreground color to #3c1f1a and with a hard, round brush draw the black tip of the pencil, like so:

  • Step 24:

Next, make a new layer above all your others. Take the Brush tool and set it to a hard, round, 5px brush.

Then take the Pen Tool, set it to Paths and draw a path like this:

Okay, now right-click–>Stroke Path–>NO Simluate pressure. The right-click–>Delete Path. You should have something like this:

Erase a little around the tips to re-shape it, then give it these layer styles:

Duplicate the layer and move the copy up a bit, like so:

  • Step 25:

Name the layer “Pencil Metal Tip”.
Now obtain a selection of it and go to Image–>Adjustments–>Photo Filter, give it a 50% orange.

Okay, now deselect, and create a ne wlayer under all your Pencil layers.
Name it “Pencil Eraser”.

Now take the Brush tool, hard round, andset your Foreground ocolor to #a83524, then draw a shape like so:

Okay, now lock its transparent pixels.
Change your Foreground color to #f4bea9 and with the Gradient tool set to Radial Gradient,  Foreground-to-Transparent, drag a tiiiny little bit to create highlight:

Okay, now take the Burn tool, same settings as before, and darken the shadowy part a little more…..and you can now merge all your Pencil-related layers into one single layer. Name it…well of course, PENCIL! hehehe :)

One more bit to go!

  • Step 26:

Shadowy shadow of the Pencil is missing o.o; OMG it has been stolen!
…or..not…xD

Okay, make a new layer and move it so that it is a Clipping Mask to the first page of the notepad.
Name it “Pencil Shadow”. Then obtain a selection of your Pencil layer and setting your Foreground color to #743d25 fill the selection on the clipping mask we just crated…yeah, the Pencil Shadow layer.
Set it to Multiply blencing mode….then press Ctrl(Cmd)+T to transform it, rotate, skew, etc etc so that you get something like this:

Take the Blur Tool set it to a soft, round brush or about 40px and Mode: Normal, Strength: 30%, and blur this shadow a bit, blurring more the farther away you are from the pencil tip. So you get something like this:

Of course, you can go on to add more detail and stuffiez to your icon….I’m not stopping you hehehe ^___^
But for now let’s say…….OMFG WE’RE DONEEEEEE *runs around in circles*

Oh yea baby 8)
Now we can haz snazzy Blog Writing icon =D

Final!

Hope you had fun, see you next time and don’t forget to send me a postcaaaarddd!…
..err..I mean, send me the results of your work, it’s always awesome to see =D
Oh, and let me know if you hit trouble, so I can give you a hand :)

See ya next time ^__~

Alice

Your ads will be inserted here by

AdSense Now!.

Please go to the plugin admin page to paste your ad code.

3D Glassy RSS Icon

Your ads will be inserted here by

AdSense Now!.

Please go to the plugin admin page to paste your ad code.

Hello everybody welcome to a new tutorial from HV-Designs. Today Alice will show us how to create an RSS Icon button. The techniques used for this tutorial could easily be used for other icons that you might want to create.

“RSS (most commonly expanded as Really Simple Syndication) is a family of web feed formats used to publish frequently updated works—such as blog entries, news headlines, audio, and video—in a standardized format. ”

“Although RSS formats have evolved from as early as March 1999, it was between 2005 and 2006 when RSS gained widespread use, and the icon was decided upon by several major Web browsers.”
(souce, Wikipedia: http://en.wikipedia.org/wiki/RSS)

So, I suppose you are well familiar with the tiny orange RSS icon, are you? :)
RSS is awesome, so that’s why I’ve chosen it as a theme for today’s tutorial ^_^
So. Today, instead of the tinsey-bitsey icon we usually see, let’s do something graaaand! Let’s do a glassy, huge, 3D RSS icon =D

….okay, I realize nobody would place an icon this big on their website but hey! We’re designers, we think with our hearts not our brains hehehe =]

So today, we’ll  learn how to do this:

To work I say! =D

  • Step 1:

Create a new canvas, say about 450×450 pixels. Fill it with…say white #ffffff….and name the layer “Background”. Then, set your Foreground color to #e2832f

  • Step 2:

Now, create a new layer (Ctrl/Cmd+Shift+N or click on the square icon at the base of your layers palette) and name it “Icon Base”.
Go to your Tools palette and take the Rounded Rectangle Tool (U), set it to Shape Layers and set its Radius to about 40px.

On the new layer you just created, hold down Shift key and click&drag to create an orange rectangle, like this:

  • Step 3:

Okay…now go to Edit–>Perspective, and squeeze the shape down a bit, on the right side. Just hold&drag one of the controllers on the right side. Then press Enter to confirm the transformation and click Ctrl(Cmd on Mac)+T to freetransform the thingy, and from the right side resize it vertically (aka, squeeze it vertically).
Like this:

At this stage, you can enlarge your shape if you feel it’s gotten small….that’s up to you.

  • Step 4:

Good until now…let’s move on =]

Create a new layer above the Icon Base one, right-click on it in the Layers Palette and choose “Create Layer Mask”. This will make the layer you just created into a layer mask, aka it will stop any pixels drawn on this layer to go out of the borders on the layer which it is assigned as a clipping mask to (in this case, the Icon base).

Kay, so now take the Gradient Tool (G) and set your Foreground color to #fac042 and your background one to #d75927 and setting your gradient to “Radial Gradient”, drag from the bottom to the top of your shape – of course, drag on the new layer….naturally. Like thiiiis……..:

  • Step 5:

Okay, now on to a new layer…..name it “Top Reflection”. Then right-click and make it a clipping mask to the icon Base layer as well (but make sure it is placed above the gradient layer, okay? )
This is what your Layers Palette should look like now:

Kay, so now take the Pen Tool (P) and set it to Paths mode, then use it to make a path that looks like a ..well..erm…err….a…curve? xD;
Like this, anyway, images explain better now :)

Then right-click on that with the Pen Tool and choose “Make Selection”.  I set mine to Feather Radius 0, Anti-aliased, New Selection.
Okay, after you have your selection, take the Gradient Tool, set your Foreground color to #f2b46b and your gradient to Linear Gradient, Foreground to Transparent, Normal blending mode and opacity 100% drag from the top-right towards the bottom-left of the icon base shape, but don’t touch the bottom left, stop about 80 pixels from it, like this:

Then this is what you should have now:

  • Step 6:

Now let’s make the “body” of our icon, shall we? :)

Duplicate the Icon Base layer. Pay attention that its two clipping masks will lose their mask abilities and become normal layers when you do this. Just right-click on them again and choose Create Clipping Mask to solve this ^_~

Now take the bottommost Icon Base copy and name it “Icon Body” then click Ctrl(Cmd)+T to free transform it. Hold down Shift key and drag from the bottom-left controller a little, like this:

Click Enter to confirm the transform then press Ctrl(Cmd)+t once again and squeeze the top-left and bottom-right points, like this:

Click Enter to confirm, then go to your Tools Palette….and choose the Direct Selection Tool (A) —that’s the one above the Pen Tool, the one which looks like a white arrow, NOT the one which looks like a black arrow, mind that o.o

Kay, now click with the white arrow somewhere on the orange of the Icon Body (now pay attention that you don’t accidentally click on the surface of the Icon Base, because then the arrow will select the Base …and we don’t want that, kay? )
So click on the flat orange of the Body, and you should see a little…wireframe…like a gray stroke around it, yea?

Click with the Direct Selection Tool directly on the gray wireframe, and then its anchor points will be visible ^___^
With the Direct Selection Tool, click on the two points I marked with red and drag them so that they give a nice, compact perspective view, and touch the Icon Base margins, like this:

So this is what you should have till now…or something close:

  • Step 7:

So far so good >w<

Now go to your Icon Body’s blending options (either double-click the layer or go to Layer–>Layer Style—>Blending Options) and give it these settings:

  • Step 8:

Okay, so now your thingy should look something like this, yea?

Yes—>proceed to step 8, no—>go back to revise hehehe :)

Buuuut, since all should be okay, let’s go on ^^

Kay, in order to do that, we absolutely need to get rid of the layer styles Icon Body layer has….but keep its styled look at the same time xD
….lost you? Lol, sorry :)
Here’s what we’ll do:

First, duplicate your Icon Base layer, move the copy under your background layer and click on the eye icon in the Layers Palette, to hide the layer. Yeah, it’s a nice layer style, keep it we might need it layer xD

Next, go back to your visible Icon Body and create a new layer above it. Holding down Ctrl(Cmd) key, click on the lcon Body layer as well, so now you have both the Icon Body and the new layer you just made on top of it in a dark blue color, and then…click Ctrl(Cmd)+E to merge them. That will get rid of the layer styles but at the same time..well..keep them ^^

That will also change your layer name to Layer 3 or..something, so now re-name it to Icon Body, kay?

Good….let’s go on now.

  • Step 9:

Make a new layer above it, and right-click—>Create Clipping Mask.

Now, take the Gradient tool(G), set your Foreground color to #eca839 and your Tool to Foreground-to-transparent, Reflected Gradient, mode=Normal and opacity 100%.

Click and drag on your new clipping mask, at the 3 visible corners of the Icon Body, like this:

Set the layer to Screen mode, lower its opacity to about 90%.

Now Ctrl(Cmd)+E to merge it with your Icon Body……

  • Step 10:

Kay, moooo-vin’ on :)

Take the Dodge Tool (O), set it to a round soft airbrush, size about 30px,  Range: Highlights, Exposure: 11% and make sure that Airbrush button is clicked.

Then brush a little on the Icon Body, at the bottom-left corner. So that it looks kinda like this (pay attention, we don’t want too much glowy stuff at the corner, kay?):

Next, brush a bit on the Body’s left side as well, but you know, only a bit, enough to change a bit its color compared to the bottom of the Body. Like thiiiissss…:

  • Step 11:

Okay, now let’s temporarily go back to working on our Icon Base layer’s look :)

First, make a new layer, name it “Border”, move it on top of Icon Base’s clipping masks, then right-click on it and transform it into a Clipping mask as well…like so:

Kay, now Ctrl(Cmd)+click on your Icon Base layer’s thumbnail in the layers palette to obtain a selection of it….and then go to Edit–>Stroke, choose Center and 24 pixels.

Okay, now your stuffie looks somewat like this :)

Good.
Then remember, we must stay true to our belief…err…I mean, we must stay true to perspective’s rules, yea? =]

So, naturally, from this perspective …we must click Ctrl(Cmd)+T to transform our Border a bit, aka drag a little to the right and a bit to the top, to make the border on those two sides barely visible, like so (I am coloring it in red, so you can see the difference, okay?) :

Okay, now give your Border this layer style:

  • Step 12:

Kay, now make a new layer and move it under the Border one.Obtain a selection of your Border layer, set your Foreground color to #fdf8d2 and your Background one to #f5dc88 and go to Edit–>Stroke–>Center–>4px.

Then set the layer to Overlay blending mode, lower its Opacity to about 50% and give it this layer style:

Ctrl(Cmd)+click on the Border layer afterwards, to have them both selected, and merge them by Ctrl(Cmd)+E.
After which, take the same Dodge tool we used earlier and give it a few highlights, then take the Burn Tool with the settings of round, soft, Shadows, Exposure: 11% and airbrush NOT clicked, and burn&pillage..errr.dodge I mean..around to get it to look like this:

Your ads will be inserted here by

AdSense Now!.

Please go to the plugin admin page to paste your ad code.

  • Step 13:

Make a new layer, and move it on top of your Icon Body one.
Obtain a selection of your Icon BASE layer (careful not to confuse it with Icon Body haha). Then right-click—>Create Clipping mask and go to Edit–>Stroke–>Center–>4px…..okay…then set it to Hard Light and lower Opacity to about 70%.

Good…now click on the the Lock Transparent Pixels icon at the top of your Layers Palette…here:

Set your Foreground color to #fbf2c7 and your Background one to #fbca30, take the Gradient Tool (G) set it to Foreground to Transparent, Radial Gradient and Give it a few highlits at the corners, and a few shadows at the bottom side, like soooo:

Then give it this layer style:

  • Step 14:

Moooo-vin’ on >w<

Okay, obtain a selection of your Icon Base. Then create a new layer and move it so that it is placed between your Icon Body layer and the stroke you just created now, in the previous step. Make sure both the stroke and the layer you just made now are clipping masks to Icon Body, okay?

Kay, name your layer “Body 3D” and set your Foreground color to #c35c18 after which fill the selection you have with this color using the Paint Bucket Tool (G).

Set it to Color Dodge blending mode and lower its Opacity to about 20%. Deselect.

This is what it should look like….:

  • Step 15:

Now we’l move our bisiness elsewhere…and that is to making the Base part look 3D =]

Okay, get a selection of the Icon Base layer again.

Create a new layer and move it just over the Top Reflection one, so that it is a Clipping Mask too. Name it “Body 3D” …Like this:

Lock its transparent pixels like we did before, and then set your Foreground to #f2af3b and the Background to #c25c18 then take the Gradient Tool (G) and set it to Foreground to background, then drag from the top-right of the rounded rectangle to the bottom-left….
Like so:

Set the layer to Multiply, and lower Opacity to about 27%.

  • Step 16:

More work ^^
Set your Foreground color to #fcee88 and create a new layer above the Body 3D one and name it “Corners Glow”. Take the Gradient Tool (G), set it to Radial Gradient, Foreground-t-transparent, and drag a little in the corners, like this:

Set the layer to Linear Dodge, and lower Fill to about 35%.

  • Step 17:

Okay, now deselec any existing selections you might have. Then obtain a selection of the Body 3D layer and set your Foreground color to #c35c18.
Make a new layer, name it “Shadow 3D” and place it as a clipping mask between the Border and the Corners Glow, like this:

Take the Gradient tool, make sure it’s set to Foreground-to-transparent, and Linear Gradient and drag from top-middle towards bottom-left, like this:

Lower the layer’s opacity to about 40% ^___^

  • Step 18:

Make a new layer between the gradient one and the Top Reflection, like this:

Set it to Linear Burn, lower its opacity to about 70%. On that note, also lower your Top Reflection’s Fill to 90% and set it to Lighten.

Obtain a selection of your Body 3D layer and press Ctrl(Cmd)+Shift+I to invert selection, then take the Gradient tool with the same settings as before and drag from top to middle of the selection. Deselect.

This is about what you should have now :)

  • Step 19:

Okay, now we’ll take care of the Reflections =]

Make a new layer and place it just under the Border one (so that it’s a clipping mask). Name it “Reflection 1″. Then, obtain a selection of your Icon Base, and click on the Elliptical Marquee Tool (M). Set it to Intersect with Selection, Feather: 0px and anti-alias checked.

Next, zoom out to about 70% and using the Elliptical Marquee Tool, click at about 11 o’clock, some 100px outside, so that you get a selection like this:

Okay…that done, let’s switch our tool of trade…to the Gradient tool hehehe :)
Set your Foreground color to white (#ffffff) and taking the Gradient Tool (G), with the Foreground-to-transparent setting, Linear Gradient, drag like this:

Set the layer to Color Dodge, and then lower its Fill to 35% :)

  • Step 20:

Woohoo! Step 20, we’ve gone far hehehe >w<

Mmkay, now deselect…and your pic should look something like this:

Okay, one more highlight to go…
Obtain the seletion of your Icon Base again. Then make a new layer, under the Reflection 1…name..well of course, with the extra original name of “Reflection 2″! =D

Hehe….Now using the same Elliptical Marquee Tool (M) strategy we used in the previous step, make a selection something like this:

Then take the glooorious Gradient tool (G)…yes, same settings as before of course, and drag like this:

Set the layer to Hard Light blending mode and lower its Fill to about 25%.

  • Step 21:

This is what your thingy should look like…or something similar :)

Kay. Good! Now let’s take care of our RSS symbol, okay?
Download this shape to your computer:

http://seiorai.deviantart.com/art/RSS-custom-shape-188328814

Make a new layer, above all your other layers.
Now load the shape into Photoshop and drag to create a shape that’d cover about 70% of the icon surface, like this:

Next, click Ctrl(Cmd)+T to freely transform it, by holding down Ctrl(Cmd)&click&dragging the top-right corner especially, into something like this:

  • Step 22:

Duplicate it 2 times, hide two of them and the third move it under the Reflection 2 layer, so it is a clipping mask as well. Name it “RSS Face”.

Now add to it these Blending Styles:

Lower the layer’s Fill to 90%.

So now this is about how your pic should be like:

  • Step 23:

Okay, now take one of the other 2 copies we made of the RSS shape, and move it under the RSS Face one. Then use the Move Tool (V0 to move it a bit to the left and then down, so that it looks like a shadow of the RSS face…like this:

If needed, you can transform it a bit so that you won’t see any “gap”..”valley” between the tips of the shaow and the tips if the RSS face.

Change its Shape color to #c35c18 this is very important.
Give it this layer style:

Now, lower its Fill to about 35%.

  • Step 24:

Not much more till the finish, I promise xD

Know the third copy of the RSS shape? Move it under the other 2 copies of the shape……and set its shape color to #c55f1a.

Move it to the left and a bit down, like this:

Lower its Fill to about 20%.

Okay…done! =D

Final result:

Now go and have a snack, you deserve it ^_^

Hope you enjoyed this :)

Your ads will be inserted here by

AdSense Now!.

Please go to the plugin admin page to paste your ad code.

Photoshop Gallery Website Layout Tutorial (CS5)

Your ads will be inserted here by

AdSense Now!.

Please go to the plugin admin page to paste your ad code.

Today I am proud to bring you another Photoshop Tutorial! We will be creating a simple product sales page with gallery addition.
This tutorial is going to be classified as an Intermediate Photoshop tutorial as we will be using more styles and custom shaping and images than in our other tutorials. Your final image will look like this:

Resources

Shine Icon Set by DryIcons

Social Media Icon Set by Aaron Nichols

Four Color Logo

Four Color Menu by Aaron Nichols

Getting Started

Start out by creating a new document 1100*1220

Fill your document with white. Now grab your rectangle marquee tool. Choose Fixed Size for your style and draw out a rectangle 1100x20px. Now create a new layer and fill your selection with black.

Now grab your rectangle tool again and draw out a rectangle of 275x20px. You are going to want to create a new layer, fill it with black. You will want to line up your new layer to fit right at the end of your first line. Now space it 60px from the right side of our document.

Top Navigation

Alright, now grab your type tool. We will be using the font Franklin Gothic Medium, Color White, 14pt. Type out “Login” and place it in your black box we just created. Space it 8px from the bottom and 15px from the left.

Grab your type tool again. This time change the font size to 18pt. Type out a “|” and space it 10px from the end of our login text.

Change the text size back to 14pt and type out “Sign Up”. Space it 8px from the bottom and 10px from our “|”. Like this:

How exciting right? Well, no its not exciting at all yet, but it will be. Grab the shopping cart icon (16×16)that we downloaded earlier. You will want to space it 8px from the bottom of our black box and 65px from the left of your Signup Layer. Now add a Color Overlay of White to the shopping cart layer.

Now grab your text tool again. To refresh we are using the font styles: Franklin Gothic Medium, Color White, 14pt. Now type out “Shopping Cart”. Space it 8px from the bottom and 15px from the right of our box. Like so:

Creating the Main Content Layer

Now create a new layer. With this layer selected grab your rectangle marquee tool and create a fixed size of 1100×435. Fill your selection with any color as we will be adding the following layer style to it:

Ok, so from here we are going to be working in an apparently random pattern, but it will all work out in the end trust me.

So first lets add our logo. You can use your logo or download THIS free logo created by me for the sole purpose of this tutorial.

(If you are not using our logo skip this part)

Open up the PSD file and hit Ctrl+I and re-size the image to 50×55. Now drag over the “logo” group and place on our document. Space it 20px from the bottom of our black layer and 90px from the left of our document.

Now grab your type tool and use the Font RockoUltraFLF at 36 pt with a color of #221209. Using this font color will give our document a letterpress style. Center it vertically with our logo image and space it 20px to the right of our logo.

Alright, now to set up our search bar. Create a new layer. On that new layer grab your rectangle marquee tool and make a selection of 275×40. Fill the selection with white and apply the following layer styles:

Now line up our search bar with our black user navigation box and space it 15px from the bottom of the user nav.

Ok, now create a new layer and make a selection of 80×40 and fill it with black. This layer should match up just inside of our search bar and go just to the very end of it. Like this:

Now add the following layer styles to your object:

Alright, now grab the font Myriad Pro, size 18pt, color #151515. Now type out “Search” and center it on our Search Button.

Now we will be grabbing our navigation downloaded above from my Friday Freebies #4. Open up the PSD document and resize your image to a width of 950px. Drag over the Menu group (the plain menu group). Space it 71px from the left of your document and 35px from under the search bar.

Featured Image

Alright, now to set up our featured image. The first thing we are going to do is grab a pic of our most recent work and shrink it down to be 550px by 565px.

Drag the layer over to our PSD document and space it 25px from the bottom of our navigation and 70px from the right of our document.

Now apply the following layer styles:

Alright, now we need to set up the navigtion for our slider. This will be a matter of a few shapes with some layer styles.

Grab your ellipse tool and create a circle that is 25px by 25px. Fill your circle with #6a4126. Space it 45px from the bottom of our brown layer and 10px from right of our latest work.

Duplicate your shape four times and space them 5px from each other. Set the duplicate layer styles to Soft Light.

And now to set up our slider caption. Create a new layer and make a selection with a size of 505×80 and line it up with the left edge of our image and the bottom of our image.

Now lower the opacity to 60%. Grab your text tool with font style RockoUltraFLF, 12pt, and color #ccff00. Type out “$99″ and space it 20px from the left of our image and 15px from the top of our document.

Now grab your line tool, with white set to your forground, and drag out a line that is 60px long. Space it 15px from the left of your text and 12px from the top of our black bar.

Alright, now grab your text tool again. This time use the font Myriad Pro, 6pt, color #ccff00. Type out the name of whatever product you have on the front page. Space it 15px from our white line and 15px from the top of our black bar.

Grab your text tool again, same font, color white, 3pt. Type out some content so that it is two lines. Space it 18px from the left of your white line and 10px from the bottom of your header text.

Time to set up our content to go next to our slider. (See, I told you we were going to go a bit in reverse). Grab your text tool again, same font, color #ccff00, and size 7pt. Now type out whatever you want for your header. I have typed out “Premium Graphics for Discount Prices”. Space your text 25px from the left and 35px from the bottom of your navigation.

Now add some content to your post. You will want to space your content 30px from the left of your document and the first line of text 20px from our header.

Your ads will be inserted here by

AdSense Now!.

Please go to the plugin admin page to paste your ad code.

Now grab your rounded rectangle tool and give it a radius of 5px. Drag it out so it is 110×30, filling it with white (we are going to add layer styles later on). Now rasterize your layer and add the following layer styles: [

You should have this:

Now grab your type tool and use Myriad Pro, 5pt, color #2f2f2f and type out “Read More”. Center it horizantally and vertically on your button and apply the following style:

Alright, that finishes out our top content. Now onto another area.

Center Content

Create a new layer and make a selection of 1100×475 fill it with black for the time being. Drag this layer to be underneath all our content and just above our top content bg.

Now make sure that the end of our top background is the beginning of our black background.

Alright, now apply the following style:

Grab your Rounded Rectangle tool again and give it a radius of 5px. Drag out a rectangle that is 300×215. Filled with black is fine for now as we will style them later. Now space your shape 27px from the left of our document and 80 px from the brown background.

Now duplicate your layer twice. Space them 73px from each other so you have this:

Now create three groups and name them Content 1, 2, and 3 respectively. Place your first shape layer in Group 1, your second in Group 2, and of course your third in Group 3. Now hide groups 2 and 3, we won’t be working on them right now.

What we are going to do now is to copy a layer style from a previous layer. Our previous layer we are going to be copying our layer style from is our brown bg. To do this right click our brown bg layer and choose Copy Layer Styles. Now simply right click your shape layer and choose Paste Layer Style. Though the other two boxes are hidden you should paste the layer styles on the other two boxes now to save time.

Alright, now grab your icon set from earlier (Big shout out to Dry Icons for the icons) and pick your favorite three. What we are going to do is add our content. In the end you should have something like this

The button was achieved by copying and pasting our other buttons layer styles and the text header uses the same header color as before.

Alright, now lets set up our second content slider. This will be used to display more of our featured content, but in a much smaller size. To start out select your Custom Shape tool, choose Arrow 2.

Now use the arrow tool to draw out an arrow 50×55 and fill it with black. Space it 70px from the bottom of your content box and 20px from the right of your document.

Now apply the following styles:

Duplicate your layer. Go to free Edit–Transform–Flip Horizantal and use the same spacing to place your next arrow on the left side of our document.

Now open up whatever images you want to place in your gallery below your content. Resize the image to 100×100 and bring it over to our document. Space it 45px from your left arrow and 50px from the bottom of your content box.

Now bring over another image the same size or for right now just duplicate your layer and space it 20px from the first image. Duplicate your layer again and space it the same.

Now for our rollover effect image. Drag another image over but this time it needs to be 125×125. Now space it 30px from your other image and 36px from the bottom of your content box. Now add a 5px white stroke. This will give our image a little bit more draw from the eye on mouseover.

Now repeat the process for the last three images,using the same spacing so you have this:

Footer

Now make a selection that covers the rest of your layer. Create a new layer and fill it with black. Bring this layer down and place it above our other two background layers.

Now copy and paste the layer styles from your first background (the brown) onto the layer we just create. Go back up to the top of our layers and grab your text tool. Here we will be adding our footer content, which is going to be our categories with a few recent products.

Grab your text tool and use Myriad Pro, Size 4pt, and Color #98cb00. Type our whatever category you are going to use and spacae it 20px from the bottom of our grey box and 40px from the left of your document.

Now grab your text tool and use Myriad Pro, Size 3pt, and Color #dcdcdc. Add your content for your category and space it 20px from the bottom of your header. Each text line needs to be spaced 15px from each other.

Group all the layers into a group called Header and duplicate the group three times. Space them each 77px from each other. The final right header should be spaced 40px from the right of our document. Delete a a few of the text lines to make it look a little better.

Now grab your favorite social network icon set to use. We are going to be using the icon set in our resources (the 32px size). Drag over your favorite social networks (I am using Dribbble, Facebook, forrst, Twitter, and RSS). Your first icon should be 20px from the left of your document and 15px from the bottom of your document. Each icon after should have a spacing of 20px.

Alright, now grab your rounded rectangle tool with a radius of 5px, color white, and drag out a rectangle that is 80×45. Space this rectangle 20px from the right of our document and 15px from the bottom. Copy and paste the layer styles from our earlier buttons. Grab your text tool, using Myriday Pro, 3pt, and type out Submit. Center it both horizantally and vertically on your button.

Now grab your rounded rectangle tool again and draw out a white shape of 290×45. Keep it 15px from the bottom but space it 10px from the left of our Submit Button.

Now grab your text tool and use Myriad Pro, 5pt, and color #98cb00 to type out Grab Our Product Newsletter. Line it up with the left of our rectangle and 15px above the rectangle.

Grab your text tool again, color #5e4531 and type out your copyright. Center it on the screen and you are done!

Conclusion

I hope you have enjoyed this tutorial and would love to hear your comments!


Your ads will be inserted here by

AdSense Now!.

Please go to the plugin admin page to paste your ad code.

Create a Recipe Web Layout

Your ads will be inserted here by

AdSense Now!.

Please go to the plugin admin page to paste your ad code.

Hi there! Most recipe sites tend to be unique in their set up. Like other user-submitted content sites, they thrive on the right content management system. Unlike most other user-submitted content sites, visitors to these sites aren’t often treated to personal insights about the recipes they seek. Personality and individuality are portrayed solely through the recipes themselves along with the pictures that accompany them. This site is designed to complement the recipes and let them shine through in all their glory.

What We’ll Be Creating

Click image for full view.

Resources Used In This Tutorial

Lets Get Started

To begin, I set my background color to #E0C3B1 and then created a new file in Photoshop:

step1-create-new-document

Then I added some noise to give the background a little bit of a grainy look:

step2-add-noise

step3-noise-settings

My next step was to set vertical guides to make sure that the layout stayed within the right margins:

step4-new-guides

step5-first-guide

step6-second-guide

With the guides set, you should see something like this:

step7-view-of-guides

Next, I used the Rectangle Tool to create the shapes for the Navigation bar and the banner:

step8-create-shapes

I created these first so I had a good reference for placing my ribbon – which also serves as the right sidebar. Now I started with the ribbon. On a new layer, I used the Rectangular Marque tool to make a long selection:

step9-select-area-for-ribbon

Then I set my foreground color to #22467A and my background color to #0B1F44. Using the Gradient Tool, I filled in my selection:

step10-gradient-settings

step11-apply-gradient

step12-finished-gradient

Next, I cleared my selection (CTRL D) and used the Polygonal Lasso Tool to select a new area at the bottom of my ribbon:

step13-select-triangle

And then deleted the selected area by pressing the delete key on my keyboard:

step14-delete-selection

Next, I applied these layer styles to the ribbon:

step15-ribbon-drop-shadow

step16-ribbon-inner-glow

For a little more added depth, I used the Burn Tool:

step17-burn-tool

step18-burn-tool-settings

And brushed on just a few lowlights:

step19-brush-on-burn

Then I switched over to the Color Dodge Tool:

step20-color-dodge-settings

And filled in some highlights:

step21-brush-on-color-dodge

Next, I created a new layer over my ribbon and set my foreground color to white and my background color to black. Then I rendered some clouds by going to Filter > Render > Clouds:

step22-render-clouds

Once the clouds covered my layout, I applied the chrome effect:

step23-chrome-clouds

step24-chrome-settings

With the clouds layer still selected in my layer palate, I selected my ribbon’s pixels by holding down the CTRL key and left-clicking on the ribbon’s thumbnail:

step25-select-ribbon-area

Then I inverted this selection:

step26-inverse-selection

And hit the delete key on my keyboard so that my chromed clouds only cover my ribbon at this point:

step27-delete-selection

Then I set the blending options for this layer:

step28-clouds-blending-options

Here is how my ribbon looks so far:

step29-ribbon-so-far

Now that the ribbon is almost complete, we’re going to warp it to add a slight wave:

step30-filter-wave

step31-wave-settings

Take a moment to use the Move Tool to re-position the ribbon into a good spot, since the wave will seem to adjust the margins a bit. Then use the Polygonal Lasso Tool to make a small selection at the top left corner of the ribbon:

step32-select-top-corner

Once I made my selection, I hit the delete key on my keyboard to get rid of it. Then, I moved onto the top right corner. Again, using the Polygonal Lasso Tool, I made a small rectangular selection:

step33-select-top-right

This selection I filled in with black, leaving the top of my ribbon looking like this:

step34-finished-ribbon-top

Finally, I added a drop shadow to my finished ribbon:

step35-ribbon-drop-shadow

Here is how my layout looks so far with my completed ribbon:

step36-layout-so-far

Now that the ribbon is complete, I can start adding in the other elements around it. This is a little backwards for me, since I usually like to start at the top of a layout and then work my way down. But because the ribbon on this site helps to serve as such a focal point and because of the wave effect, I wanted to make sure that it was set up first so I could fit everything else around it. So, back to the top for the login and register links. First, I used color #0B1F44 and the Rectangle Tool to create this shape along the top of my layout:

step37-login-bar-shape

Next, I switched to the Ellipse Tool and created this shape:

step38-ellipse-shape

Then I used the Move Tool to place the Ellipse exactly where I wanted it to line up with the bar and merged the two layers together:

step39-merge-login-bar-shapes

Finally, I applied these layer styles to my login bar:

step40-login-bar-drop-shadow

step41-login-bar-bevel

step42-login-bar-gradient

step43-login-bar-gradient-settings

Once my layer styles were applied, I used the Type Tool with color # E0C3B1 and Tahoma Font to fill in my login links and then applied this drop shadow to those links:

step44-login-links-drop-shadow

Your ads will be inserted here by

AdSense Now!.

Please go to the plugin admin page to paste your ad code.

Here is how my login bar looks once it’s finished:

step45-finished-login-bar

Next, I used Cooper Black Font to type in my Site Name:

step46-site-name

Now, I’ve actually typed the site name using two different layers:

step47-site-name-layers

So you’ll need to be careful to space the words “Blue” and “Recipes” correctly to fit in “Ribbon” on the new layer. It may help to use your grid to line up the words exactly.

Next, I applied the same gradient as I used on the ribbon before to the word “Ribbon”:

step48-word-ribbon-gradient

step49-word-ribbon-gradient-settings

I then created a new layer and, using black and white, rendered clouds, chromed them, and clipped them down to the word ribbon:

step50-word-ribbon-chromed-clouded

And set the chromy clouds to “Soft Light”:

step51-ribbon-soft-light

Next, take some time to use the move tool and make sure that the words in the site name are exactly positioned just the way you want, then merge those layers together and apply these layer styles:

step52-site-name-drop-shadow

step53-site-name-outer-glow

Here is how my site name turned out:

step54-finished-site-name

Onto the Navigation Bar. First, I applied these layer styles to my navigation bar:

step55-navigation-drop-shadow

step56-navigation-gradient

step57-navigation-gradient-settings

I then used Tahoma Font with color #0B1F44 and filled in the primary links with my Type Tool. Once those were filled in, I applied these layer styles to my links:

step58-links-drop-shadow

step59-links-outer-glow

For the separators, I found a silverware icon at iconspedia and downloaded the 32 pixel size; then I placed one between each link. Here is my completed navigation:

step60-completed-navigation

Moving onto the banner, I copied the layer styles from the Navigation bar and pasted the same layer styles to the banner shape, giving me something that looks like this:

step61-banner-area-with-styles

For the featured recipe picture, I used a photo of one of my all-time favorite recipes, Cinnamon Raisin Pull-Apart Muffins from Annie’s Eats. I’ve made this recipe dozens of times, and my husband has as well – they never last long in our house. Anyway – must concentrate… I sized the photo and set it into my banner:

step62-add-recipe-photo

Then I used Tahoma Font with color #0B1F44 to type in the title of the banner area. I applied the same layer styles to this title as I had to the links in the navigation bar:

step63-added-title-to-banner

Using the line tool set to 3 pixels wide, I created this shape beneath the banner title:

step64-add-line-shape

Then I rasterized the line layer and chose “Hide All” for the layer masks:

step65-hide-layer-mask

Once you hide the layer mask, you should see the line disappear from your layout and in your layer palate you’ll see a new layer mask thumbnail linked to your title bar:

step66-view-of-layer-mask

Make sure you click on the Layer mask thumbnail and then choose the gradient tool set to the default settings for black and white. Then drag your mouse across to apply a faded effect for the line:

step67-apply-gradient

This makes the line fade out nicely:

step68-finished-faded-line

I continued to fill in more information using the type tool with color #0B1F44 and the Tahoma font. For the star ratings, I used the Polygon Tool set to create a five-point star with no fill and 1 pixel stroke:

step69-star-shape

I then duplicated this layer 4 times, giving me 5 stars all together and applied this gradient to each star:

step70-stars-gradient

step71-stars-gradient-settings

For the caption on the photo, I added these layer styles to the text:

step72-photo-caption-drop-shadow

step73-photo-caption-outer-glow

I also duplicated the line that we placed under the banner title and used it as a separator between the recipe teaser and the star ratings. Finally, here is how my completed banner area looks:

step74-finished-banner-area

For the left sidebar, I used the Rectangular Marquee tool to select an area about the size of the ribbon (at least the ribbon’s width before we applied the wave):

step75-select-left-sidebar-area

I then filled in this selection with white. It’s not going to stay as this, but I wanted to use this as a guide for my block titles that go along the left side bar:

step76-fill-selection-white

Next, I created these shapes along the left sidebar using the Rectangle Tool:

step77-sidebar-title-shapes

Finally, I copied the layer styles from the navigation bar and pasted those layer styles onto each of these shapes, leaving me with this look:

step78-sidebar-title-layer-styles

I then filled in the rest of my information along the left sidebar using the type tool set with Tahoma Font and color #0B1F44. I also applied these layer styles to my titles along the sidebar:

step79-sidebar-title-drop-shadow

step80-sidebar-title-outer-glow

Once my text was laid out correctly, I was able to delete that white layer that I had used as a guide for spacing, leaving my left sidebar looking like this:

step81-finished-left-sidebar

The main content area was done very similarly to the left sidebar, but I added the search area near the top so that my content titles could be slightly off-line:

step82-search-bar

I finished out the main content area using the same techniques as I used for the left side bar and using the same separators as I had used for the banner area between the search bar and the content:

step83-finished-main-content

And now we can finally get back to filling out that ribbon. I used the Type Tool with color #CDADA2 to fill in the text along the length of the ribbon:

step84-content-on-ribbon

But of course, this looks really bad right now, right? Because the ribbon has that nice wave to it and the text doesn’t. So, we are going to select the layer with the text on it and apply the same wave as we did on the ribbon:

step85-filter-distort-wave

step86-wave-settings

You may need to use the move tool on your text to make sure that the wave effect lines up nicely with the wave of the ribbon. Here is my result:

step87-finished-ribbon-content

Last but not least, I used the Type Tool to add in the secondary links and copyright information along the bottom of the site. And here is the finished layout:

Your ads will be inserted here by

AdSense Now!.

Please go to the plugin admin page to paste your ad code.

Advanced Orb Tutorial

Your ads will be inserted here by

AdSense Now!.

Please go to the plugin admin page to paste your ad code.

O-hai guys :) Today we’ll go shopping in the web interfaces accessories mall ^_~ That is, we’ll learn how to beautify our websites with nice glassy orbs ^^
This is what we’ll be creating:

Okay, so take a bag of chips and a drink and let’s get to work ^^

Step 1:

First, let’s create a new canvas, say 400×400 pixels. Fill it with a dark gray, I chose #09192a. Make a new layer and then set your foreground color to #751900.

Step 2:

Take the Elliptical Marquee tool and holding Shift, draw on your new layer a perfect circle that fills about half the canvas. Take then the Bucket Tool and fill the selection you just created with the #751900 foreground color. Press Ctrl (Cmd on Mac)+D to deselect. Name your layer “Orb Base”.

Step 3:

Moooo-vin’ on. Now make another new layer on top of the “Orb Base” layer and name it “Shadow”. Right-click on it and choose “Create Clipping Mask”.
Once you do that, Ctrl (Cmd)+click on your “Orb Base” layer’s thumbnail in the layers palette to get a selection of it. Take then the Elliptical Marquee tool, and set it on “Substract from Selection”.

Okaaaay, now, click first somewhere top-left of your existing selection, then holding down the Shift key, drag to make a perfect circle with the Elliptical Marquee over your existing selection of the Orb Base, so that in the end you are left with a sort of…half-moon, a semiluna. This might be a bit difficult for beginners, but don’t give up! ^_^

Now, once you have your semiluna (make sure it is decently symmetric and balanced like mine, okay?) remember that layer that we named “Shadow”? Well, make sure it is your “working on” layer (aka, it is a blueish color) and then set your foreground color to #49230f and your background color to #160d07.

Step 4:

Now, take the Gradient tool, make sure it is set to “Foreground to Background” and “Reverse” is NOT ticked, set it to “Radial Gradient” and clicking inside the selection, about at half-width, drag a little distance and then release the mouse button. Now your gradient should be filling the selection, with the foreground (lighter) color to the center and the background (darker) color to the “horns” of the half-moon ^__^
Press Ctrl(Cmd)+D to deselect…….

Step 5:

Aaand…this is where the fun begins ^^
Now you should have: 1 background layer, 1 Orb Base layer, 1 Shadow layer (which we made the “Clipping Mask” of the Orb Base).
Now I’ll take a second and explain what Clipping Masks are, for anyone who doesn’t know. Basically, they are a sort of “servant” of the layer beneath them, their patron-layer if you like. If we have a circle on a patron layer, whatever we draw on the Clipping Mask one will NEVER go out of the boundaries of the patron ^^  Whatever pixels are filled in the patron will be visible in the servant as well, nothing else :)

Back to our orb now. Click the “Orb Base” layer and then click the “New Layer” icon, to create a new layer between your “patron” and your “servant” layers. As you notice, the layer you just created inherits the characteristic of the one above it (Shadow) and becomes NOT a normal layer but a Clipping Mask as well.
Mmkay. That’s exactly what we want, so! Take the Elliptical Marquee tool, and make a perfect circle roughly around all the orange you see.
It doesn’t have to be exact so no worry if it goes a liiittle bit over, like in my screenshot.

Now make sure you have your newly-created layer selected and name it “Bottom Glow”…so it has a name we can identify easily, we don’t want the poor layer to have an identity crisis do we? ^__~

Kay, now!  Set your foreground color to #eb460f and your background color to #8b2c0b .
With the Gradient Tool, click at the lowest point of the selection and holding Shift drag only a little bit upwards. Juuust a little bit, so the colors boundary is visible near the bottom. Don’t deselect!

Step 6:

Keeping your selection, make a new layer and name it “Highlight Bottom” just about the “Bottom Glow” layer. Of course this new layer will be a Clipping Mask too….
Take the Marquee tool and set it to “New Selection -this button is a little bit left than the “Substract from Selection” button we clicked earlier in Step 3 ^_~
This will allow you to move your selection. So, move it a little upwards….and with your “Highlight Bottom” layer as your working one take the gradient tool, click on it’s icon at the top bar near the “New Selection” button and add these settings:

Then once you clicked OK  go back to your selection and positioning your pointer at its bottommost point, press Shift and drag upwardsto approximately a third of the selection’s height. Still, DON’T deselect.

Step 7:

Make a new layer above the Highlight Bottom one, name it “Side Shadows”.
Kay, now go to Select—>Transform Selection.

Squeeze your selection so that it becomes an ellipse..like this:

Step 8:

Now press Ctrl(Cmd)+Shift+I to inverse selection. Take the Gradient tool, set it to Foreground to Transparent, then set your Foreground color to #672f00 .
Set your gradient to Linear Gradient. And on the “Side Shadows” layer, click to the left side of the Orb, and pressing Shift, drag a little to the right. Do the same for the right side, drag to the left in its case though ^^ Like in my screenshot :)
Set your “Side Shadows” layer to Multiply blending mode and lower its opacity to about 80%

Step 9:

Now let’s start giving it highlights ^__^
Create a new layer and name it “Highlights 1″ ………yea, you guessed right, we’re going to have more highlights layers hahaha…
so, name it “Highlights 1″ and set your Foreground color to #ffffcb.
Once you do that, make an oval selection using the Elliptical Marquee tool, on the top-right of the orb, similar to mine:

Take the Gradient Tool and with it set to Foreground to Transparent, hold down Shify key and drag diagonally from the outer-top-right side of the selection to the bottom-lower-left part, like this:

Set it to Linear Dodge blending mode and lower its Fill toabout 70%

Step 10:

Now make a new layer again, name it “Highlights 2″ and Ctrl(Cmd)+click on your Highlights Bottom layer thumbnail in the layers palette to get its selection.
Use the Marquee tool like beore to move it upwards, until its bottommost point is about that half the height of the total orb.
Now with your foreground color set to #ffffcb, take the Gradient tool set to Foreground to transparent, hold Shift and drag from the top to the bottom of the selection. Set your layer to Linear Dodge and lower its fill to about 40%

Step 11:

Make a new layer, name it “Highlights 3″ and taking the Elliptical Marquee draw a perfect circle at the top, covering about 2/3 of the orb, like this:

Now change your foreground color to #ffff71 and with the same gradient settings as before drag from top to bottom. Set the layer to Color Dodge and lower opacity to about 30%

After this….well we just go on with the highlighta, hahaha…let’s see, I promise just a couple more and we’re done with them :)
Make a new layer, name it “Highlights 4″ and with the same Marquee, make a selection similar to the previous, only smaller in diameter. Only this time, make sure that it doesn’t touch the top margin of the orb, but is some 15-20px lower. Using #ffffef as your foreground color, drag as previously from top to bottm of the selection, then set your layer blending mode to Linear Dodge and lower its Fill to 25%
Make a new layer yet again, name it “Highlights 5″ and make an ellipse with the marquee tool, whose top begins where the top of the last circle began but as an ellipse, it is shorter in height, like this:

Your ads will be inserted here by

AdSense Now!.

Please go to the plugin admin page to paste your ad code.

Step 12:

Set your layer to Color Dodge and lower its Fill to 30%
Now let’s take care of some more shadows ^^
Click on your “Highlight Bottom” layer, then click on New Layer icon. Name it “Shadows Center 1″.
Take the gradient too, keep it Foreground to Transparent, but change its style from the top menu to “Reflected Gradient”. As a foreground color, use #6c3000
Position your cursor at about a third of the orb -to the bottom- and drag for about 30 pixels upwards.
Then release the mouse button and set the layer to Multiply, and lower its fill to about 5-8%
New layer again, name it “Shadows Center 2″..or something xD
Ctrl(CMD)+click on your “Highlight Bottom” layer thumbnail to select it, then use the Marquee tool to move the selection upwards about 25px.
Like this:

Using the same color as before, set your gradient to Linear Gradient, Foreground to Tranparent and drag, this time from bottom to top of the selection. Don’t deselect. Set the layer to Multiply and lower Fill to 30%
Make another new layer. Name it “Shadows Center 3″. Move it about 10px upwards. Same gradient as before, fill it from bottom to top, so that the transparency shows at the top.
Set it to Multiply and lower Fill to 35%.

Step 13:

Now let’s add the refining touches ^^
Make a new layer above all others (but make sure it is still a Clipping Mask), name it “Border1″ and get a selection of your Orb Base layer.
Set your foreground color to #38180c, then go to Edit->Stroke, choose 10px and Center.
Click OK then set your layer to 60% Fill.
Now let’s transform this to an ellipse, so go and press Ctrl(Cmd)+T and pull its tip&bottom, so it becomes a vertical ellipse whose top  goes over the margin of the Orb and is not visible anymore, and the sides are the only ones left visible.

Make another new layer, move it under the Border1 layer, get a new selection of the Orb Base, set your foreground color to #160d07 and go to Edit->Stroke, shoose 12px.
Click okay, then set your layer to Linear Burn and lower its Fill to 70%

Now, your Orb should look something like this:

Step 14:

New Layer above all others, but it must still be a clipping mask. Name it “Flare White” . Set your foreground color to #ffffa4 and your backgorund color to #ffb409.
go to the brushes palette and choose a soft, round brush, around 20px in size. Now, see where the most glowy part of bottom half of the orb is? Click once with your airbrush over it.  Now set your layer to Linear Dodge and using Transform, make it an ellipse by pulling the sides and pushing the top/bottom. After that, your orb should look like this:

Step 15:

Click X to reverse your Foreground with your Background colors.
Make a new layer and move it under your “Flare White” layer. Name it “Flare Orange”.
Get a selection of your “Flare White” layer and go to Select–>Modify–>Expand. Choose a value around 4px.
Click OK and then fill your selection with the foreground color, #ffb409.
Set your layer to Overlay blending mode.
Now your image should look like this:

Step 16:

Let’s take care of the borders now, shall we? :)
Set your foreground color to #6a6974.
Make a new layer and move it under ALL the orb layers that you have, so that it is above the background color layer. name it “Ring Small”
Get a selection of your Orb Base layer and go to Edit->Stroke, shoose 14px and Center.
Now click OK and enter the layer’s Blending Options.
Add these settings:

Step 17:

Now make a new layer yet again, move in uner your “Ring Small” layer, name it “Ring Large”and go to Select—>Modify—>Expand, choose a value around 15px.
Now set your Foreground color to #635337 and go to Edit—>Stroke–>about 15-17px.
Now add your layer these settings:

Step 18:

Now your orb should look something like this:

Now get a selection of your “Ring Large” layer and go to the bottom of your Layers palette, click “New Fill or Adjustment Layer” and choose “Photo Filter”.
Choose #ac7a33 as a color and around 60% Density. Make sure “Preserve Luminosity” is ticked.

Now obtain a new selection of your “Ring Large” layer and  go to the same Photo Filter, only this time choose #ec8a00 as color, 56% Density and again, Preserve Luminosity must be ticket. Your orb should now look similar to this:

Step 19:

Kaaay…we’re alllmost done, rejoyce! ^___^

Deselect. Now let’s deal with the blue glow, shall we?
Make a new layer, above the Photo Filters but below the “Ring Small” layer. Name it “Blue Glow”. Choose #277ef5 as your Foreground color. Get a selection of your “Ring Large” layer and take the Gradient tool, st it to “Color to Transparent” and to Linear Gradient and click&drag from right to left over a distance of about 50px on the right side of the large ring.
Do the same on the left side, only drag from left to right.
Set your layer to Hard Light, duplicate it and now your orb should have a fancy contrasting electric blue glow…:

Step 20:

Deselect. Make a new layer…(yea that’s how all the steps seem to start huh) xD;
Yea, like I was saying. Make a new layer and move it on to of your “Rings” layers, so the it right under the “Orb Base” one. Name it “Top Orange Glow”
Ctrl(Cmd)+click on the thumbnail of the “Ring Large” layer, then Shift+Ctrl(Cmd)+click on the thumbnail of the “Ring Small” layer.
Like this, you should have the selections of both layers in one selection ^_^

Riiight, now set you Foreground color to #eaa602 and taking the same gradient tool as before, with the same settings, click above the selection and pressing Shift at the same time drag down for about 100px.
Set your layer to color Dodge and Fill 30%, then duplicate it.
Your orb now:

Step 21:

Now ………….make a new layer! hahaha. Yea, make a new layer on top of the other Rings layers, name it “Bottom Shadow” and set your foreground color to #53442c. Now take the Gradient tool, and drag from bottom upwards for about 100px distance. Deselect. Set layer to Multiply.
Ta-daaaa…now your orb is fancy and sweet like this:

Step 22:

Iiiif you want to add extra fancy to your orb, let’s go give it some rusty texture ^^
Set your Foreground color to#d69308 and take a Spatter 46 brush from your brushes palette. Make a new layer and move it just above the “Ring Large” layer. Name it “Rust”. Obtain a selection of the “Ring Large” and start clicking randomly around with your brush.

Then take the Eraser tool, set its brush to a Spatter 39px and start erasing, randomly again. Leave just a little texture here&there.
Set your layer to Multiply and lower Opacity to 81% and Fill to 89%.

Step 23:

Now go to your Rust layer’s Blending Options, and give it these settings:

Dun-dun-dun-dun..you’re finisheeeddd…Now go and sleep for a week ^______~

Oh, and if you want to add some text to it  like I added to mine,  go ahead ^^ Just give it some Outer Glow and stroke and it’s done, nothing too fancy ^^

Hope you enjoyed and/or found this tutorial useful, see you next time and feel welcome to link me to your results or tell me your opinions :)
Cya :)

Your ads will be inserted here by

AdSense Now!.

Please go to the plugin admin page to paste your ad code.

Freelance Home Page PSD Tutorial

Your ads will be inserted here by

AdSense Now!.

Please go to the plugin admin page to paste your ad code.

Today I will be walking you through the process of creating a simple Freelance Home Page PSD document. This is the final step in creating the websites for our Beginning To End Tutorial Series. Here is what you will be creating:

Resources

Pencil Icon

Cog&Gear

Mailbox

Overall Selection

Getting Started

Start out by creating a new document 1366*959 and fill it with #2f1901. Next we will be adding a bit of texture to the background. Go to Filter—>Add Noise and use the below value:

Now it is time to insert the logo. We will be using a text only logo but feel free to use any logo that you would like. We spaced our logo 20px from the top and 20px from the bottom. We used the text Your Name for the main text of our logo and My Freelance Website for the subtext. We centered the sub header on the header and applied the following layer styles to the document:

Once you have your logo finished create a new group and lable it Logo. Place your logo layer styles in that folder.

Navigation

Now to start on our navigation. We will be using right aligned navigation with simple text and a simple rounded rectangle overlay for our hover effect.

For our font style we are using Lucida Sans, White, 18pt, All Caps. Now because our navigation is aligned to the right we are going to reserve create our navigation. Space your final navigation text (in our case Hire Me) 95px from the right side of the screen and 10px from the top.

Continue using the same font styles but space the navigation 45px. We used About Me, Portfolio, and Home for our navigation. You should have this:

Now time to start on our navigation hover state. We are going to be using a simple Rounded Rectangle, with a 5px Radius. Set your foreground color to white and draw out a rectangle 62*28 px over our Home Text Layer. Move our rounded rectangle tool to be beneath all our navigation layers and set the Blend Mode to Overlay. Center the rounded rectangle on our Home Layer and space it 3px from the top of our document. You should have this:

Search Bar

We will now be creating the search bar for our website. Start out by selecting your rectangle tool and drawing out a white rectangle 250*25px. Space it 50px from the right and 35px from the bottom of our navigation.

Set your layer to overlay. Now to apply the layer styles. We will be using an Inner Shadow to give our search bar the appearance of being “sunk in” to our document. Apply the following layer styles:

Grab your text tool, using Lucida Sans, 12pt, White and type out Search My Site. Space your text 10px from the left and 10px from the top. Open up the Magnifying Glass Icon from earlier and shrink it down to 18px by 18px and drag it over to our search box. Space it 5px from the top and 15px from the right of our search box. You should have this:

Create a new group and name it Search. Move all three above layers into the group.

Center Content

Grab your rectangular marquee tool and select the fixed size style. Insert 1366px for our width and 300px for our height. Click the rectangular marquee tool to create the selection.

Create a new layer and fill the selection with #CE8B32. Now that layer will be placed wherever you drew your marquee so we need to move it to the right area in our document. We want the layer to be space 45px from the bottom of our search bar.

We are now going to be creating the focus of our center content, the images. Grab your rectangle tool and draw out a white rectangle 390*230. Space it 35px from the top and 85px from the left of our document. Now to add our photo. Make a selection of the photo that you want to use that is 390*230px. Insert the photo you want to use. Hold down the CTRL key and click the thumbnail of your photo bg layer. Now right click and select inverse, hit delete. Not hit CTRL+T and at the top change the size to 95%.

We will not merge our layers down by right clicking your photo layer and choosing Merge Down. Repeat the above process three times, choosing a different image each time. Hide your first layer and your third layer.

Now select your second layer, use CTRL+T and change the to change the angle to -10. Now hide your second layer and unhide your third layer. Use CTRL+T and change the angle to +10. Unhide the other two layers so that you have the following:

Now, here you can choose whatver you would like to do. We have our layers in order of creation, 1-3, but you can move them around something like Layer 3, Layer 1, Layer 2.

Time to create our spacer. We will be using the same spacer technique we have used in previous tutorials. Grab your line tool, 1 px, and choose White for your foreground color. Draw out a white line that is 285px tall. Now set that layers blend mode to soft light. Draw out another rectangle that is exactly the same but change the color to black. The two lines should be right next to each other and create a nice “sunken in” style look for our spacer.

Now for bother layers apply the following style:

You will want to space your lines according to whatever content you want to add to the right. If you want more space between your images and content then add more space, if you want less than add less. We are using 135px to space our photos and content. Now add your content to the right of the spacer. This is what we have:

Main Three Boxes

Grab your rectangular marquee tool and make 3 Boxes: 455px * 190px just as a guide for right now. Make each box a different color and stick them back to back. Like the following.

Grab your Mailbox Icon from earlier and space it 50px from the left side of our document and 30px from the bottom of your center layer. Then line it up with the left hand side of your box. Do this for all three icons.

Now delete the three placeholder layers we created earlier. Now grab the type tool style Qlassik Bold, 24pt and White. This will be the header for our document . Space the text 30px from the bottom of your center content and 20px from the left of your icon. Repeat for remaining two icons.

Grab the type tool again style Qlassik Bold, 14pt and White. Space the text 20px from the bottom of your header text and 20px from the left of your icon. Repeat for remaining two icons.

Your ads will be inserted here by

AdSense Now!.

Please go to the plugin admin page to paste your ad code.

Create a new group and name it Three Boxes. Now take the three icon layers and the six text layers and add them to the group three boxes.

Latest Blog Post

We will be using the rectangular marquee tool once again to create our white latest blog post and contact form area. Change the style to Fixed Size again and make the size 1366*230. Create a new layer and fill it with #f1f1e9. Move your layer to be 45px from the bottom of your three boxes text.

We need to let people know what the box is for so grab your type tool with a style Nyala, All Caps, 30pt, color black and type out “Your Latets Blog Post Here”. When coding your website this will reflect your posts name. Space this text 20px from the top of your box and 15px from the left.

Now grab your type tool again so we can add the date the post was made. We will be using Nyala, All Caps, 14pt with a color of #bfbebe. Type out “Posted On (choose a date) by Me”. Space it 20px from your blog post header.

We will now be creating the image thumbnail for our latest blog post. Grab your rectangle shape tool again, using black as the fill color, and draw out a rectangle to be 200*140. Space it 35px from the bottom of your blog post header and 20 px from the left of your document. You should have this so far:

Now grab the thumbnail of your latest blog post (if you have one if not just choose a regular image) and shrink it down to 200*140. Bring the image over and line it up with our black rectangle so that none of the black is showing. We will be using the same process as above to shrink our image down to the right size. Use CTRL+T and change it to 93%. You should have this:

Now we will add the content to the latest blog post. We will be using the Font Style Qlassik Bold, 18pt Color Black for our content. Add your content and center it vertically on our image thumb and add a left spacing of 35px.

Contact Area

Now to add our small contact area to our home page. The first thing we will be doing is adding the header. Once again we will grab out type tool and use the font style Qlassik Bold, All Caps, 30pt, Color Black. Type out the word “Contact”. This will be our header, but we still need to create our sub-header. We will be using the font style Qlassik Bold, 14pt, color #bfbebe. Type out “Get In Touch With Me” and add a left spacing of 20px.

Now you will want to add your contact information. We will be using the Font Style Nyala, All Caps, 24pt, Color Black for the headers. We will be using the same font for the information to the right of it but change the font size to fit it in with the rest.

Make sure that your semi colons line up with the end of the T in contact. Like this:

You should have this so far:

Create a new group called White Box Overall. Now take all the layers you have that are not grouped, meaning the ones we just worked on, and add them to the group we just created.

Simple Footer

We will now be starting on our simple footer. Our footer will consist of three areas; Navigation, Copyright, and Newsletter. Each area is simple in and of itself and is comprised of simple layer styles and blend modes.

Fist off we will be adding our navigation. Grab your text tool with the font style Qlassik Bold, All Caps, 24pt, Color White. Type our your navigation from above (or change it if you wish) and space them 55px between each other, 55px from the bottom of our white content box, and 60px from the left of our document.

Now duplicate your layer and set the blend mode of both layers to Overlay.

Of course you can add a hover state to the navigation if you wish, but I find that adding it to our bottom navigation is adding too much layer styling to the footer.

Our copyright is a simple text style, centered on the document, and spaced 10px from the bottom of our document. Use the font style Qlassik Bold, 18pt, Color White and write out our copyright text.

To add our newsletter we will be using our Text Tool, our Rectangle Shape Tool and our Rounded Rectangle Tool.

Let’s start out with our text tool. Use the font style Qlassik Bold, All Caps, 24pt, Color White and type out “Newsletter”. Space it 15px from the bottom of our white content box and 220px from the right hand end of our document. You should have this so far:

Now lets grab our Rectangle Tool and draw out a white rectangle 220*30 pixels. Space the rectangle 15px from the bottom of our newsletter text and give it an indent of 20px. Set the blend mode on the rectangle to overlay.

Now apply the following layer styles to the rectangle you just created.

Grab your text tool again. This time use the font styles: Tercio, All Caps, 14pt, Color #bbbbbb. Type out “Your Name Here”. Give it a left and top padding of 10px.

Now duplicate your two layers (rectangle and text) and move them down 10px. Change the text to “Your Email Here” so you have this:

Time for our submit button! Grab your rounded rectangle tool with a radius of 5px and drag out a white rectangle: size 75*30. Space it 10px from the end of our previous two rectangles and center it vertically against the two rectangles. Set the blend mode to overlay and duplicate the layer

Now apply the following style to the second rounded rectangle layer:

For the last time we will grab our Type Tool and use this font style: Qlassik Bold, All Caps, 18pt, Color Black. Type out the word Submit and center it on our rectangle.

And here you go!

Conclusion

As you can see you can achieve a great looking website with just the basic abilities in Photoshop. We have created this simple website tutorial using only the basic photoshop actions that come with beginner knowledge of photoshop. It is not always about knowing how to do all the fancy stuff in Photoshop but knowing how to take everything you know and make it look great.

I would love to see what you make with this tutorial. Post a link to your work in the comments below and I will feature them on my website!

Your ads will be inserted here by

AdSense Now!.

Please go to the plugin admin page to paste your ad code.

Create a New York Tourism Web Layout

Your ads will be inserted here by

AdSense Now!.

Please go to the plugin admin page to paste your ad code.

Hello everybody, welcome to a new tutorial from HV-Designs. In this tutorial Naomi will walk you through the steps to create tourism web layout.

Hello again! One of my favorite things to do is to find all the free tourist attractions, whether it be around my home or when I travel to other places. The hard part is finding tourist attractions that are free. But once you find them, the free tourist attractions are everywhere. New York City is one such place with hundreds of things to do to discover the history and majesty of the city for free and every time I go I find something else to do. One of my favorites is walking across the Brooklyn Bridge. So when I found this photograph of the Brooklyn Bridge at DeviantArt I absolutely had to design a site around it.

What We’ll Be Creating

Click image for full view.

New-York-Tourism-Site

Resources Used In This Tutorial

Lets Get Started

To start, I opened a new document:

Then, using color #3E2624, I filled in the background layer:

step2-color-background

Once the background is filled in, I added some noise:

step3-add-noise

And then set a Guassian Blur:

step4-guassian-blur

Then I set my guides:

step5-new-guides

Using these settings for my guides:

step6-first-guide

step7-second-guide

Right now, you should see something like this:

step8-view-of-guides

With the background complete, it’s time to add in the logo. To start, I used Renaissance Font, which you can download from the link shown at the beginning of this tutorial, with color #B59AA. Then I used the Type Tool to type in my site name:

step9-type-site-name

Then I applied these layer styles to the Logo:

step10-site-name-drop-shadow

step11-site-name-inner-shadow

Which gives me this look for the logo:

step12-finished-site-name

Next I used Tahoma Font with color #CCAA88 to type in the slogan:

step13-type-slogan

And applied these layer styles to the slogan:

step14-slogan-drop-shadow

step15-slogan-gradient

step16-slogan-gradient-settings

Here is my finished logo and slogan:

step17-finished-logo-and-slogan

For the primary links area, I set my foreground to color #CCAA88. With the Rounded Rectangle Tool  and a radius of 20 pixels, I created this shape:

step18-navigation-shape

I then applied these layer styles to my navigation bar:

step19-navigation-drop-shadow

step20-navigation-stroke

For some added shading that was a little more than just adding a gradient, I created a shape using the Ellipse tool:

step21-highlighter-shape

And then applied a Guassian Blur:

step22-highlighter-blur

Next, I used the Rectangular Marquee tool to make this selection:

step23-select-area

And then I deleted the selection, leaving only the highlighter over the navigation bar – which now has a nice, smooth finish to it:

step24-finished-navigation-bar

I filled in my links with Tahoma font and color #3E2624 and then applied these layer styles to my links:

step25-link-drop-shadow

step26-link-outer-glow

step27-link-stroke

For the separators between the links, First I used the line tool with color #3E2624 to create a line 1 pixel wide:

step28-separator-shape

Then I duplicated that layer, and moved it slightly, adding a color overlay of color #B59AA3. Here is a close-up of the two lines:

step29-separator-close-up

Next, I went into my layer palate and selected both layers that make up the separator:

step30-select-separator-layers

And then merged the two layers together by pressing CTRL E:

Your ads will be inserted here by

AdSense Now!.

Please go to the plugin admin page to paste your ad code.

step31-merged-layers

Finally, I duplicated the separator layer 3 times (giving me 4 separators all together) and moved the duplicates between the other links. Here is my finished navigation bar:

step32-finished-navigation

Now, the best part – adding in that beautiful picture of the Brooklyn Bridge. First, open the picture and resize it to fit within our space (960 pixels wide):

step33-resize-photo

And then place the photo just below the navigation bar:

step34-place-photo

Next, I set my Rectangular Marquee Tool to a feather of 25 pixels and selected the photo:

step35-select-photo

And then I inverted my selection:

step36-inverse-selection

Once the selection inverted, I hit the delete button 3 times to achieve the faded affect around the edges of the photo:

step37-finished-photo

For the caption over the photo, I used the Rectangle Tool to create this shape:

step38-caption-create-shape

And then applied this blending option to this shape:

step39-caption-blending

After the blending option is set, rasterize the layer and then hide the layer mask:

step40-hide-layer-mask

Once you hide the layers, you’ll see the shape disappear off your layout and you’ll see a black thumbnail in the layer palate next to the shape:

step41-view-layer-mask-thumbnail

Make sure you click on this black thumbnail and then select the gradient tool with the default black and white settings. Then drag your mouse across where the shape is:

step42-drag-mouse-for-gradient

Then right click on the layer and apply the layer mask:

step43-apply-layer-mask

Then we start the whole process over again. Hide the layer mask, click on the black Layer Mask Thumbnail, use the gradient tool with the default black and white settings and drag the mouse to apply the fade:

step44-drag-mouse-second-gradient

Then I used the Type Tool with color #B59AA3 and a blend of Renaissance and Tahoma fonts to fill in the caption.  This drop shadow was applied to the caption text:

step45-caption-text-drop-shadow

Here are the results of my layout so far:

step46-results-so-far

Now we’re ready to move onto the bottom area of the site. First, using color #CCAA88, I created this shape:

step47-bottom-create-shape

Next, I applied a warp by going to Edit > Transform Path > Warp:

step48-transform-edit

This sets up the shape so that you can see the different paths you can use to warp the shape:

step49-warp-paths

Instead of warping the shape manually, I used the preset settings for Arc-Upper:

step50-arc-upper

And set the bend to -15%:

step51-arc-upper-settings

Finally, I applied the warp and repeated the process using the Arc-Lower setting:

step52-finished-bottom-warps

Using the same technique that we used for the caption, I rasterized the layer, applied a layer mask using the gradient tool, and created the fades on both sides of this shape:

step53-finished-bottom-area-background

To create a bit of shadowing, I created a new layer underneath this shape and then used the Ellipse Tool to create this shape:

step54-shadow-shape

And then applied a Guassian Blue to the shape:

step55-shadow-shape-blur

I then repeated this for the bottom of the shape, gaining this as my result:

step56-finished-shadows

The icons that I used for the bottom were created by Icons Pedia. The typing was done using Tahoma Font with color #3E2624 and the separators were made exactly the same as the separators we did earlier in the navigation bar:

step57-finished-bottom

Finally, I used the Type Tool with color #CCAA88 to type in the secondary links and copyright notices. Then I applied this drop shadow to that text:

step58-copyright-drop-shadow

And voila! We are done. Here is how my completed layout looks:

That’s it all done, hope you enjoyed this tutorial, look out for more tutorials coming soon. Thanks.

Your ads will be inserted here by

AdSense Now!.

Please go to the plugin admin page to paste your ad code.

Freelance Coming Soon Photoshop Tutorial

Your ads will be inserted here by

AdSense Now!.

Please go to the plugin admin page to paste your ad code.

Today I will be walking you through the process of creating a Coming Soon Page for your Freelance website. We will be using a lot of basic techniques and simple layer styles to create an excellent look.

Resources

Wooden Cup From Graphics Fuel

Setting Up Our Document

Start by creating a new document 1366*768 with whatever color background that you choose as we will change it next.The background color for your document is going to be #2f1901 and use the paint bucket tool to fill in your document. Next we will be adding a bit of texture to the background. Go to Filter—>Add Noise and use the below value:

The Header

Now we will be creating our header image. We will be using the font Tercio font 87pt, with all caps on. We used the text “freelance is my life [enter / break] is coming soon” and we also added the following layer styles:

The Timeline

Now to set up our timeline. We will be using a rounded rectangle, color black, at a radius 45px. Draw it out 1165*90. Now set the opacity so you have the below image:

Now to set up the base for our four color squares. Set up a new layer: Use CTRL+Click thumbnail. Now to shrink it to fit hit Select, modify, contract 1opx. Fill with White. Should be 1145*70. This layer is merely to set up some guides and will be deleted later, but it should still be the correct size. So far you should have:

Create four squares by using the below properties, by setting up a fixed size rectangle marquee 286*100, and apply the below colors:

Now use the CTRL+Click thumbnail to select your smaller white rectangle layers outline. Like Below:

Right click and choose select inverse, and now hit the delete key on each layer. You should have this:

You should now create a Group and label it FourSquaresColored to keep organized. Bring the four squares into the group and add the below styles:

RED


ORANGE

Your ads will be inserted here by

AdSense Now!.

Please go to the plugin admin page to paste your ad code.


BLUE


GREEN


Now hide all but the first three layers and delete the layer that held the white rectangle from earlier. You should have something like this:

The Content

Now we will be creating our content letting them know to look at our Digital CV and our Social Network area. First start off by downloading the Digital Cup from above. Choose the 128×128 version and bring it down to the bottome left corner of our document.. Space it 45px from the left and 90px from the bottom of the screen. You should have something like this:

And now set up two guides at the bottom of your cup and the top of the rectangle like below:

Now use the font Qlassik Medium at 18pt size, color white, to fill out your content within the guides we set up earlier. Make the fonts different colors. I chose to use colors associated with whatever link I was linking to. Like below:

The Sign Up Form

Now to set up our sign up form. We will only be asking for email for our coming soon signup. Garb your rounded rectangle tool again , choose your color as white and set it as a 15px radius. Now set your layer to overlay. You should have this so far:

Create a new layer and using the rectangular marquee tool make a new selection 170*113, set it up at the end of the rectangle like below:

Now use CTRL+Click thumbnail of the rounded rectangle layer. Now right click and hit select inverse and then the delete key. You should have the button a little brighter than your search area. Now using the font Tercio, size 24pt, color black. Add it into your submit button layer we created earlier and center it vertically and horizantally. Here is what we have so far:

Bring Our Document To The Next Level

Now that would be a completed coming soon page for most but its time to take it up to the next level. Add a description to our timeline so that people know where you are at in your design and even a countdown. This is what we added.

That is our completed Coming Soon Tutorial. Please be on the lookout for the next tutorial where we code our document.

Your ads will be inserted here by

AdSense Now!.

Please go to the plugin admin page to paste your ad code.

Create a Simple Freelance Curriculum Vitae (CV)

Your ads will be inserted here by

AdSense Now!.

Please go to the plugin admin page to paste your ad code.

Today we will be creating a simple yet elegant Curriculum Vitae (CV) for a freelance designer. The CV will detail the freelancers work history as well as the four areas that they consider their strongest areas of expertise. This CV is strictly for a freelance web designer to use. I always like to put up a CV before the Coming Soon Page so people have something to look at when the coming soon page gets put up to attract their attention.

Resources Used In This Tutorial

What We Will Be Creating

Let’s Get Started

Start out by creating a new document 1200*1295. The document is going to be a little bit long due to the information on it, but not too long that people won’t want to read it. We will be using the full document to display our information.

The background color for your document is going to be #2f1901 and use the paint bucket tool to fill in your document. Next we will be adding a bit of texture to the background. Go to Filter—>Add Noise and use the below value:

Creating the Header

Now we will be using the font Tercio (found at Abduzeedos Friday Fresh Free Fonts) to create our heading. We will be using the text tool, color white for right now, to type out Freelance is My Life, with Caps Lock On and 94pt size. Space it 27px from the left side of our document (right in the center) and 41px from the top. Please use the following Gradient Overlay:

Now, just below our header text we will place our sub-header. This will be in the font you downloaded above Qlassik (which we found at the Friday Fresh Free Fonts). The font size will be 52pt and white will work for the color as we will be adding effects to the text next. It should be spaced 37 pixels below our header and center it on the header. Like this:

Now apply the following styles to your Sub-Heading:

This is what you should have so far:

Creating the What I Am Good At Space

Choose the rounded rectangle tool (again the color white will work as we will apply layer styles later), and make the radius 45px. Drag out your rounded rectangle to be 1250*60. Now we will create the outer backing to our rounded rectangle. Select just the outline of our rounded rectangle. To do this you hold CTRL down and click the thumbnail of the rounded rectangle layer. Now create a new layer. With your selection still chosen go to Select—>Modify—>Expand and expand it by 10px. Now fill your selection with black and lower the opacity to 30%.

Now we will create four squares using the marquee tool. You will need to be very precise and place the squares just at the end of our first rectangle (the white one). All four squares should have the following:

4 Squares Size: 312px wide (each a different color)
—Square 1: #14d500
—Square 2: #ff0000
—Square 3: #009abb
—Square 4: #ff8400
——Set them up back to back to cover the rounded rectangle

Now we will be using the same selection technique to remove the excess from the squares. Select the outline of our first rounded rectangle (the white one) and then right click, choose select inverse, and then hit the delete key. You should have this:

It is time to apply the styles to our squares. It will be a simple gradient overlay that will give them a nice look with a simple style.

Green Square

Red Square

Blue Square

Your ads will be inserted here by

AdSense Now!.

Please go to the plugin admin page to paste your ad code.

Orange Square

Creating Our Circles

Now we will begin to create our circles which will tell us where to look in regards to the colored squares. This process is simple and easy. We will begin by creating the circles.

Use your circle shape tool and create a circle 30*30. Now use our selection method from above and choose the circle you just created. Go to Select–>Modify–>Contract and choose 2px and hit the delete key. Now create another circle, 16*16, and place it in the center of our previous layer. Make sure the circles are in the very center of your green square. You should have something like this:

Now it is time to create our line. Choose your line shape tool and make it 2px wide. Draw out a line 75px tall and connect it to the center circle.

Now create a new group by clicking the folder icon in your layers window. Name the group Green Square Circles. Bring your two circle layers and the line layer inside the group. Now duplicate the group and rename it Red Square Circles. Select the group layer and go to Edit—>Transform—>Flip Vertical. Now drag the whole group over and place it in the center of our Red Square.

Now duplicate both groups (rename them to their corresponding colors) and drag them over until they are centered on the last two squares. You should have something like this:

Now add whatever you are good at using the Qlassik Font. We have added our own things we are good at as well as the years we have been doing them to get this:

Now to create our spacer between the top headers and the information. To create our spacer grab your line tool and draw out a line that is 1135px long, white, with a 30% opacity. Rasterize your layer and duplicate it. Space it down, using your arrow keys, eight times (which is 4px).

Creating the Content

Now we will start creating the content. The first thing we will do is use the icon set we downloaded earlier. I am going to use the Wizard Icon, in the 128×128 folder. Bring the wizard onto the document and place it 27px from the left hand side of the document and space it 58 pixels from your second spacer line. Now give the wizard the following Drop Shadow:

Now add your content header to the document. We will be using the Tercio font from earlier for our content header, color white, and 26pt size. Space it 20px from your wizard and type whatever you want. I used “Making The World of Design Magical” because it fits with the wizard icon and also fits with the layout of the CV. Now, underneath, using whatever font you want, type your content about how you make the world of design magical. Keep it spaced 20px from your wizard and 30px from your content header text.

Now use the gallery icon, found here, and place it 27px from the right hand side of the document and 85px from the bottom of your last content. Use the same process to write your content as we did above, though using a right aligned text.

Use the same process as above, though spacing this icon 27px from the left as we did with the wizard and left aligned text again.

You should have something like this:

Social Media

To start off we are going to create another spacer like the one we created earlier. You can either follow the same process, or to save time, just duplicate those layers and drag them down. Space it 70px from the bottom of your last piece of content.

Now using the Twitter icon that we have in our resources above. You will need to open it and remove the white background. To do that you can use the magic wand tool and select the white BG. Make sure you are no longer on the BG image and remove the white BG with the delete key. Now use CTRL + I to resize the twitter icon to 110*110. Now drag it over to our document and space it 152 pixels from the left of our document and 20px from our second spacer line. Set the Mode on the Twitter icon to Overlay. Duplicate the Twitter icon to give it the right look.

Now using the Tercio font from earlier, color white size 21pt, to write Follow Me. Center it on your Twitter Icon. Set the Mode to Overlay and then duplicate it to give it the right look.

Do the same with the deviantART logo from above. Open it up separately and remove the greenish grey background. Use CTRL + I to resize the image, making the height 110 (which will make the width 258). Use the same process from above (using the right guides instead of left). You should have this, which is, your final product!

And that is it. You are all done! You can add a few other things into it if you would like, but this is our simple CV for freelancers! In the next step you will learn to code it!

Your ads will be inserted here by

AdSense Now!.

Please go to the plugin admin page to paste your ad code.

Create a Clean Portfolio Web Layout

Your ads will be inserted here by

AdSense Now!.

Please go to the plugin admin page to paste your ad code.

Hello everybody, welcome to a new tutorial from HV-Designs. In this tutorial Naomi will walk you through the steps to create a clean portfolio web layout.

Ten years ago, I was working as a part-time DJ at a small radio station desperately trying to land a full time position there – any full time position. One day, I caught a lucky break when the marketing director at that station asked me if I knew anyone who understood computers and could learn how to make simple graphics for the station’s new web site. I told him that I was his gal – and less than a week later I was in his office learning my way around photoshop and HTML. I remember looking around at other radio stations’ web sites and the first time I came across one such web site with flashing lightning across the page while the logo bounced around – fading in and out of view. Both the marketing director and I drooled as we decided we just had to figure out how to create something similar for our own web site.

My, how trends have changed! Flash is still used a lot in web design, but the lightning effects, floating menus, hovering over a menu item here to see a pop up explanation over there, pictures and movies galore have all been sized down quite a bit in favor of a new trend known as clean designs. Clean designs allow the web site to be focused on the content rather than the glitz of the pictures and those little sayings that follow the mouse around the screen. So, in keeping with this trend, today’s tutorial is about creating a clean web layout that will work as a portfolio layout for web designers, photographers, or anyone else who may want their work displayed for all to see.

What We’ll Be Creating

Click image for full view.

Resources Used In This Tutorial

Lets Get Started

To begin, I set my background color to #BF9268 and then created a new document that was 1200 pixels wide by 1000 pixels high:

Next, I used color #671900 with the soft brush tool set to 300 pixels and created this circle near the top of my page:

Still using the soft brush tool, I created other circles using colors # CC6B04 and #1D3855 of different sizes. Here is my outcome:

Next, add some noise to this layer:

And then apply a guassian blur:

Here is the top part of my page so far:

For now, I’m going to go ahead and hide the circles from view and work on the layer below them. Use the Rectangular Marquee tool to select an area 1200 pixels wide by 400 pixels high at the top of the page:

Then set your foreground color to # AB7849 and your background color to #5B3A17. Use the Gradient Tool to fill in the selected area with a gradient from foreground to background color:

Once that’s done, you can un-hide the layer with the blurred circles so that they show over the gradient layer. Create a clipping mask by right clicking on the circles’ layer and select “Create Clipping Mask”:

You should now see something like this:

Using color #671900 and the Rectangle Tool, I created this shape to serve as the seam between the header area and the bottom of the page:

Next, I used the Rounded Rectangle Tool to create a white shape in the center of the page:

Then I applied these layer styles to the white rectangle:

Here is what my complete page looks like so far:

Now we’ll need to type in our site’s name. To highlight the site name, I used the Ellipse Tool to create a small circle near the top of the page beneath the center area:

Then I applied a guassian Blur to the circle using this setting:

Using color #671900 and Tahoma font, I typed in the site name over the highlighter and applied these layer styles:

Here is what my site name looks like when it’s finished:

To create the navigation bar, first I used color #617900 and the Rectangle Tool to create a thin rectangle to run across the top of the layout:

Your ads will be inserted here by

AdSense Now!.

Please go to the plugin admin page to paste your ad code.

Next I selected the Rounded Rectangle Tool and placed it directly above my thin rectangle going down near the top of the central area. Once both shapes are lined up the way you like, merge the two layers together (CTRL E) and apply these layer styles to the navigation bar:

Next, create a new layer directly above the navigation bar. With the Rectangular Marquee Tool set to feather 6px, select an area around just the rounded rectangular portion of the navigation bar:

With the area still selected, use the line tool with white to create small, vertical lines across the rectangular selection. For this, I used the grid to help me align my lines, and used the “Add to Shape Layer” setting so that all the lines would appear on the same layer:

Here is what my header looks like once I’ve finished drawing in my vertical lines:

Now we’re going to set the Blending Mode for this layer to “Soft Light”:

Now, create a new layer and use the lasso tool to select this area:

With your soft brush tool set to 30 pixels and opacity 50%, paint just over the top edge of the selection:

Then inverse the selection and repeat the process. You can also delete some of the white from inside:

And finally set the Blending Mode to Overlay and set your opacity:

I used Tahoma font with color#BF9268 to write in the links using the text tool and applied this drop shadow to each link:

Here is the completed header section for my layout with the completed navigation bar:

For the content that appears in the top portion of the central area, I used Tahoma font with color #5B3A17. On the right side, I placed a thumbnail image of another layout I developed.

To create the navigation arrows around the thumbnail image, I set my foreground color to #617900. Then I used the Line tool set to 6 pixels and created a small diagonal line:

I duplicated this process slanted the other way to create the arrow and then merged the two shapes together into one arrow. Next I applied these layer styles:

I repeated this process to create the right arrow as well.

To frame the thumbnail for the site that’s on display, I first created another layer directly beneath the layer containing my site’s thumbnail. Then, using the Rectangular Marquee Tool, I selected a rectangle around my picture and filled it in with color #1D3855. Next, I applied this layer style:

For the text in the middle, I used color # AB7849 and then applied this drop shadow:

I used the text tool to fill out the content for the bottom area as well.

For the highlighters behind the titles in the bottom area, I used color #1D3855 and the Ellipse tool to create a very thin ellipse:

Then I applied a shape blur to the ellipse:

Here is my result for the title highlighter in the bottom content area:

And finally, add in your social media icons. The set I used comes from claycauleyincat DeviantArt.

Here is what my finished layout looks like:

That’s it all done, hope you enjoyed this tutorial, look out for more tutorials coming soon. Thanks.

Your ads will be inserted here by

AdSense Now!.

Please go to the plugin admin page to paste your ad code.

E-commerce Web Layout

Your ads will be inserted here by

AdSense Now!.

Please go to the plugin admin page to paste your ad code.

Hello everybody, welcome to a new tutorial from HV-Designs. In this intermediate tutorial from one of our new Authors, Naomi Nakashima will be walking you through the steps to create an e-commerce web layout. This tutorial is very easy to follow and not too complicated for those of you just getting into web design.

Please give Naomi a warm welcome when you have a chance.

What We’ll Be Creating

Click image for full view.

Resources Used In This Tutorial

Social Media Icons

Lets Get Started

To begin, start Photoshop and set your background color to #525252. Then create a new file (File >> New). Set the dimensions to Width 1200 and Height 1200.

Now, because our workspace is larger than our actual layout, set new vertical guides (View >> New Guide). You’ll need to do this for each guide.

Right now you should be seeing something like this:

Using the Type Tool with Arial Font and color #BB9EB, I typed in my logo. Then apply the following styles to the word “Template”:

Using the same layer style for the slogan, here is my logo so far:

Next, we need to create the top navigation. Use the Type tool (I used Arial Font) to insert your links. For each link apply this layer style:

For the hover styles over the top navigation links, use the rounded rectangle tool and add the shape around the “Welcome, Doreen” link. I used color #403840. Then apply this layer style to that shape:

Here is what I have so far for my page header:

Now for the primary links. Use the Rectangle tool to create this shape with white:

Now apply these layer styles to your navigation bar:

Your ads will be inserted here by

AdSense Now!.

Please go to the plugin admin page to paste your ad code.

Now use the Type Tool to add links to the primary navigation bar. Apply a Drop Shadow to each link:

Creating The Seperators

Now for the separators between each link. Using the Line tool with #403840, draw a short line 1 pixel wide between the first two links and apply these layer styles:

Repeat the process of drawing lines and applying these styles between each link on your primary menu bar. Here is what I have after finishing this:

Creating The Content Area

Next, we need to create the content area. Use the rectangle tool to create a rectangle and apply these layer styles:

You should now have something that looks like this:

Now to add content. Choose a stock image to serve as the featured product. After placing your stock photo into the content area, create a clipping mask to ensure that it’s framed well. Then hide the layer mask (Layer >> Layer Mask >> Hide All). Click on the Layer mask thumbnail in your layer palate and choose the gradient tool, selecting the Black and White gradient. Place the gradient:

Now your featured photo has a nice faded effect on the side:

Use the type tool and add some smaller pictures to create the content. Here is how my content looks:

Creating The Footer

Use the rectangle tool with color #646464 to create the background for the footer area:

Next, use the rectangle tool to create a title area for your footer information. I used color #525252. Set the Blending mode to Overlay and the opacity to 15%:

Use the type tool to fill in titles and text links within the footer area. Use this drop shadow on the titles:

Use the rectangle tool to place the shapes for the newsletter sign up. Then apply this layer style to each rectangle:

Finish everything off by placing your social media icons.

Here is how the finished template looks:

That’s it all done, hope you enjoyed this tutorial, look out for more tutorials coming soon. Thanks.

Your ads will be inserted here by

AdSense Now!.

Please go to the plugin admin page to paste your ad code.

Product/Business Style Layout

Your ads will be inserted here by

AdSense Now!.

Please go to the plugin admin page to paste your ad code.

Hello everybody welcome to a new tutorial from HV-Designs. In this tutorial ill be walking you through the process of creating a product layout.


What We’ll Be Creating

Click image for full view.

Product layout

Resources Used In This Tutorial

Lets Get Started

Create a new document 1200 x 1225 pixels with a white background. Set your foreground color to #eeeff3 then select the rectangular marquee tool.

Product Layout

Once you’ve selected the rectangular marquee tool make a selection about 80px in height spanning the width of your canvas. Fill the selection with your foreground color.

Product Layout

Creating The Header

Select the text tool then add your website title and slogan inside the rectangle using the color #70767d.

Product Layout

After your website title create a small divider, to do this zoom in then make two 1px lines next to each other. Color the first line in black (#000000) and the second line in white (#ffffff), once you’ve filled the lines set the layer blend mode to soft light.

Product Layout

Creating The Navigation

Using the text tool create a simple textual navigation, use the color #70767d for the text then add a drop shadow using the settings below.

Product Layout

The result.

Product Layout

On a layer underneath your navigation text create a rounded rectangle using the rounded rectangle tool. Color the rectangle in the color #e0dfe2, your should have something like this.

Product Layout

Creating The Product Featured Area

Select the rectangular marquee tool and make a selection about 370px in height that also spans the width of your canvas. Fill the selection with any color then add a gradient overlay using the settings below.

Product Layout

Once you’ve added the gradient overlay right-click the layer and go to “Convert To Smart Object”. Now go to “Filter > Noise > Add Noise”, use the settings below.

Product Layout

You should have something like this.

Product Layout

At the top of the featured area create a divider using two 1px lines colored black and white. Set the layer blend mode to overlay.

Product Layout

Once you’ve create the divider line at the top of the featured area, duplicate the layer and drag it to the bottom of the featured area.

Adding Content To The Featured Area

Inside the featured area add a screenshot of your product. Make the product screenshot overlap on to the background past the featured rectangle.

Product Layout

Once you’ve added your screenshot add a drop shadow using the settings below.

Product Layout

Above your screenshot add some text, maybe a title or something along those lines.

Product Layout

Once you’ve added your text add a drop shadow using the settings below.

Product Layout

On the right side of the screenshot add a couple of icons from the icon pack provided in the resources list. Underneath the icons add a smaller title with a couple of paragraphs of text. You should have something like this.

Product Layout

Creating The Download Button

Using the rounded rectangle tool, drag out a smallish rectangle. Again make the button overlap the featured area and background.

Product Layout

Your ads will be inserted here by

AdSense Now!.

Please go to the plugin admin page to paste your ad code.

Now add the following layer styles to your button.

Product Layout

Product Layout

Product Layout

Product Layout

You should have something like this.

Product Layout

Select the type tool and add your desired text inside the button. Once you’ve added your text add a drop shadow to the text layer using the settings below.

Product Layout

You should have something like this.

Product Layout

You can now duplicate the button as many times as you wish.

Creating The Content Area

Set your foreground color to #f1eeea and background color to #ffffff then select the gradient tool. With the gradient tool select select a linear gradient then drag the gradient over your background layer starting from just above the featured area and dragging about 200 pixels downwards.

Now underneath the product screenshot add a small title saying “From The Blog”.

Product Layout

Underneath your small title add one of your buttons which we created earlier. Re size the button quite a bit then add a month of the year inside.

Product Layout

On the right side of the month box add a post title with a description underneath.

Product Layout

Repeat the steps as many times as need until you get a small blog.

Product Layout

Creating The Gallery

Create a new text heading saying “In The Gallery” then underneath add 3 screenshots of your product. I’ve just used my current screenshot for the purpose of this tutorial.

Product Layout

Finish off the gallery by adding a small paragraph underneath the screenshots.

Creating The Seperators

Select the type tool and keep the dash key (-) pressed until you get a row of dashes. Place the horizontal dashes in between the blog and the gallery.

Product Layout

Repeat the process once more only this time make the separator a lot longer. Once your happy with the separator rotate it by 90 degrees and place it along side the left content.

Product Layout

Finish off the separator by adding a layer mask. Once you’ve added the layer mask drag a linear gradient from about about 50 pixels from the top, dragging upwards to the top of the separator. The separator should blend in with the background.

Product Layout

More Content

Finish off the content area on the right by adding more product related content building up your layout. I’ve chosen to go for a demo section where you can see the product in action.

Product Layout

Creating The Footer

Select the rectangular marquee tool and make a selection around the last bit of space at the bottom of your canvas. Fill the selection with the color #b8bdc8 then add a inner shadow and stroke using the settings below.

Product Layout

Product Layout

Once you’ve added the layer styles press “Ctrl + T” to enter into free transform mode. Select the left anchor point and drag out past the canvas. Repeat the process for the right anchor.

Finally add your footer text somewhere on the footer area.

Product Layout

That’s it all done, hope you enjoyed this tutorial, look out for more tutorials coming soon. Thanks.

Your ads will be inserted here by

AdSense Now!.

Please go to the plugin admin page to paste your ad code.

Mobile App’s Layout #2

Your ads will be inserted here by

AdSense Now!.

Please go to the plugin admin page to paste your ad code.

hello everybody welcome to another tutorial. In today’s tutorial i’ll be showing you how to create an apple theme mobile app layout.


What We’ll Be Creating

Click image for full view.

Resources Used In This Tutorial

Lets Get Started

Create a new document 1200 x 1200 pixels with any color background. Change your foreground color to #f3f3f2 and background color to #d2d2d2 then select the gradient tool with a reflected gradient.

Mobile App Layout #2

Drag the reflected gradient over your canvas starting from about 400 pixels down from the top of your canvas. Your looking to get something like this.

Mobile App Layout #2

Creating The Navigation

Select the rounded rectangle tool from the menu then change the radius of the rectangle to 10px (should be 10px by default).

Mobile App Layout #2

Drag out a rectangle on the right side of the canvas. The rectangle should be quite smaller than your average navigation.

Mobile App Layout #2

Once you’ve created the rectangle add the following layer styles.

Mobile App Layout #2

Mobile App Layout #2

Mobile App Layout #2

Mobile App Layout #2

Mobile App Layout #2

You should have something like this.

Mobile App Layout #2

Inside the navigation bar add your textual links using the color #676767. Leave the first link set to the color white.

Mobile App Layout #2

Now using the rounded rectangle with a radius of 5px create a rectangle around the first link. Fill the rectangle in the color #8f8f8f and make sure the layer is underneath your text layer.

Once you’ve created the rectangle add a drop shadow using the settings below.

Mobile App Layout #2

You should have something like this.

Mobile App Layout #2

Creating The Website Title

On the left side of the canvas add your website title using the text tool. Once you’ve add the text add the following layer styles to the text layer.

Mobile App Layout #2

Mobile App Layout #2

You should have something like this.

Mobile App Layout #2

Adding The Iphone Information Area

Download the 3G/3GS iphone PSD file from the resources list then open up the PSD file in photoshop. In the layers window find the two layers “front” and “back black” once you’ve found the layers drag the two layers into your layers window.

Expand the “front” layer to reveal the rest of the layers inside the group. Once expanded find the reflection layer then hide it by clicking the little box next to the layer.

Mobile App Layout #2

Now resize the all the layers in the “front” group by highlighting the group in the layers window and pressing “CTRL + T” on the keyboard. Resize the iphone so it fits underneath the title text.

Mobile App Layout #2

Now resize and rotate the other iphone making it much smaller. Place the iphone behind the bigger one.

Your ads will be inserted here by

AdSense Now!.

Please go to the plugin admin page to paste your ad code.

Mobile App Layout #2

Adding The Iphone App Icons

Download your desired iphone icons using the icons from the resources list. Place each icon in a list next to the big iphone underneath the navigation.

Mobile App Layout #2

Next to each icon add some example text.

Mobile App Layout #2

Creating The AppStore Button

Using the rounded rectangle tool with a radius of 10px, create a small rectangle underneath your apps list.

Mobile App Layout #2

Now add the following layer styles to your rectangle.

Mobile App Layout #2

Mobile App Layout #2

Mobile App Layout #2

Mobile App Layout #2

Mobile App Layout #2

You should have something like this.

Mobile App Layout #2

Were now going to make a custom diagonal pattern, create a new document 25px x 25px with a transparent background, select the pencil tool with a 1pixel black brush and duplicate the image below.

Mobile App Layout #2

Once you’ve created the custom pattern go to “Edit > Define Pattern”, give your pattern a name and save it.

Head back to your original canvas and load a selection around your rectangle, to make a selection highlight the layer and go to “Select > Load Selection”. Once you’ve loaded the selection select the paint bucket tool and change “Foreground” to “Pattern”.

Mobile App Layout #2

Fill the selection with your pattern on a new layer then set the layers opacity to 1%.

Mobile App Layout #2

Inside the rectangle add the iphone icon from the resources list then add the text “Available on the iphone AppStore” once you’ve added the text add the following layer styles.

Mobile App Layout #2

Mobile App Layout #2

You should have something like this.

Mobile App Layout #2

Creating The Content Area

Using the text tool add a content title underneath the big iphone, once you’ve added the text apply the following layer styles to it.

Mobile App Layout #2

Mobile App Layout #2

On the right side of the content title text create two 1 px lines on top of each other, color the top line in black and the bottom line in white then set the layers blend mode to “Overlay”.

Mobile App Layout #2

Underneath the title add some example text and a small image gallery using a small selection of images.

Mobile App Layout #2

Creating The Footer

Repeat the creation of the two 1px lines on top of each other only this time make the lines span the width of the canvas. Once you’ve created the lines add a layer mask to the layer and drag a reflected gradient from the middle of the line outwards. The line should blend in from each side.

Mobile App Layout #2

Finally add your footer text underneath the line.

That concludes this tutorial, hope you enjoyed the read. I’ll look forward to all your comments.

Your ads will be inserted here by

AdSense Now!.

Please go to the plugin admin page to paste your ad code.

Learn To Create A Photography Style Web Layout

Your ads will be inserted here by

AdSense Now!.

Please go to the plugin admin page to paste your ad code.

Hello everybody, welcome to another tutorial by HV-Designs. In this tutorial I’ll be walking your through the process of creating a photography/portfolio style web layout.


What We’ll Be Creating

Click image for bigger version.

Photography Style Web Layout

Resources Used In This Tutorial

Lets Get Started

Create a new document 1200 x 1200 pixels then select the gradient tool with a radial gradient.

Photography Style Web Layout

Once you’ve selected the gradient tool change your foreground and background colors. Change your foreground color to #eae9e9 and background color to #d7d7d7.

Photography Style Web Layout

Now drag the radial gradient from the center of the top of your canvas, dragging down about a quarter of the way down your canvas. Once your happy with the gradient apply some noise to the background by going to “Filter > Noise > Add Noise”.

Photography Style Web Layout

Creating The Header

Select the rectangular marquee tool then make a selection about 240 pixels in height that spans the width of your canvas. Once you’ve made the selection shift it down about 50 pixels from the top of your canvas.

Photography Style Web Layout

Fill your selection with any color then add the following layer styles using the following settings.

Photography Style Web Layout

Photography Style Web Layout

Photography Style Web Layout

Photography Style Web Layout

You should have something like this.

Photography Style Web Layout

Creating The Header Custom Pattern

Create a new document 14 x 16 pixels with a transparent background. Select the magnifying glass and zoom in 3200%, select the elliptical marquee tool and create two circles as shown in the image below.

Photography Style Web Layout

Once you’ve created the two circles go to “Edit > Define Pattern”, give your pattern a name then close the document.

Load a selection around your header rectangle by selecting the header layer and going to “Select > Load Selection”. Create a new layer above your header layer then fill the selection with your pattern.

Photography Style Web Layout

Select your pattern layer then add the following layer styles with the following settings.

Photography Style Web Layout

Photography Style Web Layout

Finally set the pattern layers opacity to 20%, you should have something like this.

Photography Style Web Layout

Creating The Title

Select the type tool then type out your website title on the left side of the header.

Photography Style Web Layout

Once you’ve added your website title add the following layer styles to your text layer.

Photography Style Web Layout

Photography Style Web Layout

Photography Style Web Layout

On the left side of the title text add the camera icon from the “Longhorn R2 Icon Pack“. You should have something like this.

Photography Style Web Layout

Creating The Navigation

In the top right corner add your navigation using the type tool.

Photography Style Web Layout

Once you’ve added your text add the following layer styles to your text navigation layer.

Photography Style Web Layout

At the beginning of your navigation add a new text layer labeled “Homepage or Home”. Color the text white.

Underneath the text layer “Home” add a rounded rectangle using the rounded rectangle tool. Add the following layer styles to your rounded rectangle.

Photography Style Web Layout

Photography Style Web Layout

Photography Style Web Layout

You should have something like this.

Photography Style Web Layout

Creating The Login Panel

Select the rounded rectangle tool with a radius of 10px (Default Radius). Drag out a small rectangle on the right side of the header area. Once you’ve added the rectangle set layers opacity to 40%.

Photography Style Web Layout

Your ads will be inserted here by

AdSense Now!.

Please go to the plugin admin page to paste your ad code.

Select the rectangular marquee tool then create 3 boxes inside the login panel. Create the first two boxes the same size, these boxes will be our login and password fields. Finally create the third box alot smaller, this box will be our login button.

Photography Style Web Layout

Add the following layer styles to your 3 rectangles.

Photography Style Web Layout

Photography Style Web Layout

Finish off the login box by adding the labels for your rectangles and login button. You should have something like this.

Photography Style Web Layout

Creating The Gallery

Download the “Nikon D40 Iphoto Icon” and place it underneath the header on the left. To the right of the icon add the words “From The Gallery” with a small slogan.

Photography Style Web Layout

Now add the following layer styles to your text so it matches the image above.

Photography Style Web Layout

Photography Style Web Layout

Underneath the text “From The Gallery” add a couple of circles to simulate a jQuery like slider, use the circle tool or the elliptical marquee tool for the circles.

Photography Style Web Layout

Using the rounded rectangle tool create 4 rectangles, place the 4 rectangles in a line next to the gallery text and icon.

Photography Style Web Layout

Add the following layer styles to each one of the rectangles.

Photography Style Web Layout

Photography Style Web Layout

Photography Style Web Layout

Your rectangles should now be transformed into something like this.

Photography Style Web Layout

Now load a selection around one of your rectangles, to load a selection go to “Select > Load Selection”. Once you’ve loaded the selection contract the selection by 10px “Select > Modify > Contract”.

Open up your desired image to put inside the gallery then copy it to the clipboard. Paste your image inside the selection by going to “Edit > Paste Into”. Resize and move your image into place inside the selection then add a stroke and inner shadow using the settings below.

Photography Style Web Layout

Photography Style Web Layout

You should have something like this.

Photography Style Web Layout

Finish off the gallery images by adding a simple shine for that glassy effect.

Creating The Divider

Using the rectangular marquee tool create two 1px lines on top of each other, color the top line in black #00000 and the bottom line in white #ffffff. The line should be the width of your layout.

Photography Style Web Layout

Now set the layers blend mode to “Overlay” then add a layer mask. Select the gradient tool with a reflected gradient, drag the gradient from the middle of the lines outwards to either the left or the right canvas.

Photography Style Web Layout

Creating The Sidebar

Select the rounded rectangle tool then make a selection underneath the divider.

Photography Style Web Layout

Fill the rectangle with any color then add the following layer styles.

Photography Style Web Layout

Photography Style Web Layout

Photography Style Web Layout

Right click your rectangle layer and go to “Convert To Smart Object”. Once you’ve converted your layer add a layer mask then drag a linear gradient from the bottom of the rectangle upwards.

Photography Style Web Layout

Using the type tool add some content into your sidebar rectangle.

Photography Style Web Layout

Creating The Content

There’s not alot to the content area really only a fancy title styled in the same way as our gallery, then underneath i’ve added a couple of paragraphs of dummy text.

Photography Style Web Layout

Creating The Footer

Duplicate your header and dots pattern then drag it down to the bottom of your canvas. Resize the duplicated header and dots pattern to suit your footer size.

Change the color overlay of the dots pattern to #8d8d8d then change the gradient overlay of the duplicated header layer to the following.

Photography Style Web Layout

Finally add your footer information to your footer.

Photography Style Web Layout

That’s it all done hope you enjoyed this tutorial. Look forward to all your comments.

Your ads will be inserted here by

AdSense Now!.

Please go to the plugin admin page to paste your ad code.

Learn How To Create Metal Textured Text

Your ads will be inserted here by

AdSense Now!.

Please go to the plugin admin page to paste your ad code.

Today were going to be creating something a little bit different. Were going to be using a mixture of textures and layer styles to create the perfect looking rough metal style text.


What We’ll Be Creating

Click the image for full view.

Metal Text Tutorial

Resources Used In This Tutorial

Lets Get Started

Create a new document 800 x 600 pixels with any background color. Download the “Metal Texture then open it in photoshop, once opened in photoshop go to “Edit > Define Pattern”.

Metal Texture Tutorial

Close the texture document window and go back to your original document. Fill your background layer with the metal texture by selecting the paint tool with the pattern fill type selected.

Metal Texture Tutorial

Adding The Text

Select the type tool then add your text to the canvas. Use a fairly big font type so the text stands out. Here are my settings.

Metal Texture Tutorial

Once you’ve added your text add the following layer styles to your text layer.

Metal Texture Tutorial

Metal Texture Tutorial

Metal Texture Tutorial

Metal Texture Tutorial

Metal Texture Tutorial

You should have something like this.

Metal Texture Tutorial

Adding The Texture To The Text

Load a selection around your text layer by selecting the text and going to “Select > Load Selection” OR simply click the little thumbnail in the layers palette whilst holding down the CTRL key on the keyboard.

Create a new layer above your text layer then fill the selection with your metal pattern.

Metal Texture Tutorial

Now that you’ve filled the selection set the layer blend mode to screen and add a gradient overlay using the settings below.

Metal Texture Tutorial

You should have something like this.

Metal Texture Tutorial

Adding Depth To The Text

Load a selection around your text layer once again by selecting the text and going to “Select > Load Selection” OR simply click the little thumbnail in the layers palette whilst holding down the CTRL key on the keyboard.

Your ads will be inserted here by

AdSense Now!.

Please go to the plugin admin page to paste your ad code.

Create a new layer above your textured text filled layer then contract the selection by 5px by going to “Select > Modify > Contract”.

Metal Texture Tutorial

Reset your background foreground layers to black and white then fill the selection with some clouds by going to “Filter > Render > Clouds”.

Metal Texture Tutorial

Now go to “Filter > Render > Difference Clouds”.

Metal Texture Tutorial

Finally set the layers blend mode to “Soft Light”, you should have something like this.

Metal Texture Tutorial

Adding The Rivets

Load a selection around your text layer once again by selecting the text and going to “Select > Load Selection” OR simply click the little thumbnail in the layers palette whilst holding down the CTRL key on the keyboard.

Create a new layer above all your layers then contract the selection by 6px. (Select > Modify > Contract) Keep the selection active and select your brush tool. Once you’ve selected the brush tool open up the brushes palette.

Metal Texture Tutorial

Select a brush size of 4.

Metal Texture Tutorial

Then set the brush spacing to 1000%.

Metal Texture Tutorial

Now open up the paths window by going to “Window > Paths”, at the bottom of the paths window click the little button which says “Make Work Path From Selection”.

Metal Texture Tutorial

Head back to your layers palette and make sure your new blank layer is selected. Select the pen tool and then right click on your canvas and go to “Stroke Path”. Right click again and go to “Delete Path”.

Metal Texture Tutorial

Add Some Style To The Rivets

With your rivets layer selected add the following layer styles.

Metal Texture Tutorial

Metal Texture Tutorial

Metal Texture Tutorial

You should have something like this.

Metal Texture Tutorial

Repeat the same process for your background layer to add the rivets to your background.

That’s it all done, hope you enjoyed this tutorial. I’ll look forward to your comments.

Your ads will be inserted here by

AdSense Now!.

Please go to the plugin admin page to paste your ad code.

Mobile App Layout

Your ads will be inserted here by

AdSense Now!.

Please go to the plugin admin page to paste your ad code.

Mobile app’s are on the never ending increase and now so are mobile app websites. In today’s tutorial I’ll be showing you how create a dark theme mobile app web layout.


What Were Creating

This is what we’ll be creating in this tutorial, click the image for a bigger version of the layout.

Mobile App Web Layout

Resources Used In This Tutorial

galaxy_s_II

Lets Get Started!

Create a new document 1200 x 950 pixels, set your foreground color to #252625 and background color to #101010. Select the gradient tool from the toolbar then from the top menu bar select a radial gradient.

Mobile App Layout

Once you’ve selected the radial gradient start dragging from the center of your canvas outwards until your left with something like this.

Mobile App Layout

Creating The Header/Navigation

Select the rectangular marquee tool then create a rectangular selection about 140 pixels in height, which spans the width of the canvas.

Mobile App Layout

Fill the selection with a linear gradient using the colors #202123 and #070707.

Mobile App Layout

Now add a stroke to your rectangle using the settings below.

Mobile App Layout

Inside the rectangle add your website title to the left with your slogan. On the right side of the rectangle add a simple textual navigation.

Mobile App Layout

Mobile App Layout

Select your website title layer then add the following layer styles.

Mobile App Layout

Mobile App Layout

Mobile App Layout

You should have something like this.

Mobile App Layout

Creating The Featured Area

Using the rectangular marquee tool drag out a selection about 340 pixels in height and the same width as your canvas. The selection should be directly underneath your header/navigation.

Mobile App Layout

Fill the selection with any color on a new layer underneath your header/navigation. Once you’ve filled the selection add the following layer styles.

Mobile App Layout

Mobile App Layout

Again using the rectangular marquee tool, create two horizontal 1 pixel lines on top of each other. Color the top line in black #000000 and the bottom line in white #FFFFFF, finally set the blend mode to overlay.

Mobile App Layout

Were now going to create the featured area background pattern using the pen tool. Select the pen tool then create a wavy path like the image below.

Mobile App Layout

Fill the path with the color white then add a gradient overlay using the settings below.

Mobile App Layout

Once you’ve applied the gradient overlay we need to remove any excess of the shape from outside of the featured area. Start off by loading a selection around your featured rectangle but keep the wavy shape layer highlighted.

Now go to “Select > Inverse” and hit the delete key. Your pattern should now be inside the featured rectangle only and the excess removed, you should have something like this.

Mobile App Layout

Duplicate your wavy shape then “Free Transform” (Ctrl + T) the shape. Once free transformed rotate anti-clockwise.

Mobile App Layout

Remove the excess of the wavy shape by repeating the process explained above. Repeat the the whole process once more so you have a total of 3 wavy patterns, you should have something like this.

Mobile App Layout

Adding The Featured Area Content

For this part your going to need an iphone or some type of mobile phone, I’m using an iphone from “DeviantArt“.

Your ads will be inserted here by

AdSense Now!.

Please go to the plugin admin page to paste your ad code.

Drag your desired image onto your canvas then chop off the bottom of the phone using your desired cutting tool.

Mobile App Layout

Inside the screen area of the phone add an image or create an image which best describes your app, I’ve just added an HV-Designs screen shot.

Mobile App Layout

Directly underneath your mobile phone create two 1 pixel horizontal lines, fill the top line in black and bottom line in white. Set the layer blend mode to “Soft Light”, you should have something like this.

Mobile App Layout

Add a layer mask to your two 1px lines then drag a reflected gradient over the top starting from the middle of the line and dragging outwards. Doing this should blend the lines in with the background either side.

Mobile App Layout

Select the rectangular marquee tool and a make a selection underneath your two 1 pixel lines.

Mobile App Layout

Select the gradient tool with a radial gradient, set the gradient to “White (#ffffff) to Transparent” then drag the gradient from the top of the selection down.

Add a layer mask to the selection then drag a reflective gradient starting from the middle then dragging outwards, just like we did for out two 1 pixel lines. Finally set the blend mode to “Overlay”.

Mobile App Layout

Finish your featured area off by adding your featured content. I went for a nice bold title with a small paragraph of text, underneath i went for a small list with small icons.

Mobile App Layout

The Left Sidebar

Our sidebar will be relatively simple, start off by creating two 1 pixels lines next to each other. Color the first line in black (#000000) then the second line in white (#ffffff), finally set the layer blend mode to overlay.

Mobile App Layout

Now select the rectangular marquee tool and create a selection starting from directly underneath the featured area, keep the selection pixel close to the divider line.

Mobile App Layout

Once you’ve created the selection select the gradient tool with a linear gradient. Before applying the gradient set your foreground color to #0a0a0a and background color to #101010.

Drag the gradient from the top right hand corner of your selection, dragging the gradient diagonally towards the bottom left corner of the selection.

Mobile App Layout

Using some nice icons dress up your sidebar. I’m using icons from “MediaLoot“.

Mobile App Layout

Creating The Content Area

On the right next to the sidebar create your content area, i’ve added a simple but bold heading with a small paragraph of text.

Mobile App Layout

Underneath our bold heading and text i’ve added a small gallery. Select the rectangular marquee tool and create 4 squares.

Mobile App Layout

Add the following layer styles to your squares.


step35

Mobile App Layout

You should have something like this.

Mobile App Layout

Were now going to add our image inside the squares but before we do lets add a 10pixel border. Make a selection around one of your squares then go to “Select > Modify > Contract”, enter 10px in the box that pops up then press ok.

Keep the selection active then paste your image into the selection by going to “Edit > Paste Into”.

Mobile App Layout

Creating The Footer

Make selection around the bottom of the rest of your canvas then fill the area with the color #0a0a0a. Make sure the selection starts directly underneath the sidebar divider line.

Mobile App Layout

Now add the following layer styles to your footer rectangle.

Mobile App Layout

Mobile App Layout

That’s it all done, hope you enjoyed this tutorials, see you all next time.

Your ads will be inserted here by

AdSense Now!.

Please go to the plugin admin page to paste your ad code.

Make a Dark Blog Web Design Layout with Photoshop

Your ads will be inserted here by

AdSense Now!.

Please go to the plugin admin page to paste your ad code.

I will be showing you a quick and easy way to develop a simple dark-themed blog layout with the use of Photoshop. When I say “quick and easy”, I mean it. We will only rely on basic Photoshop tools such as the marquee selection tools and layer styles. The outcome will be a professional-level website design mockup that can be converted to a blog theme or HTML web page.


Tutorial Via Design Instruct

Your ads will be inserted here by

AdSense Now!.

Please go to the plugin admin page to paste your ad code.

Dark Web Blog Design

View The Full Tutorial

This tutorial was wrote by me for Design Instruct, you can view the tutorial HERE. I’l look forward to all your comments.

Thanks

Your ads will be inserted here by

AdSense Now!.

Please go to the plugin admin page to paste your ad code.

Software Layout #6

Your ads will be inserted here by

AdSense Now!.

Please go to the plugin admin page to paste your ad code.

Hello everybody, welcome to another tutorial by HV-Designs. In this tutorial I’ll be showing you how to create a simplistic product layout with a green theme. Lets get going…


Resources Used In This Tutorial

The Finished Layout

This is what we’ll be creating, click image for a bigger view.

Software Layout #6

Creating The Document

Create a new document 1200 x 1200 pixels with a white background. Set your foreground color to #d6d6d6 and background color to #efefef then select the gradient tool with a linear gradient.

Software Layout #6

Drag the linear gradient over your canvas starting from the top, drag the linear gradient about 250 – 300 pixels down.

Software Layout #6

Creating The Header

Select the rectangular marquee tool, then drag out a selection the width of the canvas and about 160 – 170 pixels in height.

Software Layout #6

Before filling the selection set your foreground color to #483f38 and background color to #1e1916. Select the gradient tool then this time set your gradient type to reflected.

Software Layout #6

Drag the reflected gradient from the middle of the rectangle towards either the left or the right side of the canvas. Once you’ve filled the rectangle add some noise by going to “Filter > Noise > Add Noise”.

Software Layout #6

Software Layout #6

Creating The Template Title

Using the type tool add your website title and slogan inside the rectangle.

Software Layout #6

Once you’ve add your title and slogan add a drop shadow to the title using the settings below.

Software Layout #6

To one of the words in your title add a gradient overlay using the settings below.

Software Layout #6

You should have something like this.

Software Layout #6

Creating The Small Navigation

Select the rounded rectangle tool with a corner radius of 10px.

Software Layout #6

Drag out a small rounded rectangle on the right side of the canvas inside the header rectangle.

Software Layout #6

Now add the following layer styles to your rounded rectangle.

Software Layout #6

Software Layout #6

Software Layout #6

Inside the rectangle add a small selection of textual links, you should have something like this.

Software Layout #6

Creating The Main Navigation

Before creating the main navigation using the rectangular marquee tool or the single row marquee tool create two 1px lines on top of each other. Color the top line in black and the bottom line in white. Place the two lines directly underneath the header rectangle.

Software Layout #6

Using the rounded rectangle tool drag out a rectangle, keep the rectangle in the center of the line between the background and header.

Software Layout #6

Add the following layer styles to your navigation rectangle.

Software Layout #6

Software Layout #6

Software Layout #6

Still with the rounded rectangle tool create another rectangle inside the main navigation rectangle. The rectangle should be the color white and should only be half the size or smaller than the main rectangle.

Software Layout #6

Set the opacity of the small rectangle to 5%. For this next part you need to create your own custom pattern.

Create a new document 25 x 25 pixels, zoom in as much as you can then select the pencil tool. Using the pencil tool and the color black mimic the image below.

Software Layout #6

Once you’ve created the pattern go to “Edit > Define Pattern”, save the custom pattern has “Diagonal Lines”.

Your ads will be inserted here by

AdSense Now!.

Please go to the plugin admin page to paste your ad code.

Head back over to your original canvas and load a selection around the main navigation rectangle. You can load a selection by selecting the layer inside the layers window then go to ” Select > Load Selection”.

Once you’ve loaded the selection fill your selection on a new layer using the paint bucket tool (Don’t forget to set paint bucket option to pattern). Finally set the pattern layers opacity to 1%.

Software Layout #6

Creating The Search

Using the type tool add your navigation items, in the space left over on the right hand side this is where we’ll be adding our search field.

Using the rounded rectangle tool with a radius of 5px create a small rectangle in the space.

Software Layout #6

Add the following layer styles to your search field rectangle.

Software Layout #6

Software Layout #6

Software Layout #6

Inside your search field add some text and a little icon on the right. I’ve chosen a small magnifying glass from the custom shapes library.

Software Layout #6

Creating The Featured Area

Underneath the main navigation were going to create a featured area to feature the product in question. Start off with the text tool and add a nice big title followed by a couple of paragraphs.

Software Layout #6

On the right side of the text create your product in the form of a software box. For this tutorial I’ve just used a blank software box from HERE. You can take more time in creating your very own custom software box, or simply use the icon from the link above.

Software Layout #6

Once you’ve added your content box duplicate it, then drag the duplicated software box behind its original. Free transform the software box by pressing “CTRL + T”, resize your duplicated box by a fraction or two then blur it by 1px by going to “Filter > Blur > Guassian Blur”.

Software Layout #6

Finally duplicate your blurred software box then drag the layer behind its original. Blur the third software box by 1 px once more then resize it again by a fraction or two. You should have something like this.

Software Layout #6

Were now going to create two small buttons, select the rounded rectangle tool with a radius of 10px. Drag out two small button sized rectangles then add the same layer styles as the main navigation.

Software Layout #6

On your two buttons add the diagonal pattern the same as the main navigation then label the two buttons accordingly.

Software Layout #6

Creating The Divider

Using the single row marquee tool or the rectangular marquee tool create two 1px lines on top of each other, color the top line in #c9c9c9 then the bottom line in white (#ffffff).

Software Layout #6

Make a selection directly underneath your two lines using the rectangular marquee tool.

Software Layout #6

Set your foreground color to #e6e6e6 and background color to #efefef then select the gradient tool with a linear gradient. Drag downwards from the top of the selection releasing the mouse button just short of the bottom of the selection.

Software Layout #6

We now need to blend the two lines and the little gradient we added into the background on both the left and right sides.

Add a layer mask to one of the layers, set your foreground color to white and background color to black. Select the gradient tool with a reflected gradient then drag the gradient from the center of the element you have chosen first outwards to either the left or right. The element you have chosen should be blending in with the background on both sides, left and right.

Do this for all 3 layers, top line, bottom line and gradient.

Software Layout #6

Adding The Content

On the left side of the canvas underneath the divider create a rounded rectangle with the rounded rectangle tool. The rectangle doesn’t have to be big as it will just hold a small list of features.

Software Layout #6

The layer styles are as follows.

Software Layout #6

Software Layout #6

Software Layout #6

Inside the rounded rectangle add a simple list with green bullet points, separate each list item with its own divider.

Software Layout #6

On the right side of the box add a heading with a short paragraph underneath. Then underneath the paragraph add some icons, I’ve used the “Classy Icon Set” from “Dryicons”.

Software Layout #6

Creating The Footer

Duplicate the header and the bottom divider then drag it all the way down to the bottom of the canvas. Select the duplicated header layer then press CTRL+T to free transform the header. Resize the height of the rectangle to fit your footer content.

Move the duplicated divider line to the top of the duplicated header. Finally add your footer text to your footer.

Software Layout #6

That’s it all done, hope you enjoyed this tutorial. If you did enjoy this tutorial then maybe you would consider digging and retweeting it.

Your ads will be inserted here by

AdSense Now!.

Please go to the plugin admin page to paste your ad code.