Your ads will be inserted here by
AdSense Now!.
Please go to the plugin admin page to paste your ad code.
O-hai guys ![]() Today we’ll go shopping in the web interfaces accessories mall ^_~ That is, we’ll learn how to beautify our websites with nice glassy orbs ^^
Today we’ll go shopping in the web interfaces accessories mall ^_~ That is, we’ll learn how to beautify our websites with nice glassy orbs ^^
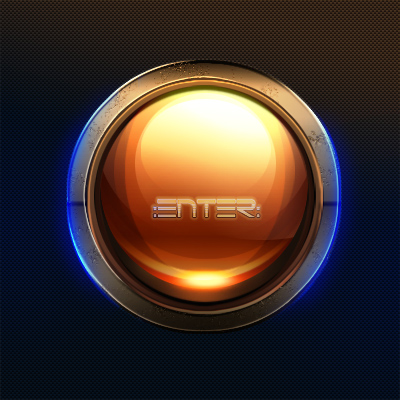
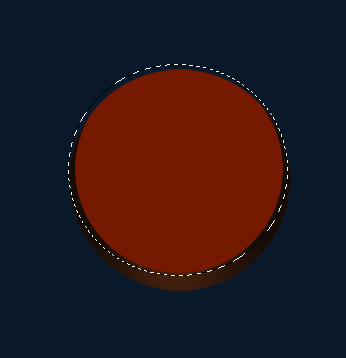
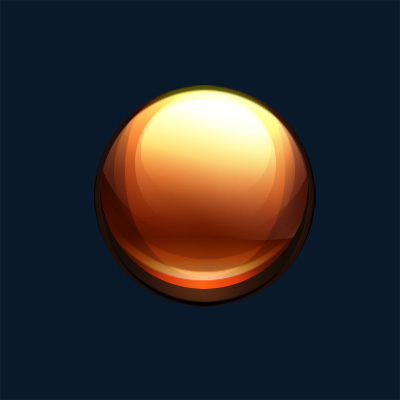
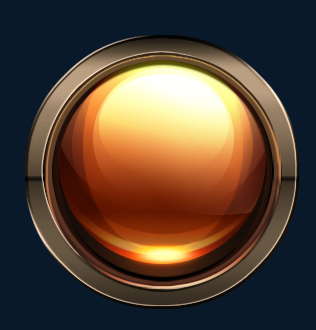
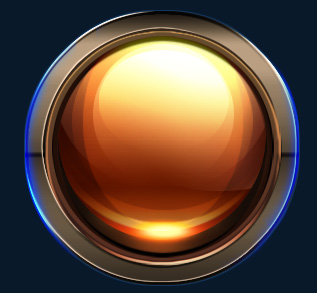
This is what we’ll be creating:
Okay, so take a bag of chips and a drink and let’s get to work ^^
Step 1:
First, let’s create a new canvas, say 400×400 pixels. Fill it with a dark gray, I chose #09192a. Make a new layer and then set your foreground color to #751900.
Step 2:
Take the Elliptical Marquee tool and holding Shift, draw on your new layer a perfect circle that fills about half the canvas. Take then the Bucket Tool and fill the selection you just created with the #751900 foreground color. Press Ctrl (Cmd on Mac)+D to deselect. Name your layer “Orb Base”.

Step 3:
Moooo-vin’ on. Now make another new layer on top of the “Orb Base” layer and name it “Shadow”. Right-click on it and choose “Create Clipping Mask”.
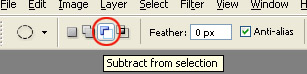
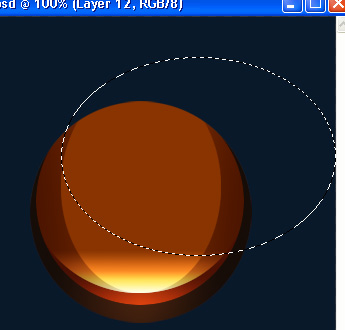
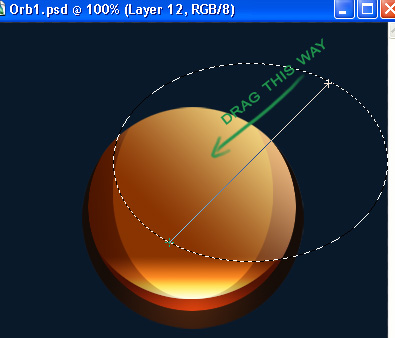
Once you do that, Ctrl (Cmd)+click on your “Orb Base” layer’s thumbnail in the layers palette to get a selection of it. Take then the Elliptical Marquee tool, and set it on “Substract from Selection”.
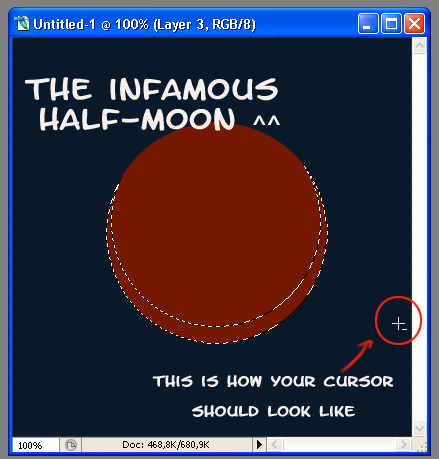
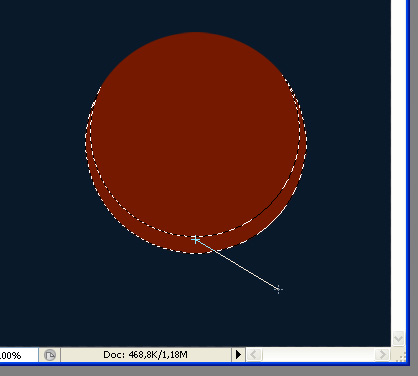
Okaaaay, now, click first somewhere top-left of your existing selection, then holding down the Shift key, drag to make a perfect circle with the Elliptical Marquee over your existing selection of the Orb Base, so that in the end you are left with a sort of…half-moon, a semiluna. This might be a bit difficult for beginners, but don’t give up! ^_^
Now, once you have your semiluna (make sure it is decently symmetric and balanced like mine, okay?) remember that layer that we named “Shadow”? Well, make sure it is your “working on” layer (aka, it is a blueish color) and then set your foreground color to #49230f and your background color to #160d07.
Step 4:
Now, take the Gradient tool, make sure it is set to “Foreground to Background” and “Reverse” is NOT ticked, set it to “Radial Gradient” and clicking inside the selection, about at half-width, drag a little distance and then release the mouse button. Now your gradient should be filling the selection, with the foreground (lighter) color to the center and the background (darker) color to the “horns” of the half-moon ^__^
Press Ctrl(Cmd)+D to deselect…….

Step 5:
Aaand…this is where the fun begins ^^
Now you should have: 1 background layer, 1 Orb Base layer, 1 Shadow layer (which we made the “Clipping Mask” of the Orb Base).
Now I’ll take a second and explain what Clipping Masks are, for anyone who doesn’t know. Basically, they are a sort of “servant” of the layer beneath them, their patron-layer if you like. If we have a circle on a patron layer, whatever we draw on the Clipping Mask one will NEVER go out of the boundaries of the patron ^^ Whatever pixels are filled in the patron will be visible in the servant as well, nothing else ![]()
Back to our orb now. Click the “Orb Base” layer and then click the “New Layer” icon, to create a new layer between your “patron” and your “servant” layers. As you notice, the layer you just created inherits the characteristic of the one above it (Shadow) and becomes NOT a normal layer but a Clipping Mask as well.
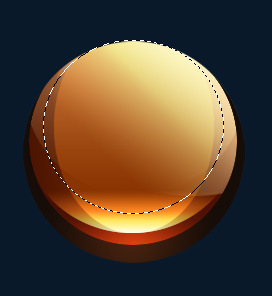
Mmkay. That’s exactly what we want, so! Take the Elliptical Marquee tool, and make a perfect circle roughly around all the orange you see.
It doesn’t have to be exact so no worry if it goes a liiittle bit over, like in my screenshot.
Now make sure you have your newly-created layer selected and name it “Bottom Glow”…so it has a name we can identify easily, we don’t want the poor layer to have an identity crisis do we? ^__~
Kay, now! Set your foreground color to #eb460f and your background color to #8b2c0b .
With the Gradient Tool, click at the lowest point of the selection and holding Shift drag only a little bit upwards. Juuust a little bit, so the colors boundary is visible near the bottom. Don’t deselect!

Step 6:
Keeping your selection, make a new layer and name it “Highlight Bottom” just about the “Bottom Glow” layer. Of course this new layer will be a Clipping Mask too….
Take the Marquee tool and set it to “New Selection -this button is a little bit left than the “Substract from Selection” button we clicked earlier in Step 3 ^_~
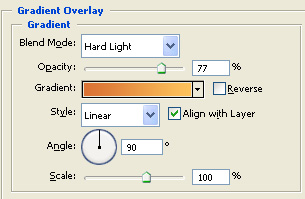
This will allow you to move your selection. So, move it a little upwards….and with your “Highlight Bottom” layer as your working one take the gradient tool, click on it’s icon at the top bar near the “New Selection” button and add these settings:
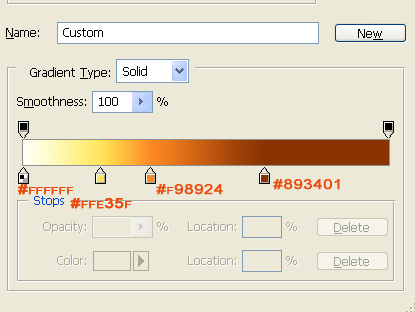
Then once you clicked OK go back to your selection and positioning your pointer at its bottommost point, press Shift and drag upwardsto approximately a third of the selection’s height. Still, DON’T deselect.
Step 7:
Make a new layer above the Highlight Bottom one, name it “Side Shadows”.
Kay, now go to Select—>Transform Selection.
![]()
Squeeze your selection so that it becomes an ellipse..like this:
Step 8:
Now press Ctrl(Cmd)+Shift+I to inverse selection. Take the Gradient tool, set it to Foreground to Transparent, then set your Foreground color to #672f00 .
Set your gradient to Linear Gradient. And on the “Side Shadows” layer, click to the left side of the Orb, and pressing Shift, drag a little to the right. Do the same for the right side, drag to the left in its case though ^^ Like in my screenshot ![]()
Set your “Side Shadows” layer to Multiply blending mode and lower its opacity to about 80%
Step 9:
Now let’s start giving it highlights ^__^
Create a new layer and name it “Highlights 1″ ………yea, you guessed right, we’re going to have more highlights layers hahaha…
so, name it “Highlights 1″ and set your Foreground color to #ffffcb.
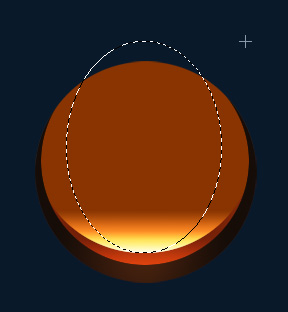
Once you do that, make an oval selection using the Elliptical Marquee tool, on the top-right of the orb, similar to mine:
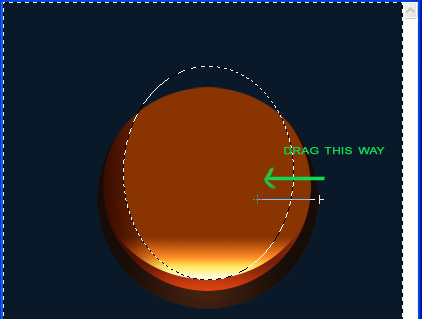
Take the Gradient Tool and with it set to Foreground to Transparent, hold down Shify key and drag diagonally from the outer-top-right side of the selection to the bottom-lower-left part, like this:
Set it to Linear Dodge blending mode and lower its Fill toabout 70%
Step 10:
Now make a new layer again, name it “Highlights 2″ and Ctrl(Cmd)+click on your Highlights Bottom layer thumbnail in the layers palette to get its selection.
Use the Marquee tool like beore to move it upwards, until its bottommost point is about that half the height of the total orb.
Now with your foreground color set to #ffffcb, take the Gradient tool set to Foreground to transparent, hold Shift and drag from the top to the bottom of the selection. Set your layer to Linear Dodge and lower its fill to about 40%
Step 11:
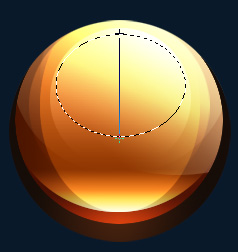
Make a new layer, name it “Highlights 3″ and taking the Elliptical Marquee draw a perfect circle at the top, covering about 2/3 of the orb, like this:
Now change your foreground color to #ffff71 and with the same gradient settings as before drag from top to bottom. Set the layer to Color Dodge and lower opacity to about 30%
After this….well we just go on with the highlighta, hahaha…let’s see, I promise just a couple more and we’re done with them ![]()
Make a new layer, name it “Highlights 4″ and with the same Marquee, make a selection similar to the previous, only smaller in diameter. Only this time, make sure that it doesn’t touch the top margin of the orb, but is some 15-20px lower. Using #ffffef as your foreground color, drag as previously from top to bottm of the selection, then set your layer blending mode to Linear Dodge and lower its Fill to 25%
Make a new layer yet again, name it “Highlights 5″ and make an ellipse with the marquee tool, whose top begins where the top of the last circle began but as an ellipse, it is shorter in height, like this:
Your ads will be inserted here by
AdSense Now!.
Please go to the plugin admin page to paste your ad code.
Step 12:
Set your layer to Color Dodge and lower its Fill to 30%
Now let’s take care of some more shadows ^^
Click on your “Highlight Bottom” layer, then click on New Layer icon. Name it “Shadows Center 1″.
Take the gradient too, keep it Foreground to Transparent, but change its style from the top menu to “Reflected Gradient”. As a foreground color, use #6c3000
Position your cursor at about a third of the orb -to the bottom- and drag for about 30 pixels upwards.
Then release the mouse button and set the layer to Multiply, and lower its fill to about 5-8%
New layer again, name it “Shadows Center 2″..or something xD
Ctrl(CMD)+click on your “Highlight Bottom” layer thumbnail to select it, then use the Marquee tool to move the selection upwards about 25px.
Like this:

Using the same color as before, set your gradient to Linear Gradient, Foreground to Tranparent and drag, this time from bottom to top of the selection. Don’t deselect. Set the layer to Multiply and lower Fill to 30%
Make another new layer. Name it “Shadows Center 3″. Move it about 10px upwards. Same gradient as before, fill it from bottom to top, so that the transparency shows at the top.
Set it to Multiply and lower Fill to 35%.
Step 13:
Now let’s add the refining touches ^^
Make a new layer above all others (but make sure it is still a Clipping Mask), name it “Border1″ and get a selection of your Orb Base layer.
Set your foreground color to #38180c, then go to Edit->Stroke, choose 10px and Center.
Click OK then set your layer to 60% Fill.
Now let’s transform this to an ellipse, so go and press Ctrl(Cmd)+T and pull its tip&bottom, so it becomes a vertical ellipse whose top goes over the margin of the Orb and is not visible anymore, and the sides are the only ones left visible.
Make another new layer, move it under the Border1 layer, get a new selection of the Orb Base, set your foreground color to #160d07 and go to Edit->Stroke, shoose 12px.
Click okay, then set your layer to Linear Burn and lower its Fill to 70%
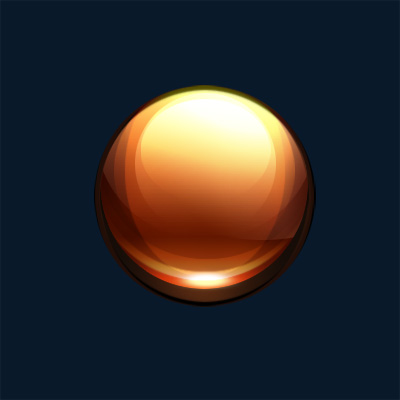
Now, your Orb should look something like this:
Step 14:
New Layer above all others, but it must still be a clipping mask. Name it “Flare White” . Set your foreground color to #ffffa4 and your backgorund color to #ffb409.
go to the brushes palette and choose a soft, round brush, around 20px in size. Now, see where the most glowy part of bottom half of the orb is? Click once with your airbrush over it. Now set your layer to Linear Dodge and using Transform, make it an ellipse by pulling the sides and pushing the top/bottom. After that, your orb should look like this:
Step 15:
Click X to reverse your Foreground with your Background colors.
Make a new layer and move it under your “Flare White” layer. Name it “Flare Orange”.
Get a selection of your “Flare White” layer and go to Select–>Modify–>Expand. Choose a value around 4px.
Click OK and then fill your selection with the foreground color, #ffb409.
Set your layer to Overlay blending mode.
Now your image should look like this:
Step 16:
Let’s take care of the borders now, shall we? ![]()
Set your foreground color to #6a6974.
Make a new layer and move it under ALL the orb layers that you have, so that it is above the background color layer. name it “Ring Small”
Get a selection of your Orb Base layer and go to Edit->Stroke, shoose 14px and Center.
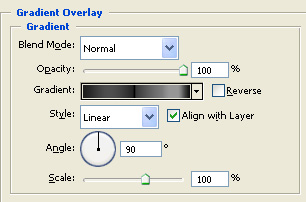
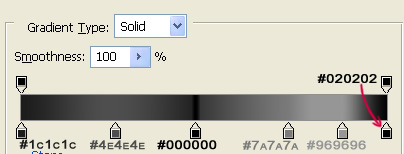
Now click OK and enter the layer’s Blending Options.
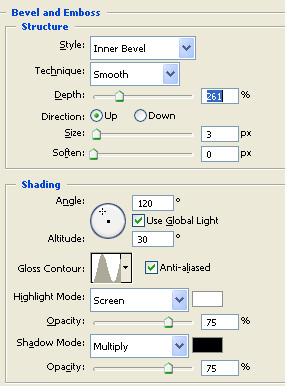
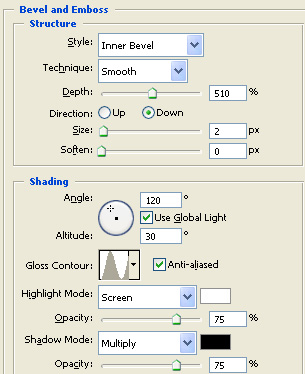
Add these settings:

Step 17:
Now make a new layer yet again, move in uner your “Ring Small” layer, name it “Ring Large”and go to Select—>Modify—>Expand, choose a value around 15px.
Now set your Foreground color to #635337 and go to Edit—>Stroke–>about 15-17px.
Now add your layer these settings:

Step 18:
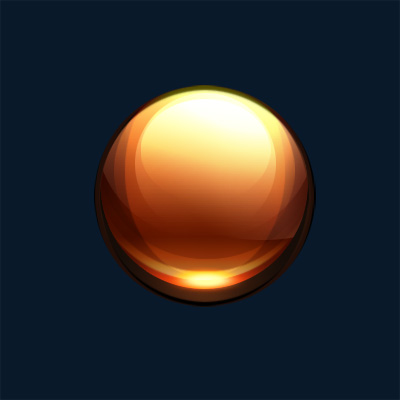
Now your orb should look something like this:

Now get a selection of your “Ring Large” layer and go to the bottom of your Layers palette, click “New Fill or Adjustment Layer” and choose “Photo Filter”.
Choose #ac7a33 as a color and around 60% Density. Make sure “Preserve Luminosity” is ticked.
Now obtain a new selection of your “Ring Large” layer and go to the same Photo Filter, only this time choose #ec8a00 as color, 56% Density and again, Preserve Luminosity must be ticket. Your orb should now look similar to this:
Step 19:
Kaaay…we’re alllmost done, rejoyce! ^___^
Deselect. Now let’s deal with the blue glow, shall we?
Make a new layer, above the Photo Filters but below the “Ring Small” layer. Name it “Blue Glow”. Choose #277ef5 as your Foreground color. Get a selection of your “Ring Large” layer and take the Gradient tool, st it to “Color to Transparent” and to Linear Gradient and click&drag from right to left over a distance of about 50px on the right side of the large ring.
Do the same on the left side, only drag from left to right.
Set your layer to Hard Light, duplicate it and now your orb should have a fancy contrasting electric blue glow…:
Step 20:
Deselect. Make a new layer…(yea that’s how all the steps seem to start huh) xD;
Yea, like I was saying. Make a new layer and move it on to of your “Rings” layers, so the it right under the “Orb Base” one. Name it “Top Orange Glow”
Ctrl(Cmd)+click on the thumbnail of the “Ring Large” layer, then Shift+Ctrl(Cmd)+click on the thumbnail of the “Ring Small” layer.
Like this, you should have the selections of both layers in one selection ^_^
Riiight, now set you Foreground color to #eaa602 and taking the same gradient tool as before, with the same settings, click above the selection and pressing Shift at the same time drag down for about 100px.
Set your layer to color Dodge and Fill 30%, then duplicate it.
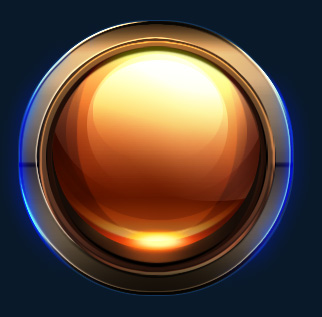
Your orb now:
Step 21:
Now ………….make a new layer! hahaha. Yea, make a new layer on top of the other Rings layers, name it “Bottom Shadow” and set your foreground color to #53442c. Now take the Gradient tool, and drag from bottom upwards for about 100px distance. Deselect. Set layer to Multiply.
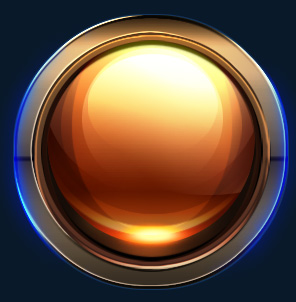
Ta-daaaa…now your orb is fancy and sweet like this:
Step 22:
Iiiif you want to add extra fancy to your orb, let’s go give it some rusty texture ^^
Set your Foreground color to#d69308 and take a Spatter 46 brush from your brushes palette. Make a new layer and move it just above the “Ring Large” layer. Name it “Rust”. Obtain a selection of the “Ring Large” and start clicking randomly around with your brush.
Then take the Eraser tool, set its brush to a Spatter 39px and start erasing, randomly again. Leave just a little texture here&there.
Set your layer to Multiply and lower Opacity to 81% and Fill to 89%.
Step 23:
Now go to your Rust layer’s Blending Options, and give it these settings:
Dun-dun-dun-dun..you’re finisheeeddd…Now go and sleep for a week ^______~
Oh, and if you want to add some text to it like I added to mine, go ahead ^^ Just give it some Outer Glow and stroke and it’s done, nothing too fancy ^^
Hope you enjoyed and/or found this tutorial useful, see you next time and feel welcome to link me to your results or tell me your opinions ![]()
Cya ![]()
Your ads will be inserted here by
AdSense Now!.
Please go to the plugin admin page to paste your ad code.