Your ads will be inserted here by
AdSense Now!.
Please go to the plugin admin page to paste your ad code.
Before 2006, it was not possible to make transitions, animations and other decent web stuff quickly within seconds. You will find a lot of plugins for menus, banners, etc. for the jQuery.
With the same purpose, my today’s tutorial is about a menu which has all the decent and stylish animated functionality, what you may be looking for. I’ll not go into details of HTML and CSS, I’m assuming you know about that or you can copy the HTML and CSS from below.
Slicing PSD
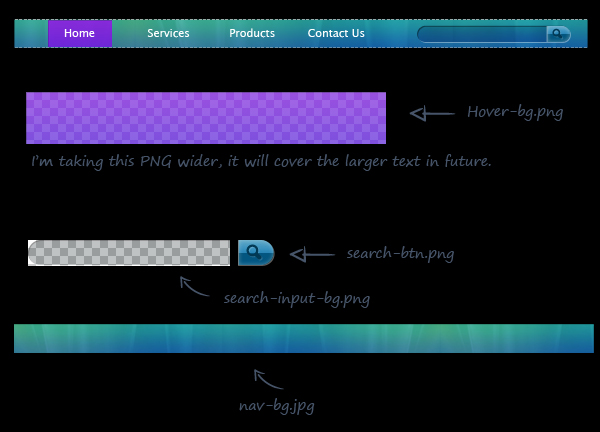
We have a free PSD for this tutorial and we’re using that in our tutorial, scroll down to download the PSD. Following is the snapshot how we will slice out.
The HTML Structure
As you can see in the PSD, there are Menu items and one Search Bar on right side. The HTML for all those elements goes here.
|
1
2
3
4
5
6
7
8
9
10
11
12
13
14
15
16
17
18
19
20
21
22
23
24
25
26
27
28
29
30
31
32
33
34
35
36
37
38
39
40
41
42
43
44
45
46
47
48
49
50
51
52
53
54
55
56
|
<div class="main-navigation"> <ul> <li><a href="#">Home</a> <ul> <li><a href="#">Sub Menu Item 1</a></li> <li><a href="#">Sub Menu Item 2</a></li> <li><a href="#">Sub Menu Item 3</a></li> <li><a href="#">Sub Menu Item 4</a></li> <li><a href="#">Sub Menu Item 5</a></li> </ul> </li> <li><a href="#">Services</a> <ul> <li><a href="#">Sub Menu Item 1</a></li> <li><a href="#">Sub Menu Item 2</a></li> <li><a href="#">Sub Menu Item 3</a></li> <li><a href="#">Sub Menu Item 4</a></li> <li><a href="#">Sub Menu Item 5</a></li> </ul> </li> <li><a href="#">Portfolio</a> <ul> <li><a href="#">Sub Menu Item 1</a></li> <li><a href="#">Sub Menu Item 2</a></li> <li><a href="#">Sub Menu Item 3</a></li> <li><a href="#">Sub Menu Item 4</a></li> <li><a href="#">Sub Menu Item 5</a></li> </ul> </li> <li><a href="#">Contact</a> <ul> <li><a href="#">Sub Menu Item 1</a></li> <li><a href="#">Sub Menu Item 2</a></li> <li><a href="#">Sub Menu Item 3</a></li> <li><a href="#">Sub Menu Item 4</a></li> <li><a href="#">Sub Menu Item 5</a></li> </ul> </li> </ul> <div class="search"> <input type="text" name="search" class="search-input" /> <input type="submit" name="search" value="" class="search-btn" /> </div></div> |
Keep in mind I’ve added sub menus within the list item.
The CSS
Below is the CSS which used to format the menu. Apply the styles and see results in browser.
|
1
2
3
4
5
6
7
8
9
10
11
12
13
14
15
16
17
18
19
20
21
22
23
24
25
26
27
28
29
30
31
32
33
34
35
36
37
38
39
40
41
42
43
44
45
46
47
48
49
50
51
52
53
54
55
56
57
58
59
60
61
62
63
64
65
66
67
68
69
70
71
72
73
74
75
76
77
78
79
80
81
82
83
84
85
86
87
88
89
90
91
92
93
94
95
96
97
98
99
100
101
102
103
104
105
106
107
108
109
110
|
.main-navigation{ width:890px; height:44px; border:1px dashed #a2d2cf; background:url(../images/nav-bg.jpg) left repeat-x; top:50%; left:50%; margin:-22px 0 0 -445px; position:absolute; }ul{ margin:0px; padding:0px; list-style:none; }li{ float:left; font-size:15px; color:#FFFFFF; height:42px; display:block; position:relative; }li .hover{ color:#FFFFFF; text-decoration:none; position:absolute; background:url(../images/hover-bg.png) top left no-repeat; top:0; left:0; z-index:0; height:44px; display:none; }li a{ display:block; color:#FFFFFF; text-decoration:none; padding:14px 43px 13px 44px; z-index:1000; position:relative; }.search{ float:right; margin:9px 26px 0 0; padding:0px; }.search-input{ font-family:LucidaGrande, Lucida Sans, Arial; font-size:12px; color:#FFFFFF; width:117px; height:26px; padding:0 5px 0 10px; padding:5px 5px 0 10px \9;/* IE 7 and 8 */ border:0; outline:none; background:url(../images/search-input-bg.png) top left no-repeat; float:left; }.search-btn{ width:37px; height:26px; border:0; outline:none; background:url(../images/search-btn.png) top left no-repeat; float:left; }ul li ul{ width:200px; position:absolute; display:none; top:44px; padding:1px 0 0 0; }ul li:hover ul{ display:block; }ul li ul li{ display:block; padding:10px 10px 10px 0; width:200px; padding:0px; margin:0px; background:url(../images/nav-bg.jpg) left repeat-x; position:relative; }ul li ul li a{ display:block; color:#FFFFFF; text-decoration:none; padding:14px 43px 13px 28px; z-index:1000; position:relative; } |
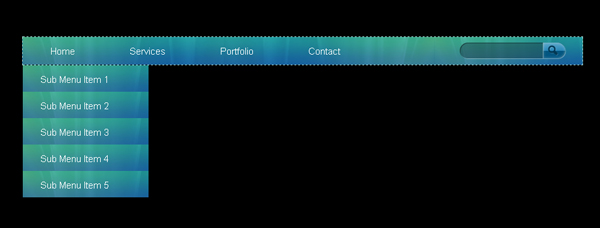
Now you can view a decent looking menu with search box. You can check it’s functionality, it’s simple. Now we go ahead and work with jQuery to apply some effects to look it more decent. Here is the CSS menu snapshot.
The jQuery
Now, the actual part of tutorial begins here. I will teach you step by step here. Go to the head section of your page and paste the following code.
|
1
2
3
4
5
6
7
|
<script type="text/javascript" src=" https://ajax.googleapis.com/ajax/libs/jquery/1.6.1/jquery.js"></script><script type="text/javascript">$(document).ready(function() {});</script> |
Your ads will be inserted here by
AdSense Now!.
Please go to the plugin admin page to paste your ad code.
I’ve included jQuery library from google libraries. After that, a normal script is started and in the //
After this, we will go for another function. That will do the same as we use some mouseover and mouseout functions. Let’s see the code.
|
1
2
3
4
5
|
$("li").hover(function() { //This function will call the HOVER event on any li.} , function() { //This function will call the HOVER OUT event on the li which was hovered.}); |
A basic function is ready and we will add all the transitions for menu here.
|
1
2
3
4
|
var itemwidth = $(this).width(); /* Getting the LI width */$(this).prepend("<div class='hover'></div>"); /* Inserting a blank div into within li above the <a> tag*/$(this).find("div").fadeIn('10000').css({ 'width' : itemwidth}); /* Using the itemwidth for the div to display properly*/$(this).find("ul").fadeIn('1000').slideDown('10000').css("display", "block"); |
After putting the above code into HOVER function, our code will look like this.
|
1
2
3
4
5
6
7
8
9
10
11
12
13
14
15
16
17
18
|
<script type="text/javascript" src=" https://ajax.googleapis.com/ajax/libs/jquery/1.6.1/jquery.js"></script><script type="text/javascript">$(document).ready(function() {$("li").hover(function() {var itemwidth = $(this).width(); /* Getting the LI width */$(this).prepend("<div class='hover'></div>"); /* Inserting a blank div into within li above the <a> tag*/$(this).find("div").fadeIn('10000').css({ 'width' : itemwidth}); /* Using the itemwidth for the div to display properly*/$(this).find("ul").fadeIn('1000').slideDown('10000').css("display", "block");} , function() { //This function will call the HOVER OUT event on the li which was hovered.});});</script> |
Now, we will work down the HOVER OUT event. Remove the HOVER OUT comments and put the following code in it.
|
1
2
3
|
$(this).find("div").slideUp('1000').fadeOut('1000');/* sliding up and fading out the hover div */$(this).find("div").remove();/* removing the <div> code from html at every mouseout event*/$(this).find("ul").fadeOut('1000'); /* fading out the sub menu */ |
Well. If you test the menu, it’s really amazing drop down and hover effects. The menu part has been done. We will go ahead and work on the animation of search box.
We will create two functions here. Focus and Focus out. Both are as follows:
|
1
2
3
4
5
6
7
|
$(".search-input").focus(function(){$(this).animate({width:'180px'}, 500); /* on focus, increasing the input width of search to left side*/ });$(".search-input").focusout(function(){ $(this).animate({width:'117px'}, 500); /* on focus, decreasing the input width of search to left side*/ }); |
Your jQuery menu including sub menu and search box are ready to use.
Conclusion
There are thousands of jQuery plugins available to use but the purpose of this tutorial is to give you a detailed practice how the jQuery work and how it creates animation in no time. I hope you will like the menu and give us feedback.
Download PSD FILE
ENjoy
Your ads will be inserted here by
AdSense Now!.
Please go to the plugin admin page to paste your ad code.