Your ads will be inserted here by
AdSense Now!.
Please go to the plugin admin page to paste your ad code.
Good evening everybody, in today’s tutorial il be showing you how to create an “Apple Ipad” from scratch using only photoshop. Lets get going.
The Finished Ipad
This is what the finished result will or should look like once finished.

Lets Get Started – Ipad Frame
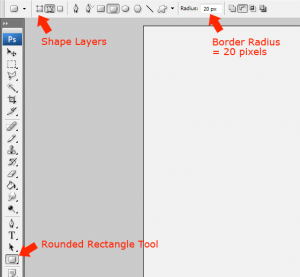
Create a new document with a canvas size of “850 pixels X 850 pixels”, Fill your background with any color. Once you’ve created your canvas select the “Rounded Rectangle Tool” with a radius of “20 pixels”.
Drag out a rectangle for your ipad, you can make the rectangle as big as you want too. I’ve chosen to use roughly my whole canvas.
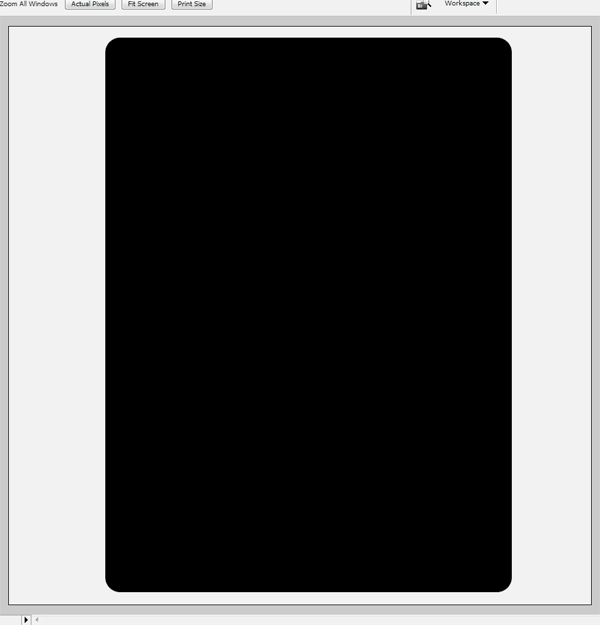
Once you’ve created your rectangle add the following layer styles.

Creating The Inner Rectangle
Still with the rounded rectangle tool only this use a radius of “15 pixels”, create another rectangle inside your first rectangle leaving about 10 pixels all the way around so your first rectangle is still visible.

Once you’ve created your inner rectangle add the following layer styles.
You should now have something like this.

Creating The Ipad Button
Select the elliptical marquee tool or the circle tool, then create the ipad button near the bottom of the inner rectangle.
Fill the circle with any color then add a gradient overlay using the following settings.

Select the rounded rectangle tool once again but change the radius to 1 pixel then switch the type to “paths”.

Drag out a small rectangle inside the button, it might be best if you zoom in. Once you’ve dragged out the path set your foreground color to #4a5e67 then right click inside the rectangle and go to “stroke path”.
Once you’ve clicked stroke path right click again and go to delete path. You should be left with something like this.
Creating The Screen
Using the rectangle tool or the rectangular marquee tool create a big rectangle inside your last inner rectangle. This will be our screen.

Your ads will be inserted here by
AdSense Now!.
Please go to the plugin admin page to paste your ad code.
For this next part you’ll need a wallpaper of some sort or you can create your own background. I’m using an apple mac background from HERE.
Once you’ve got your wallpaper copy it too the clipboard, load a selection around the black rectangle then go to “edit > paste into”. To load a selection around the black rectangle select the layer then go to “select > load selection”.
Now that you’ve pasted the wallpaper into the selection you can resize and fix the wallpaper so that it fills screen.

Once your finished with your screen press “CTRL + A” then go to “image > crop”, right click the mask in the wallpaper layer and go to “apply mask”. Doing these steps are important as it gets rid of any unnecessary parts of the wallpaper.
Double click your wallpaper layer then add the following layer styles.


Creating The Dock
Before we jump straight in adding our icons lets first create our little icon dock. Select the rectangle tool and create a rectangle just smaller than the width of the ipad screen.

Fill the rectangle with the color #60717e then add a drop shadow using the settings below.

Using the pen tool create a whirly path, then fill the path with the color white. (#ffffff)

Set the whirly paths opacity to 15% then set the blend mode to soft light. Highlight both layers in the layers pallet (dock and whirly path) then go to “edit > transform perspective”.
Adjust the perspective to simulate the look of a dock, you may need to fine tune the rectangle with the distort tool. You should have something like this.

Adding The Ipad Icons
Before we add our icons i suggest you download this iphone icon pack by “Marcelomarfil“.
Using your selected icons, add 4 icons from the icon pack to the little dock that we created in the previous step. Add small labels to each icon using the color white and a very small font. Finish the dock by reflecting the 4 icons.

Add the rest of your desired icons towards the top of the ipad, label each icon with a slightly bigger font.

Finally to finish off the screen create a small black rectangle across the top of the screen.

Set the black rectangles opacity to 25%, then add the time and anything else you’d like in the status bar.

That’s it all done, if you wanted to take it further try adding some small buttons or maybe try changing the perspective.
The Finished Ipad
Thanks for reading the tutorial, if you liked it maybe you would consider submitting it to Digg or Re-Tweeting.
See You All Soon.
Your ads will be inserted here by
AdSense Now!.
Please go to the plugin admin page to paste your ad code.