

October 2nd, 2007 in Photoshop Tutorials by Richard Carpenter
Credit Card Tutorial

 4 Votes, Rating: 4.00
Create a new document “500×300″ with a gradient background.

Select the “rounded rectangular tool”

Draw out your card shape onto a new layer, then select the pen tool, “right-click” on your rectangle and click “make selection”. Then select your card colors ive choosen #d50000 and #000000, fill your card with the gradient. Then add the following layer styles.


Should then have something like this.

Select the type tool and the font “garamond” and type your bank name and the word credit card in the top left corner. (ive also add the banks logo just by drawing out a few triangles).

Now lets create the credit cards pattern and text watermark, goto a stock images site or google images and grab your self a map of the world. (try and find a black and white map or a greyish colored map, something that aint to complicated). Copy & paste it into your document, then move the layer just above your card layer, resize your map if you have to make it smaller.

Set your maps blending mode to “color burn”. Your image should then look like this.

Now select the type tool and type out your banks name on a few lines. Then click on this icon at the top of your screen.

Once the box opens click in the drop down menu box and select “wave”.

Your text should then be transformed like this.

Set the opacity to about 40%.
Now select your “elliptical marquee tool” and draw out 2 cirles the same size, color one red and the other orange, then the circles together so they overlap slightly.

Add the following layer style to the cirlces.

Now select the type tool again with the font “arial” change to bold/italic and type out the word “mastercard” and stick it over the top of the cirlces.

Select the type too again and type your account number, valid dates and name onto your card.

Now add these layer styles to the account number, valid dates and name.


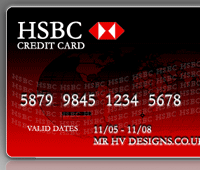
Thats it all done. Heres the final image.


Be Part Of The Community!
Become part of the hv-designs community.
Subscribe Via RSS or Follow Us On Twitter.


6 Responses to “Credit Card Tutorial”