


September 26th, 2007 in Photoshop Tutorials by Richard Carpenter
Header Tutorial

 9 Votes, Rating: 4.44
Create a new document with a width of 800 pixels X 125 pixels.

Select two colors that you want to use as your header im going to use to shades of red in this example.

Select the gradient tool ![]() and fill you document by clicking at the bottom of the picture and draggin your mouse up towards the top. you should have somthing like this.
and fill you document by clicking at the bottom of the picture and draggin your mouse up towards the top. you should have somthing like this.

Now select the rectangular marquee tool ![]() and draw a rectangle round the top of your header.
and draw a rectangle round the top of your header.

Now were going to fill the rectangle with your darkiest color that you chose for the header gradient. BUT before we fill lets create a new layer in the layers panel, once you’ve created your new layer rename it as “red bar” or what ever you want to call it then fill your rectangle with the paint bucket tool. once filled press CTRL + D to unselect the rectangle.

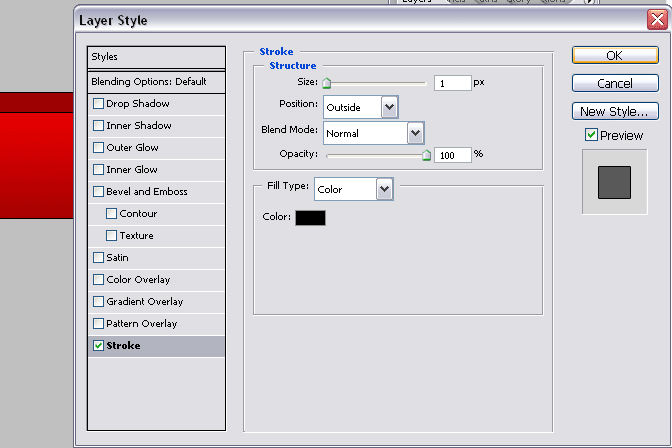
Now that you’ve filled the rectangle lets add some layer stlyes to it so double click the “red bar” layer and add a black 1 pixel stroke like this.
Now lets add some text, select the text tool and write your website name a the top like this. ive chosen the color white for my text as i think it works well on a red background.

ive used the font “Tahoma” size 10 and in bold
Now the opposite side add the some more text this write “home”

Now lest add some more text as the main title, im going to use a different font thats abit more funky, like this

font i used in this example is “SF Grunge Sans SC”
Now the main title header is in place lets add some styles.
on mine ive added
dark red 3 pixel stroke
gradient overlay using 2 selections of grey
drop shadow
nows the time for you to be creative and create a style of your own.

Now im going to add a slight reflection to my title to do this we “duplicate” our text layer and rasterize it.
to duplicate it right-click on your title layer and click duplicate layer (press okay on the follow up dialog) then right click the duplicated layer and click rasterize type.
now that its duplicated and rasterized goto “edit > transform > flip vertical”
then move the duplicated layer underneath the original layer (just click & drag)
then move the text underneath the original text like this.

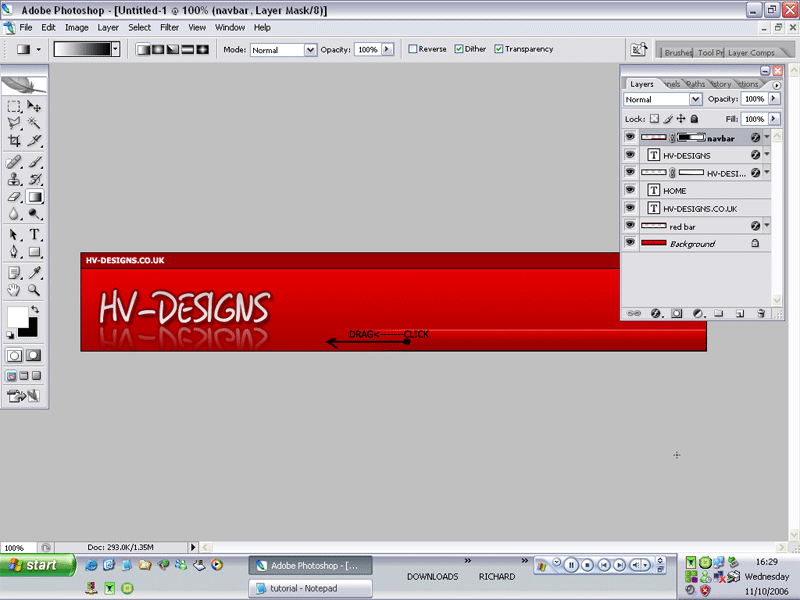
with the duplicated layer selected click “add layer mask” like this

now goto the gradient tool make sure white is selected (should be selected by default)
and click just at the top of text and drag down to the bottom of the document see black line on the image below.

now adjust the opacity to about 45%

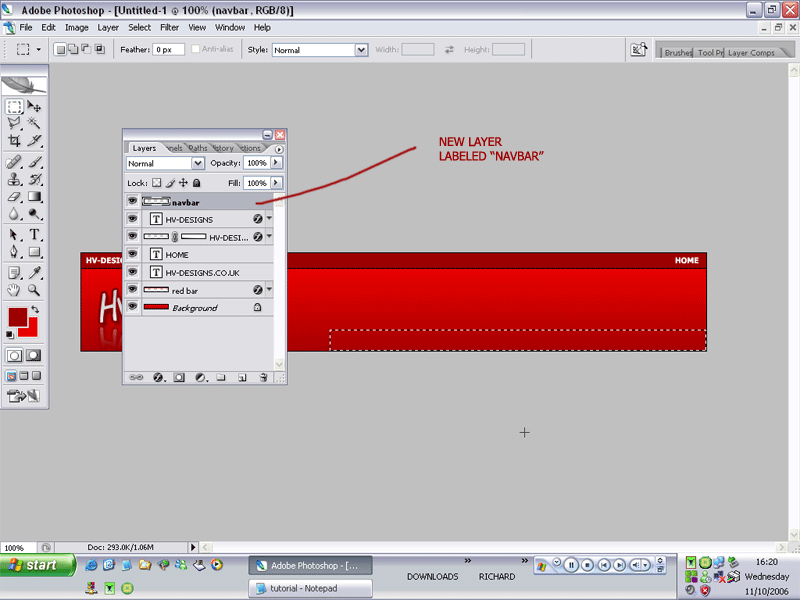
now lets add a simple navigation bar to our header, if you want to leave your header how it is dont continue with the tutorial.
create a new layer and label it “navbar”
with the “navbar” layer selected select the rectangular marquee tool and draw a small rectangle at the bottom right corner like this
fill the rectangle with a gradient and add a “bevel & emboss” layer style with these settings.

then create a layer mask and select the gradient tool. Then click a quarter of the way down the navbar and drag towards the title text (see image below)
now thats done add some text like this

create a new layer called “lines” or somthing simlar
then zoom in by 600% and draw 2 1 pixel lines (using the rectangle marquee tool) next to each other and fill them with 2 colors the same as your site one light and one dark, like this

once you’ve done the one just duplicate the layer till you’ve put em across the nav bar then merge the line layers with CTRL + E and adjust the opacity by 50%
you should then have something like this.


Be Part Of The Community!
Become part of the hv-designs community.
Subscribe Via RSS or Follow Us On Twitter.


10 Responses to “Header Tutorial”