

January 15th, 2012 in Photoshop Tutorials by Aaron
No Effects Poster Pt. 1 – The Beer
 2 Votes, Rating: 5.00
Today we will be working with the most basic tools in Photoshop and creating a very simple illustration, to practice using only the most basic effects. There will be three phases to this tutorial in order to get our final product. Today we will start out by designing a simple glass illustration, using only shapes and the paint bucket tool. Let’s get started…
As always let me show your our final product. Below is the full version of what we will be creating over the next week. Today we will be working on creating the beer glass.

To get started create a new document that is 600px by 600px and fill it with #89c3db
Setting Up Our Outline
Alright let’s get started by drawing out the outline to our glass. Go ahead and change your foreground color to #a1a1a1 and grab your Ellipse Tool. Drag out a circle that is 355px wide by 90px tall. You are going to want to center it horizantally and space it 60px from the top of our document.

Now, this will be the only time we open up the layer styles and that is just to reduce the fill and make it a solid outline circle. If you have your shape styles set up you can just choose a stroke only ellipse to draw, but in case you don’t apply the following:


Awesome! Now you are going to want to duplicate your layer and bring it down 310 pixels. You can do this by selecting your move tool and holding down the ALT key, moving down and duplicating your layer all at the same time.
Now let’s enter into free transform mode, CTRL+T, and shrink our circle to 75%.

Ok, now go ahead and rasterize your layer for your small circle because we aren’t going to need the full circle for our design. Once you have the circle rasterized grab your rectangle marquee tool and draw out a 240px rectangle, drag it down just a little over the top line of your circle, and hit the delete key.

Now, grab your line tool and draw out a 4px line that is 395 pixels tall. Enter into free transform mode again and now we are going to rotate our object to give us one side of our glass. Hold down your SHIFT key and rotate it -7 degrees and line it up with our glass.

Now simply duplicate your layer, enter into free transform and flip horizantal, and line it up on the other side of your glass. Now we have the outline for our glass and it’s time to move onto the next step, the actual creation of the glass.

Creating the Glass
Alright, now comes the glass creation. The first thing you want to do is make a selection that just barely goes beyond our glass and change your foreground color to #c7c7c7. My selection is 367px(w) by 480px(h). Create a new layer above your outline layers and fill it with our foreground color.

Awesome, now unselect your image and move your layer down below your outline. To make things easier you might want to Group together your outlines, that way you only have to bring it below the group instead of the other layers. Now for the very tedious part. Hold down the CTRL key and the SHIFT key and begin selecting each of your layers to have a full selection of your outline.

Now, right click and hit select inverse. Grab your eraser tool and begin erasing away the extra from our grey layer. You will want to really zoom in on the document so you don’t erase any of what we need. This will definitely take some time. Make sure you are letting go of the eraser tool every once in a while just in case you have to go back you aren’t going back too far.
When you have finished lower the opacity of our layer to 50% and you have the makings of the glass.

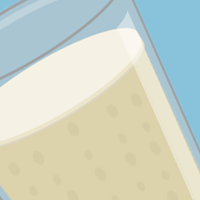
Create the Beer
Now it’s time to really get going on this baby. Change your foreground color to #eed7a0. Grab your rectangle marquee tool again and create a selection that is 355 by 330 and space it 35px from the top glass spacer and fill it with our foreground on a new layer.

Now, select the thumbnail of our glass layer (holding down ctrl and clicking the thumbnail) so you have a selection of your layer. Now we need to shrink our layer. Go to Select–Modify–Contract and choose 15px so you have a selection. Now select inverse and hit delete. It should look like below-

Awesome, now change your foreground color to #dcd6c0 and grab your ellipse tool again. Drag out a circle that is 305px by 85 px at the top of our glass. Depending on how high you want your foam you can line it up directly at the top, but we kept it down a little bit and showing some of the corners from the beer.

Looks funny right? Well now we are going to be creating the next layer of foam. Duplicate your circle and nudge it up 3px. Change the color to #ece5cb. Now, duplicate your circle one more time and nudge it up 7px. Change the color to #f5f1e4. If you want more foam you just add more spacing and a few more of our last layers. We are sticking with small foam though.

That there could be your beer, if you wanted to go for the most basics, but we are going to add just a few more things to make it look more realistic. We want to add some bubbles to our beer so we are going to grab our ellipse tool, change the foreground to #d5cca7, and draw out some random bubbles, rotate them, to whatever your hearts desire.

Now we want to give a few subtle glass highlights. To do this we are going to create a new layer, change our foreground to standard white, and lower our layers opacity to 45%. Make a selection of our glass layer and fill it with white. Contract the layer by 15, using our earlier method, and then delete the inverse selection. Shrink it down a little bit to get the right reflection for whatever you are doing.
Do the same with the top of the cup, using only our top circle for selection, instead of the full glass. This time when you do your selection you will also want to move your selection down 15px so all you are left with is a line type shape. Lower the opacity to 25% and your are finished!

Conclusion
We now have a super amazing glass of beer without effects. The next stage will be creating our fry basket, continuing with no effects. If you want to take your glass to the next level start playing around with colors on your outline, giving your glass layer more shadows and highlights, different style bubbles, and play with the foam to give it more feeling. Starting out with no effects can really get you the feel that you are looking for and then you can start adding in the additional details to get something really fantastic. Watch our Dribbble feed for what you can turn this glass into.

Be Part Of The Community!
Become part of the hv-designs community.
Subscribe Via RSS or Follow Us On Twitter.


3 Responses to “No Effects Poster Pt. 1 – The Beer”