Your ads will be inserted here by
AdSense Now!.
Please go to the plugin admin page to paste your ad code.
Today I will be walking you through the process of creating a Coming Soon Page for your Freelance website. We will be using a lot of basic techniques and simple layer styles to create an excellent look.
Resources
Setting Up Our Document
Start by creating a new document 1366*768 with whatever color background that you choose as we will change it next.The background color for your document is going to be #2f1901 and use the paint bucket tool to fill in your document. Next we will be adding a bit of texture to the background. Go to Filter—>Add Noise and use the below value:

The Header
Now we will be creating our header image. We will be using the font Tercio font 87pt, with all caps on. We used the text “freelance is my life [enter / break] is coming soon” and we also added the following layer styles:

The Timeline
Now to set up our timeline. We will be using a rounded rectangle, color black, at a radius 45px. Draw it out 1165*90. Now set the opacity so you have the below image:

Now to set up the base for our four color squares. Set up a new layer: Use CTRL+Click thumbnail. Now to shrink it to fit hit Select, modify, contract 1opx. Fill with White. Should be 1145*70. This layer is merely to set up some guides and will be deleted later, but it should still be the correct size. So far you should have:


Create four squares by using the below properties, by setting up a fixed size rectangle marquee 286*100, and apply the below colors:

Now use the CTRL+Click thumbnail to select your smaller white rectangle layers outline. Like Below:

Right click and choose select inverse, and now hit the delete key on each layer. You should have this:

You should now create a Group and label it FourSquaresColored to keep organized. Bring the four squares into the group and add the below styles:
RED

ORANGE
Your ads will be inserted here by
AdSense Now!.
Please go to the plugin admin page to paste your ad code.

BLUE

GREEN

Now hide all but the first three layers and delete the layer that held the white rectangle from earlier. You should have something like this:

The Content
Now we will be creating our content letting them know to look at our Digital CV and our Social Network area. First start off by downloading the Digital Cup from above. Choose the 128×128 version and bring it down to the bottome left corner of our document.. Space it 45px from the left and 90px from the bottom of the screen. You should have something like this:

And now set up two guides at the bottom of your cup and the top of the rectangle like below:

Now use the font Qlassik Medium at 18pt size, color white, to fill out your content within the guides we set up earlier. Make the fonts different colors. I chose to use colors associated with whatever link I was linking to. Like below:

The Sign Up Form
Now to set up our sign up form. We will only be asking for email for our coming soon signup. Garb your rounded rectangle tool again , choose your color as white and set it as a 15px radius. Now set your layer to overlay. You should have this so far:

Create a new layer and using the rectangular marquee tool make a new selection 170*113, set it up at the end of the rectangle like below:
Now use CTRL+Click thumbnail of the rounded rectangle layer. Now right click and hit select inverse and then the delete key. You should have the button a little brighter than your search area. Now using the font Tercio, size 24pt, color black. Add it into your submit button layer we created earlier and center it vertically and horizantally. Here is what we have so far:

Bring Our Document To The Next Level
Now that would be a completed coming soon page for most but its time to take it up to the next level. Add a description to our timeline so that people know where you are at in your design and even a countdown. This is what we added.
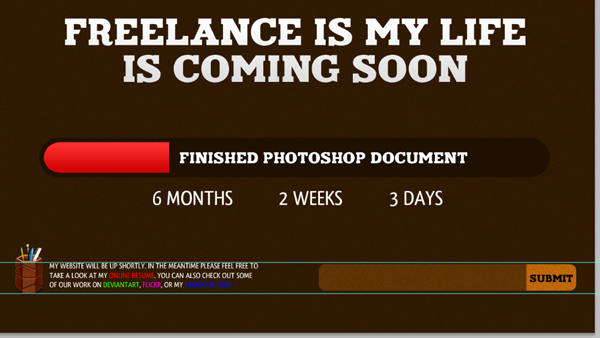
That is our completed Coming Soon Tutorial. Please be on the lookout for the next tutorial where we code our document.
Your ads will be inserted here by
AdSense Now!.
Please go to the plugin admin page to paste your ad code.