Good evening all, today were going to be diving into some jquery. What we’ll be creating is a small low key website which scrolls down to each section when a navigation item is clicked.
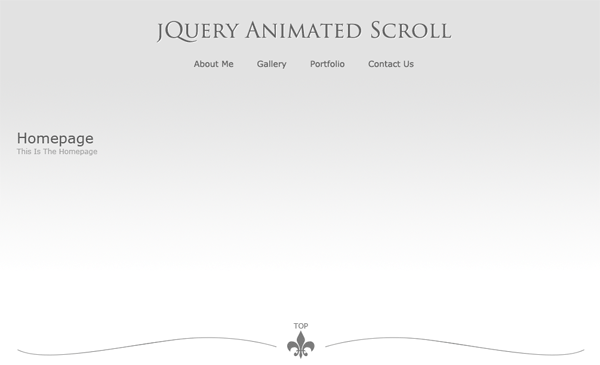
The Live Demo
Click the image to see the full working demo.

Resources Needed In This Tutorial
Lets get started…
Slicing The Images From Pre-Made PSD File
Before we start create a new folder on your desktop called template, inside the template folder create a further 3 folders. Label the 3 folders “Images”, “Js” and “Stylesheets”.
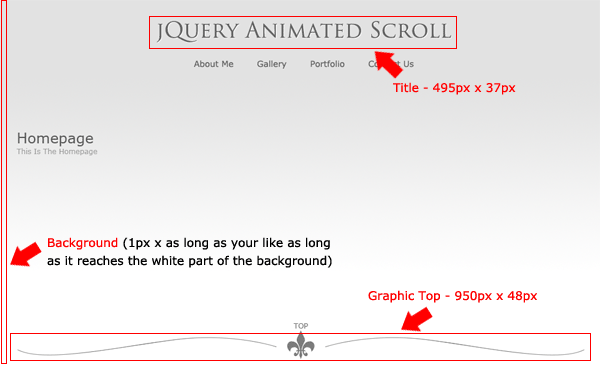
Next download the pre-made PSD file then open it up in photoshop. The PSD should look like this.
We need to slice 3 items from the PSD file which will make up our demo, the rest can be done in CSS. The items we need to slice are “The Background”, “The Title” and “The Graphic Top”.
Using the “Rectangular Marquee Tool” make a selection around each item then save them inside the images folder. Be sure to put each image on a transparent background and save the files as “bg.png”, “title.png” and “top.png”.
Creating The HTML Markup
Inside your template folder create a blank HTML file then inside your stylesheets folder create a blank CSS file. Once you’ve created the files open up both files inside your favorite code editor.
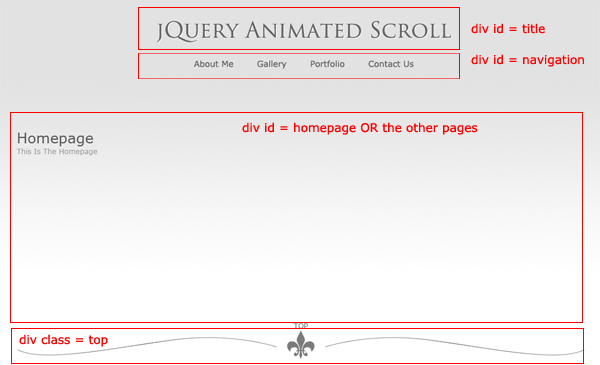
Inside your HTML file start the mark-up, which looks like this.
<div id="top"> <div id="title"> </div><!--title ends--> <div id="navigation"> </div><!--navigations ends--> <div id="homepage"> </div><!--homepage ends--> <div id="about"> </div><!--about ends--> <div class="top"> </div><!--top ends--> <div id="gallery"> </div><!--gallery ends--> <div class="top"> </div><!--top ends--> <div id="portfolio""> </div><!--portfolio ends--> <div class="top"> </div><!--top ends--> <div id="contact""> </div><!--contact ends--> <div class="top"> </div><!--top ends--> </div><!--container ends-->
Lets look at the mark-up abit more closer.
- DIV Top – The div top is our container div, this div will be the div which holds all the elements to our layout. You’ll be pleased to know that there is also a reason why its labeled as “top”.When we click “Back To Top” which will be a link underneath each section the animation will scroll to the top of this div called “top”.
- DIV Title – The div title will simply be a div which will house our title image.
- DIV Navigation – This div will be the div in which our navigation will sit.
- DIV’s Homepage, About, Gallery, Portfolio and Contact – These div’s are the sections in which the animation will scroll down to when the desired item is click in the navigation.
- Class Top – The classes top in between each section will house our fancy separators and contain our “Back To Top” link.
Adding Our Elements
Inside the “Title” div insert your title.png image.
<div id="title"> <img src="images/title.png" alt="jQuery Animated Scroll" /> </div><!--title ends-->
Inside the “Navigation” div create a simple unordered list for your navigation items. Each link should contain the class “Scroll”, this class is needed for the scroll animation to work. Also take note of the hyperlinks in each navigation item, the hyperlinks are actually the names of the DIV’s in which are used in the HTML code.
<div id="navigation"> <ul> <li><a href="#about" class="scroll">About Me</a></li> <li><a href="#gallery" class="scroll">Gallery</a></li> <li><a href="#portfolio" class="scroll">Portfolio</a></li> <li><a href="#contact" class="scroll">Contact Me</a></li> </ul> </div><!--navigations ends-->
Inside each of the sections “Homepage, About, Gallery, Portfolio and Contact” insert a H1 tag which will contain the section title. Also inside the H1 tag add a description of that section wrapped in a span class.
<div id="homepage"> <h1>Homepage <br /> <span class="description">This is the Homepage</span></h1> </div><!--homepage ends--> <div id="about"> <h1>About <br /> <span class="description">This is the About Page</span></h1> </div><!--about ends--> <div class="top"> </div><!--top ends--> <div id="gallery"> <h1>Gallery <br /> <span class="description">This is the Gallery Page</span></h1> </div><!--gallery ends--> <div class="top"> </div><!--top ends--> <div id="portfolio"> <h1>Portfolio <br /> <span class="description">This is the Portfolio Page</span></h1> </div><!--portfolio ends--> <div class="top"> </div><!--top ends--> <div id="contact"> <h1>Contact <br /> <span class="description">This is the Contact Me Page</span></h1> </div><!--contact ends--> <div class="top"> </div><!--top ends-->
Finally inside the classes “Top” add a simple P tag containing the words “Back To Top”, add a link to the words which should link to our top div. Don’t forget to add the class “Scroll” to the link, without this jquery wont work.
<div id="homepage"> <h1>Homepage <br /> <span class="description">This is the Homepage</span></h1> </div><!--homepage ends--> <div id="about"> <h1>About <br /> <span class="description">This is the About Page</span></h1> </div><!--about ends--> <div class="top"> <p><a href="#top" class="scroll">Back To Top</a></p> </div><!--top ends--> <div id="gallery"> <h1>Gallery <br /> <span class="description">This is the Gallery Page</span></h1> </div><!--gallery ends--> <div class="top"> <p><a href="#top" class="scroll">Back To Top</a></p> </div><!--top ends--> <div id="portfolio"> <h1>Portfolio <br /> <span class="description">This is the Portfolio Page</span></h1> </div><!--portfolio ends--> <div class="top"> <p><a href="#top" class="scroll">Back To Top</a></p> </div><!--top ends--> <div id="contact"> <h1>Contact <br /> <span class="description">This is the Contact Me Page</span></h1> </div><!--contact ends--> <div class="top"> <p><a href="#top" class="scroll">Back To Top</a></p> </div><!--top ends-->
Adding The CSS
The CSS for all our elements look like this.
body { background-image: url(../images/bg.gif); background-repeat: repeat-x; background-color: #FFFFFF; margin: 0px; padding: 0px; font-family: Verdana, Arial, Helvetica, sans-serif; } #top { width: 950px; margin-top: 50px; margin-right: auto; margin-bottom: auto; margin-left: auto; } #title { margin: auto; width: 495px; clear: both; } #navigation { float:left; width:100%; overflow:hidden; position:relative; margin-top: 20px; margin-bottom: 20px; } #navigation ul { clear:left; float:left; list-style:none; margin:0; padding:0; position:relative; left:50%; text-align:center; } #navigation ul li { display:block; float:left; list-style:none; margin:0; padding:0; position:relative; right:50%; } #navigation ul li a { display:block; margin:0 0 0 1px; padding:3px 10px; color:#666666; text-decoration:none; line-height:1.3em; } #navigation ul li a:hover { color:#000000; } #navigation ul li a.active, #navigation ul li a.active:hover { color:#000000; font-weight:bold; } #homepage { float: left; width: 950px; height: 800px; } #about, #gallery, #portfolio, #contact { float: left; width: 950px; height: 600px; } h1 { color: #5a5a5a; font-size: 24px; font-weight: normal; margin: 0px; padding: 0px; } span.description { color: #9f9f9f; font-size: 12px; } .top { background-image: url(../images/top.png); background-repeat: no-repeat; float: left; height: 48px; width: 950px; padding-bottom: 35px; background-position: bottom; margin-bottom: 20px; } .top p { text-align: center; color: #999999; font-size: 10px; } a:link { color: #666666; } a:visited { color: #666666; } a:hover { color: #000000; } a:active { color: #666666; }
Adding The jQuery
Download the latest jQuery library from the jQuery website, place the library file inside your “JS” folder.
Next, open up notepad then go to “File > Save As” save the blank notepad file as “Scroll.js” inside your “JS” folder.
Open up your “Scroll.JS” file inside your code editor then paste the following snippet inside and save.
$(document).ready(function(){ $(".scroll").click(function(event){ //prevent the default action for the click event event.preventDefault(); //get the full url - like mysitecom/index.htm#home var full_url = this.href; //split the url by # and get the anchor target name - home in mysitecom/index.htm#home var parts = full_url.split("#"); var trgt = parts[1]; //get the top offset of the target anchor var target_offset = $("#"+trgt).offset(); var target_top = target_offset.top; //goto that anchor by setting the body scroll top to anchor top $('html, body').animate({scrollTop:target_top}, 500); }); });
Test your HTML file inside your browser and see how it works.
That’s it all done hope you enjoyed this tutorial.