Your ads will be inserted here by
AdSense Now!.
Please go to the plugin admin page to paste your ad code.
Mobile app’s are on the never ending increase and now so are mobile app websites. In today’s tutorial I’ll be showing you how create a dark theme mobile app web layout.
What Were Creating
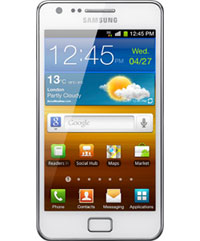
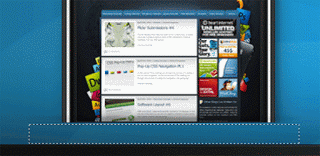
This is what we’ll be creating in this tutorial, click the image for a bigger version of the layout.

Resources Used In This Tutorial
Lets Get Started!
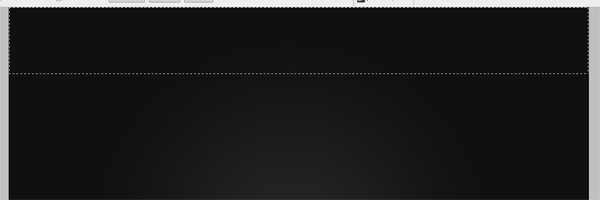
Create a new document 1200 x 950 pixels, set your foreground color to #252625 and background color to #101010. Select the gradient tool from the toolbar then from the top menu bar select a radial gradient.

Once you’ve selected the radial gradient start dragging from the center of your canvas outwards until your left with something like this.

Creating The Header/Navigation
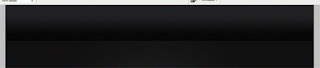
Select the rectangular marquee tool then create a rectangular selection about 140 pixels in height, which spans the width of the canvas.
Fill the selection with a linear gradient using the colors #202123 and #070707.
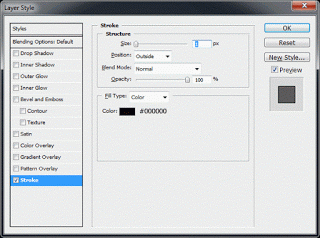
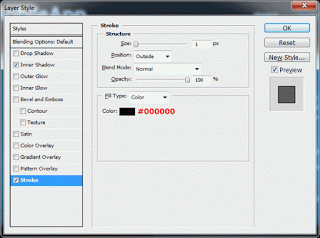
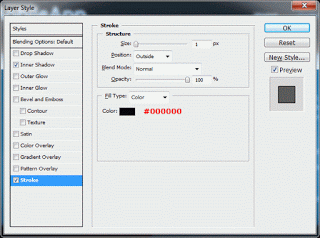
Now add a stroke to your rectangle using the settings below.
Inside the rectangle add your website title to the left with your slogan. On the right side of the rectangle add a simple textual navigation.

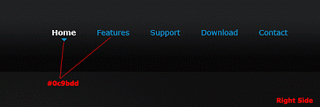
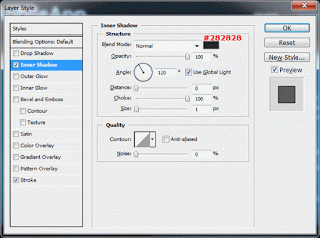
Select your website title layer then add the following layer styles.


You should have something like this.

Creating The Featured Area
Using the rectangular marquee tool drag out a selection about 340 pixels in height and the same width as your canvas. The selection should be directly underneath your header/navigation.

Fill the selection with any color on a new layer underneath your header/navigation. Once you’ve filled the selection add the following layer styles.

Again using the rectangular marquee tool, create two horizontal 1 pixel lines on top of each other. Color the top line in black #000000 and the bottom line in white #FFFFFF, finally set the blend mode to overlay.

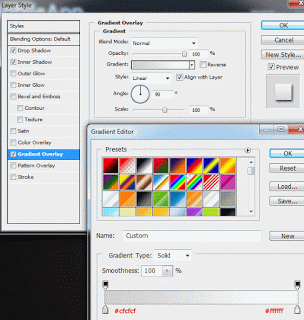
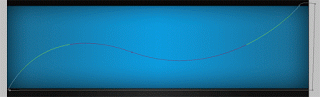
Were now going to create the featured area background pattern using the pen tool. Select the pen tool then create a wavy path like the image below.
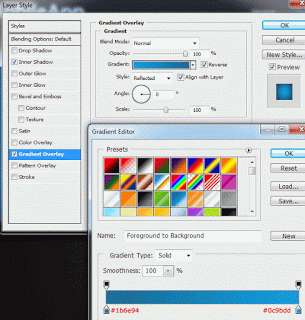
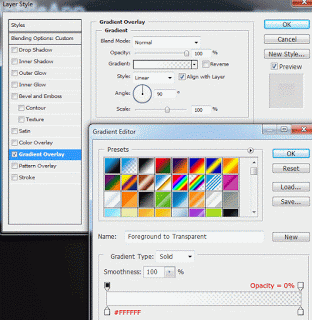
Fill the path with the color white then add a gradient overlay using the settings below.
Once you’ve applied the gradient overlay we need to remove any excess of the shape from outside of the featured area. Start off by loading a selection around your featured rectangle but keep the wavy shape layer highlighted.
Now go to “Select > Inverse” and hit the delete key. Your pattern should now be inside the featured rectangle only and the excess removed, you should have something like this.

Duplicate your wavy shape then “Free Transform” (Ctrl + T) the shape. Once free transformed rotate anti-clockwise.

Remove the excess of the wavy shape by repeating the process explained above. Repeat the the whole process once more so you have a total of 3 wavy patterns, you should have something like this.

Adding The Featured Area Content
For this part your going to need an iphone or some type of mobile phone, I’m using an iphone from “DeviantArt“.
Your ads will be inserted here by
AdSense Now!.
Please go to the plugin admin page to paste your ad code.
Drag your desired image onto your canvas then chop off the bottom of the phone using your desired cutting tool.
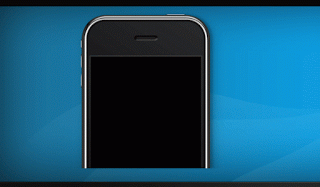
Inside the screen area of the phone add an image or create an image which best describes your app, I’ve just added an HV-Designs screen shot.

Directly underneath your mobile phone create two 1 pixel horizontal lines, fill the top line in black and bottom line in white. Set the layer blend mode to “Soft Light”, you should have something like this.
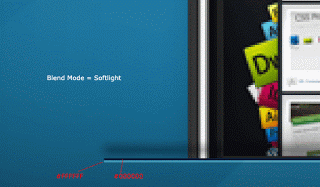
Add a layer mask to your two 1px lines then drag a reflected gradient over the top starting from the middle of the line and dragging outwards. Doing this should blend the lines in with the background either side.
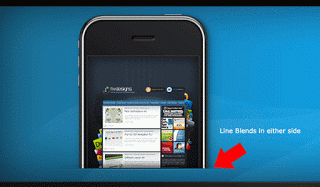
Select the rectangular marquee tool and a make a selection underneath your two 1 pixel lines.
Select the gradient tool with a radial gradient, set the gradient to “White (#ffffff) to Transparent” then drag the gradient from the top of the selection down.
Add a layer mask to the selection then drag a reflective gradient starting from the middle then dragging outwards, just like we did for out two 1 pixel lines. Finally set the blend mode to “Overlay”.
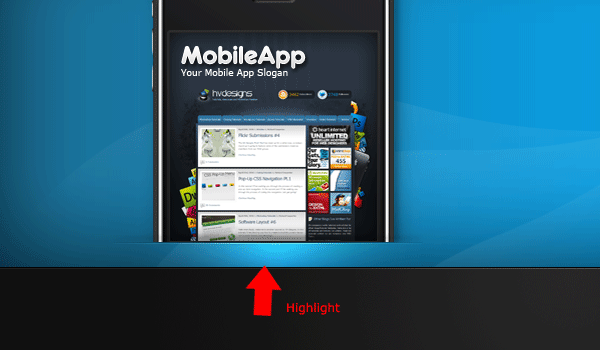
Finish your featured area off by adding your featured content. I went for a nice bold title with a small paragraph of text, underneath i went for a small list with small icons.

The Left Sidebar
Our sidebar will be relatively simple, start off by creating two 1 pixels lines next to each other. Color the first line in black (#000000) then the second line in white (#ffffff), finally set the layer blend mode to overlay.

Now select the rectangular marquee tool and create a selection starting from directly underneath the featured area, keep the selection pixel close to the divider line.

Once you’ve created the selection select the gradient tool with a linear gradient. Before applying the gradient set your foreground color to #0a0a0a and background color to #101010.
Drag the gradient from the top right hand corner of your selection, dragging the gradient diagonally towards the bottom left corner of the selection.

Using some nice icons dress up your sidebar. I’m using icons from “MediaLoot“.

Creating The Content Area
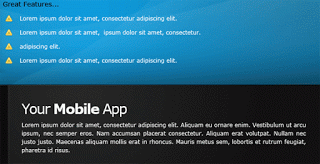
On the right next to the sidebar create your content area, i’ve added a simple but bold heading with a small paragraph of text.
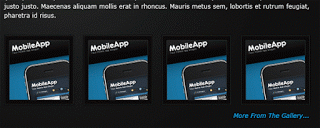
Underneath our bold heading and text i’ve added a small gallery. Select the rectangular marquee tool and create 4 squares.

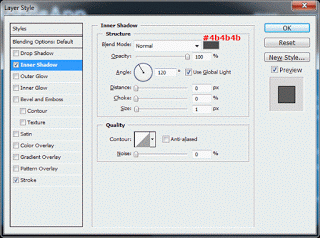
Add the following layer styles to your squares.
You should have something like this.

Were now going to add our image inside the squares but before we do lets add a 10pixel border. Make a selection around one of your squares then go to “Select > Modify > Contract”, enter 10px in the box that pops up then press ok.
Keep the selection active then paste your image into the selection by going to “Edit > Paste Into”.
Creating The Footer
Make selection around the bottom of the rest of your canvas then fill the area with the color #0a0a0a. Make sure the selection starts directly underneath the sidebar divider line.
Now add the following layer styles to your footer rectangle.
That’s it all done, hope you enjoyed this tutorials, see you all next time.
Your ads will be inserted here by
AdSense Now!.
Please go to the plugin admin page to paste your ad code.